Table of Contents
Advertisement
Quick Links
Advertisement
Table of Contents

Related Manuals for Metrohm 863


Summary of Contents for Metrohm 863
- Page 1 863 Compact Autosampler Manual 8.863.8003EN / 2019-12-02...
- Page 3 Metrohm AG CH-9100 Herisau Switzerland Phone +41 71 353 85 85 Fax +41 71 353 89 01 info@metrohm.com www.metrohm.com 863 Compact Autosampler Manual 8.863.8003EN / 2019-12-02...
- Page 4 Technical Communication Metrohm AG CH-9100 Herisau techcom@metrohm.com This documentation is protected by copyright. All rights reserved. This documentation has been prepared with great care. However, errors can never be entirely ruled out. Please send comments regarding possible errors to the address above.
-
Page 5: Table Of Contents
..................19 Remote connections ............22 3.8.1 Connecting IC instruments ............. 22 3.8.2 Connecting a 797 VA Computrace ......... 22 4 Automation sequences Sample with air gap ............24 Sample no air gap .............. 25 ■■■■■■■■ 863 Compact Autosampler... - Page 6 Loading program versions and language files ......51 6.5.2 Diagnosis functions ............... 52 7 Parameters Automation: Sample with air gap ........53 Automation: Sample no air gap ........53 Automation: Double injection ........... 54 Automation: Triple injection ..........54 ■■■■■■■■ 863 Compact Autosampler...
- Page 7 11.2 Turntable ................65 11.3 Peristaltic pump ..............65 11.4 Interfaces and connectors ..........66 11.5 Power connection ............... 66 11.6 Ambient temperature ............66 11.7 Reference conditions ............66 11.8 Dimensions ................67 12 Accessories Index ■■■■■■■■ 863 Compact Autosampler...
- Page 8 Connecting the 6.2147.000 USB keyboard with USB stick and printer ..................... 21 Figure 12 Remote connection 863 Compact Autosampler - 861 Compact IC ... 22 Figure 13 Remote connection 863 Compact Autosampler - 843 Pump Station - 797 VA Computrace ................ 23 Figure 14 Keypad 863 Compact Autosampler ..........
-
Page 9: Introduction
PC-controlled automation system. 1.1.1 Model versions The 863 Compact Autosampler is available in two model versions with dif- ferent accessories. 863 Compact IC Autosampler 2.863.0010 With ion chromatography accessories. -
Page 10: Stand-Alone Operation
1.2 About the documentation 1.1.4 Stand-alone operation The 863 Compact Autosampler can be used as a central control instru- ment in an automation system which can include various types of ion chromatography instruments or the 797 VA Computrace. In this role, the 863 Compact Autosampler acts as a reliable sample changer. -
Page 11: Safety Instructions
Electrical safety The electrical safety when working with the instrument is ensured as part of the international standard IEC 61010. WARNING Only personnel qualified by Metrohm are authorized to carry out service work on electronic components. ■■■■■■■■ 863 Compact Autosampler... -
Page 12: Tubing And Capillary Connections
Damaged tubing ends lead to leakage. Appropriate tools can be used to loosen connections. Check the connections regularly for leakage. If the instrument is used mainly in unattended operation, then weekly inspections are manda- tory. ■■■■■■■■ 863 Compact Autosampler... -
Page 13: Personnel Safety
Personnel safety WARNING Wear protective goggles and working clothes suitable for laboratory work while operating the 863 Compact Autosampler. It is also advisable to wear gloves when caustic liquids are used or in situations where glass vessels could break. WARNING Always install the safety shield supplied with the equipment before using the instrument for the first time. -
Page 14: Flammable Solvents And Chemicals
If the instrument is used for biological hazardous substances, it must be marked in accordance with regulations. In case of a return shipment to Metrohm or a Metrohm Service partner, the instrument or component has to be decontaminated and the hazard symbol for biological hazardous substances must be removed. -
Page 15: Overview Of The Instrument
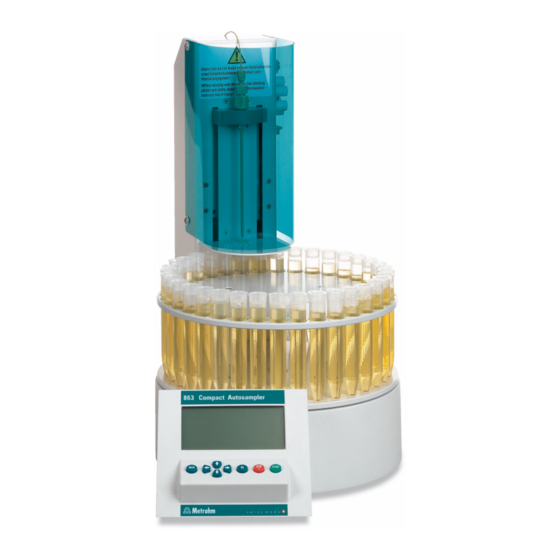
■■■■■■■■■■■■■■■■■■■■■■ 2 Overview of the instrument 2 Overview of the instrument Figure 1 Front 863 Compact Autosampler Safety shield Sample rack For 36 sample vials. Display Keypad Peristaltic pump Retaining plate ■■■■■■■■ 863 Compact Autosampler... -
Page 16: Figure 2 863 Compact Autosampler Rear
■■■■■■■■■■■■■■■■■■■■■■ Figure 2 863 Compact Autosampler rear Tubing and cable cover Remote connector For connecting instruments with a remote interface. D-sub, 9-pin. USB (OTG) connector Power socket For connecting computers, printers, USB flash drives, USB hubs, etc. Type plate Contains specifications concerning supply voltage and serial number. -
Page 17: Figure 3 Peristaltic Pump
A considerable risk of injury exists. The pump tubing may only be changed when the instrument is switched off. Switch off the instrument immediately if the roller drive jams. Only afterwards you may attempt to fix the problem. ■■■■■■■■ 863 Compact Autosampler... -
Page 18: Installation
Unplug the power plug immediately if you suspect that moisture has ■ gotten inside the instrument. Only personnel who have been issued Metrohm qualifications may ■ perform service and repair work on electrical and electronic parts. ■■■■■■■■... -
Page 19: Connecting A Computer
Compact IC plus or 883 Basic IC plus). NOTICE If the 863 Compact Autosampler is not to be controlled by MagIC Net, then no direct connection to a PC is required. In such cases, the instru- ment is used in so-called stand-alone mode and is connected via remote cable to a corresponding control instrument. -
Page 20: Figure 4 Connecting The Computer
3.3 Connecting a computer Cable connection and driver installation A driver installation is required in order to ensure that the 863 Compact Autosampler is recognized by MagIC Net. To accomplish this, you must comply with the procedures specified. The following steps are necessary:... -
Page 21: Installing The Sample Needle
These stop- pers cannot be penetrated by such needles. The needle can become damaged if this is attempted! Perforated stoppers can be used with double-bevel needles. ■■■■■■■■ 863 Compact Autosampler... -
Page 22: Figure 5 Installing The Needle
1 Opening the safety shield Loosen the lower two fastening screws of the safety shield using the hex key provided, and tip up the safety shield. 2 Remove the nut Loosen and remove the nut screwed onto the needle holder. ■■■■■■■■ 863 Compact Autosampler... - Page 23 7 Closing the safety shield Tip down the safety shield and fix it with the fastening screws. WARNING The safety shield must always be closed for safety reasons during opera- tion of the 863 Compact Autosampler. ■■■■■■■■ 863 Compact Autosampler...
-
Page 24: Installing The Peristaltic Pump
Release the tubing cartridge from the cartridge holder by pressing the snap-action lever and unhooking from the mounting pins (see figure 3, page 9). 2 Connecting the aspiration side Place a 6.2744.034 tubing olive (6-2) on the aspiration side of the pump tubing. ■■■■■■■■ 863 Compact Autosampler... -
Page 25: Figure 7 Inserting The Tubing Cartridge
5 Inserting the tubing cartridge Hang the tubing cartridge in the mounting pin and press in the ■ cartridge holder until the snap-action lever snaps in. Figure 7 Inserting the tubing cartridge ■■■■■■■■ 863 Compact Autosampler... - Page 26 The contact pressure is now set optimally. The delivery rate depends not only on the correct contact pressure but also on the interior diameter of the pump tubing and the rota- tional speed of the drive. ■■■■■■■■ 863 Compact Autosampler...
-
Page 27: Tubing And Capillary Connections
Connecting a keyboard, printer and other USB devi- The 863 Compact Autosampler has a USB (OTG) connector. Use the provi- ded 6.2151.100 adapter USB MINI (OTG) - USB A for connecting USB devices as e.g. printers, keyboards or USB sticks, see the following figure. -
Page 28: Figure 9 Connecting Usb Devices
USB hubs are available in specialty stores in a number of differ- ent models. The USB (OTG) connector of the 863 Compact Autosampler has no such hub. The 6.2147.000 numerical USB keypad has a USB hub and two USB connectors. -
Page 29: Figure 10 Connecting The Usb Stick
If you wish to connect several different instruments without own power supply, then you must possibly use a USB hub with own power supply (self powered). The USB (OTG) connector of the 863 Compact Autosampler is not designed for supplying power to several devices with elevated electricity requirements. -
Page 30: Remote Connections
■■■■■■■■■■■■■■■■■■■■■■ 3.8 Remote connections Remote connections The 863 Compact Autosampler can be used as a control instrument for a simple automation system with a large variety of different instruments. Even older Metrohm instruments can thus be integrated into an auto- mated analysis system. -
Page 31: Figure 13 Remote Connection 863 Compact Autosampler - 843 Pump Station
Remote connection 863 Compact Autosampler - 843 Pump Station - 797 VA Computrace The 863 Compact Autosampler is connected with a 6.2141.230 cable to the Remote 2 connector of the 843 Pump Station. Remote 1 is con- nected to the 797 VA Computrace with the aid of a 6.2141.280 cable. -
Page 32: Automation Sequences
The method run will be automatically restarted for every sample via remote connection (Autostart). A stepping pulse of the connected instrument is expected at the end of the method run. The 863 Compact Autosampler must be stopped manually by means of the button [STOP] after the processing of the last sample. -
Page 33: Sample No Air Gap
The method run will be automatically restarted for every sample via remote connection (Autostart). A stepping pulse of the connected instrument is expected at the end of the method run. The 863 Compact Autosampler must be stopped manually by means of the button [STOP] after the processing of the last sample. -
Page 34: Double Injection
The method run will be automatically restarted for every sample via remote connection (Autostart). A stepping pulse of the connected instrument is expected at the end of the method run. The 863 Compact Autosampler must be stopped manually by means of the button [STOP] after the processing of the last sample. -
Page 35: Triple Injection
The method run will be automatically restarted for every sample via remote connection (Autostart). A stepping pulse of the connected instrument is expected at the end of the method run. The 863 Compact Autosampler must be stopped manually by means of the button [STOP] after the processing of the last sample. -
Page 36: Va 797 Remote Start
The method run will be automatically restarted for every sample via remote connection (Autostart). A stepping pulse of the connected instrument is expected at the end of the method run. The 863 Compact Autosampler must be stopped manually by means of the button [STOP] after the processing of the last sample. -
Page 37: Va 797 Manual Start
The method run will be automatically restarted for every sample via remote connection (Autostart). A stepping pulse of the connected instrument is expected at the beginning of the method run. The 863 Compact Autosampler may need to be stopped manually by means of the button [STOP] after the processing of the last sample. -
Page 38: Operation
Proceed as follows: Keep the red [STOP] key pressed down for at least 3 s. ■ A progress bar is displayed. If the key is released during this time, then the instrument will not be switched off. ■■■■■■■■ 863 Compact Autosampler... -
Page 39: Fundamentals Of Operation
5 Operation Fundamentals of operation 5.2.1 The keypad Figure 14 Keypad 863 Compact Autosampler BACK Apply the input and exit the dialog. ⇧ ⇩ Move the selection bar either up or down by one line at a time. Select the character to be entered in the text editor. -
Page 40: Navigating In The Dialog
The following functions are available: Editing function Description Accept The modification is applied and the editing dialog is exited. Cancel The editing dialog is exited without applying the modification. Clear The content of the input field is deleted com- pletely. ■■■■■■■■ 863 Compact Autosampler... -
Page 41: Methods
The [BACK] key has the same function as Accept. Methods The 863 Compact Autosampler works with process methods that are based on specified method templates. Individual working steps of a method run can be configured individually, depending on the application. -
Page 42: Creating A New Method
If a new method has been created, then the individual parameters can be modified under Menu ▶ Parameters. 5.3.3 Saving a method If you modify method parameters, then you can save these as your own method. A maximum of 100 methods can be saved. ■■■■■■■■ 863 Compact Autosampler... - Page 43 Entering a new name: Press [OK]. ■ The text editor opens. Enter a method name (max. 12 characters) and apply with ■ Accept or [BACK]. Press [BACK]. ■ The method will be saved and the method table is displayed. ■■■■■■■■ 863 Compact Autosampler...
-
Page 44: Loading A Method
This function is possible only if a USB flash drive is connected as an external storage medium. To export a method, proceed as follows: 1 Opening the method table In the main dialog, select Method and press [OK]. ■ The method table with the stored methods opens: ■■■■■■■■ 863 Compact Autosampler... -
Page 45: Performing A Sample Series
Samples can be placed anywhere on the rack. They are processed accord- ing to ascending rack position. If the 863 Compact Autosampler is used together with the 797 Compu- trace, each vessel with sample has to be followed by one with ultrapure water. -
Page 46: Starting The Sample Series
The position of the first sample is increased with each method run. You can still cancel the start of the sample series at this time with [BACK] or [STOP]. 4 Close the sample series dialog Close the dialog with the [BACK] key. ■■■■■■■■ 863 Compact Autosampler... -
Page 47: Pausing A Sample Series And Continuing
5.4.2 Pausing a sample series and continuing Pausing a sample series A method run of the 863 Compact Autosampler can be paused and then continued again. The connected instruments are however not paused. NOTICE Interruption of the method run is not possible during the execution of commands during which the 863 Compact Autosampler waits for a sig- nal from the connected titrator. - Page 48 As is also the case at the start of a sample series, a request dialog appears here in which the number of samples to be processed can still be changed. It is thus possible to shorten a sample series or to extend it, without stopping it. ■■■■■■■■ 863 Compact Autosampler...
-
Page 49: Printing A Report Manually
1 Opening the main menu In the main dialog, select Menu and press [OK]. ■ 2 Opening the print dialog Select the menu item Print reports and press [OK]. ■ The dialog window with the available reports opens: ■■■■■■■■ 863 Compact Autosampler... -
Page 50: Manual Control
Previous The lift is moved upward and the next lowest rack position is placed in front of the lift. If the [OK] key remains pressed, the rack auto- matically moves to the next position. ■■■■■■■■ 863 Compact Autosampler... -
Page 51: Moving The Lift
[OK]: Switch on the peristaltic pump if it is switched off. Switch off the peristaltic pump if it is switched Pump+ Increase the rotational speed by one step. ■■■■■■■■ 863 Compact Autosampler... - Page 52 The shift direction of the roller drive changes as the algebraic sign of the rotational speed changes. "+": clockwise rotation ■ "–": counterclockwise rotation ■ Input range –7 - 7 Default value The rotational speed can also be changed when the pump is switched off. ■■■■■■■■ 863 Compact Autosampler...
-
Page 53: System Settings
Time Current time. Only valid numbers can be entered. Format: hh:mm:ss Date Current date. Only valid numbers can be entered. Format: YYYY:MM:DD Language Setting the dialog language. An additional language can be selected besides English. ■■■■■■■■ 863 Compact Autosampler... - Page 54 If the limited dialog for routine operation is activated, then the expert dialog cannot be activated during ongoing operation. To change the dialog type, the 863 Compact Autosampler must be switched off and then back on again. The expert dialog can be forced as soon as the instrument is started up again.
- Page 55 Beep If this parameter is activated, then a short beep will sound in the following cases: When a key is pressed. ■ At the end of the determination. ■ on | off Selection Default value ■■■■■■■■ 863 Compact Autosampler...
-
Page 56: File Management
The structure within this directory appears as follows: Backup All of the files of the backup are stored in this directory. The directory is created as soon as a backup is created for the first time. ■■■■■■■■ 863 Compact Autosampler... -
Page 57: Lift Settings (Lift)
Loosen the lower two fastening screws of the safety shield using the hex key provided, and tip up the safety shield. 2 Loosening the nut Slightly loosen the nut below the lift head using a wrench. ■■■■■■■■ 863 Compact Autosampler... -
Page 58: Configuring External Devices
Epson (ESC-POS) | HP DeskJet | HP LaserJet | Seiko (ESC-POS) Default value HP DeskJet Keyboard layout A commercially available USB keyboard can be connected to make it eas- ier to enter text and numbers. Specify the country-specific keyboard lay- out. ■■■■■■■■ 863 Compact Autosampler... -
Page 59: Instrument Diagnosis
New program versions or language files can be loaded from a USB flash drive. The corresponding file must be saved on the USB flash drive in a directory with the instrument number (e.g. 848 or 863). You can distinguish between language files and program files by noting how the file name is constructed. -
Page 60: Diagnosis Functions
No user intervention is required. 6.5.2 Diagnosis functions Electronic and mechanical functional groups in Metrohm instruments can and should be checked as part of regular maintenance by specialist per- sonnel from Metrohm. Please ask your local Metrohm representative regarding the precise terms and conditions involved in concluding a corre- sponding maintenance agreement. -
Page 61: Parameters
Menu ▶ Parameters Automation Display of the template used for the automation sequence. Sample pump time The time during which the peristaltic pump aspirates sample solution. Input range 0 - 999 s Default value 120 s ■■■■■■■■ 863 Compact Autosampler... -
Page 62: Automation: Double Injection
Menu ▶ Parameters Automation Display of the template used for the automation sequence. Sample pump time The time during which the peristaltic pump aspirates sample solution. Input range 0 - 999 s Default value 120 s ■■■■■■■■ 863 Compact Autosampler... -
Page 63: Automation: Va 797 Remote Start
Menu ▶ Parameters Automation Display of the template used for the automation sequence. Min. sample pump time Minimum time, during which the peristaltic pump aspirates sample solu- tion. Input range 0 - 999 s Default value ■■■■■■■■ 863 Compact Autosampler... - Page 64 Pump rate Rate of the peristaltic pump. One step corresponds to 6 rpm. Positive val- ues = shift direction is clockwise, negative values = shift direction is coun- terclockwise. Input range -7 - 7 Default value ■■■■■■■■ 863 Compact Autosampler...
-
Page 65: Operation And Maintenance
Pump tubing can differ in terms of material, diameter and thus flow rate. Different pump tubing is used depending on the application. The following table shows the properties and areas of application of the pump tubings: ■■■■■■■■ 863 Compact Autosampler... - Page 66 (white/white), 3 stop- (Tygon pers 6.1826.380 Pump tubing LFL 1.25 mm For Inline Dilution. ® (gray/gray), 3 stoppers (Tygon 6.1826.390 Pump tubing LFL (yel- 1.37 mm For sample solution in ® low/yellow), 3 stop- (Tygon Inline Ultrafiltration. pers ■■■■■■■■ 863 Compact Autosampler...
-
Page 67: Troubleshooting
Peristaltic pump – Contact Correctly set the contact pressure (see "Set the is pumping too little. pressure too weak. contact pressure", page 18). Peristaltic pump – Pump Replace the pump tubing (see figure 6, page tubing defective. 16). ■■■■■■■■ 863 Compact Autosampler... -
Page 68: 10 Appendix
Pin assignment of the remote interface Figure 16 Pin assignment of remote socket and remote plug The above figure of the pin assignment applies for all Metrohm instru- ments with 9-pin D-Sub remote connector. Table 3 Inputs and outputs of the remote interface Pin No. -
Page 69: Status Diagram Of The Remote Interface
Keyboards, PC mice and barcode readers are so-called HID devices (Human Interface Device) and can be connected via a USB hub only. Printers should also be connected via a USB hub. Depending on the manufacturer or printer type a direct connection is however possible. ■■■■■■■■ 863 Compact Autosampler... -
Page 70: 000 Numerical Usb Keypad
The respective editing dialog must be opened for the numerical input. Table 4 Key assignment Key of the 863 Compact Auto- Key on the numerical USB sampler or function in the keypad... -
Page 71: System Initialization
2 Switching on the instrument Keep the red [STOP] key pressed down for approx. 10 s. ■ The dialog for confirmation of the initialization is displayed for 8 s. The initialization must be confirmed during this time. ■■■■■■■■ 863 Compact Autosampler... - Page 72 If the request is not confirmed within 8 s, then the procedure will be canceled. Press [BACK] twice. ■ Initialization is started. The process takes approximately 80 s. The instrument will be automatically restarted after successful initializa- tion. ■■■■■■■■ 863 Compact Autosampler...
-
Page 73: 11 Technical Specifications
The actual flow rate depends on the contact pressure and the type of Typical flow rate tubing. with 0.3 mL/min at 18 rpm 6.1826.320 16 mL/min at 42 rpm with 6.1826.150 with 3.3 mL/min at 18 rpm 6.1826.020 Tubing material Recommended: Tygon Long Flex Life ■■■■■■■■ 863 Compact Autosampler... -
Page 74: Interfaces And Connectors
Ambient temperature Nominal function 5 - 45 °C range Humidity < 80% Storage –20 - 60 °C Transport –40 - 60 °C 11.7 Reference conditions Ambient tempera- 25 °C (±3 °C) ture ≤ 60% Relative humidity ■■■■■■■■ 863 Compact Autosampler... -
Page 75: Dimensions
■■■■■■■■■■■■■■■■■■■■■■ 11 Technical specifications 11.8 Dimensions Width 0.26 m Height 0.47 m Depth 0.43 m Weight (without 9.82 kg accessories) Material Housing Lower part: Crastin PBT Lift: Metal, surface-treated Rack ■■■■■■■■ 863 Compact Autosampler... -
Page 76: 12 Accessories
Downloading the accessories list 1 Enter https://www.metrohm.com/ into your Internet browser. 2 Enter the article number (e.g. 863) into the search field. The search result is displayed. 3 Click on the product. Detailed information regarding the product is shown on various tabs. -
Page 77: Index
Tubing connections ....19 Key assignment ....62 Program crash ......63 Keyboard layout ....... 50 Program version Update ....... 51 Update Pump tubings Dialog language ....51 Language ......... 45 Installing ......16 Program version ....51 ■■■■■■■■ 863 Compact Autosampler... - Page 78 USB flash drive Working height ......49 Printer ........ 62 Directory structure ....48 USB (OTG) User name ........ 45 Connector ......8 USB connection cable ....11 VA Computrace USB device Connect ......22 Adapter ......19 ■■■■■■■■ 863 Compact Autosampler...
Need help?
Do you have a question about the 863 and is the answer not in the manual?
Questions and answers