Table of Contents
Advertisement
Advertisement
Table of Contents

Related Manuals for Metrohm 800 Dosino


Summary of Contents for Metrohm 800 Dosino
- Page 1 800 Dosino Manual 8.800.8002EN / 2017-06-30...
- Page 3 Metrohm AG CH-9100 Herisau Switzerland Phone +41 71 353 85 85 Fax +41 71 353 89 01 info@metrohm.com www.metrohm.com 800 Dosino Manual 8.800.8002EN / 2017-06-30...
- Page 4 Technical Communication Metrohm AG CH-9100 Herisau techcom@metrohm.com This documentation is protected by copyright. All rights reserved. This documentation has been prepared with great care. However, errors can never be entirely ruled out. Please send comments regarding possible errors to the address above.
-
Page 5: Table Of Contents
Dosino on the canister ............. 9 3.2.4 Dosino on the stand holder ............. 9 3.2.5 Dosino with Sample Processor ..........11 Connecting the 800 Dosino ..........13 4 Functioning Dosing/filling the dosing cylinder ........16 Switching the stopcock ............18 Port assignments ..............19 Standard assignment of the Dosino ports ...... - Page 6 6 Handling and maintenance General information ............29 6.1.1 Care ..................29 6.1.2 Maintenance by Metrohm Service .......... 30 Quality management and qualification with Metrohm ... 30 GLP - Validation ..............30 7 Troubleshooting Problems ................32 8 Appendix Buret data ................35 9 Technical specifications Dosing drive ................
- Page 7 807 Dosing Unit from above ............22 Figure 15 Check the piston stopper ..............22 Figure 16 Mounting the 800 Dosino onto the 807 Dosing Unit ....... 23 Figure 17 Piston tongs ..................24 Figure 18 Removing the 800 Dosino from the 807 Dosing Unit ....... 25 Figure 19 Data chip and contact pin ...............
-
Page 9: Introduction
1 Introduction 1 Introduction The 800 Dosino is a versatile dosing drive which can be used with a num- ber of different Metrohm dosing devices or titrators (e.g. Titrando). The 800 Dosino and the 807 Dosing Unit associated with it are suitable as a buret for simple dosings, titrations and for complex automation and liquid handling tasks such as sample transfers or pipetting. -
Page 10: Symbols And Conventions
Warning This symbol draws attention to a possible biological hazard. Caution This symbol draws attention to a possible damage of instruments or instrument parts. Note This symbol marks additional information and tips. ■■■■■■■■ 800 Dosino... -
Page 11: Safety Instructions
The electrical safety when working with the instrument is ensured as part of the international standard IEC 61010. WARNING Only personnel qualified by Metrohm are authorized to carry out service work on electronic components. WARNING Never open the housing of the instrument. The instrument could be damaged by this. -
Page 12: Working With Liquids
The correct disposal of your old instrument will help to prevent negative effects on the environment and public health. More details about the disposal of your old instrument can be obtained from your local authorities, from waste disposal companies or from your local dealer. ■■■■■■■■ 800 Dosino... -
Page 13: Overview Of The Instrument
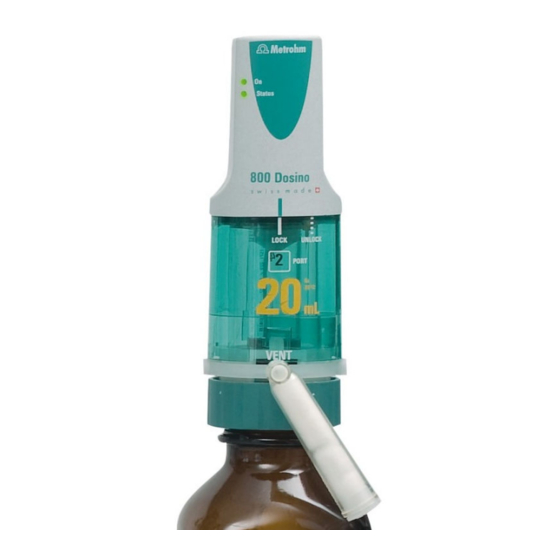
■■■■■■■■■■■■■■■■■■■■■■ 2 Overview of the instrument 2 Overview of the instrument Figure 1 800 Dosino On LED Status LED Lights up, when the Dosino is connected to Indicates the current status of the Dosino. an MSB connector of a control device and the control device is switched on. - Page 14 ■■■■■■■■■■■■■■■■■■■■■■ Piston rod 10 Drive pin With coupling. For moving the dosing piston For the rotation of the stopcock. in the dosing unit. 11 Piston tongs 6.1546.030 For pulling the PTFE piston out of the dosing unit. ■■■■■■■■ 800 Dosino...
-
Page 15: Installation
3.2.1 Dosino with Titrando When the 800 Dosino is used together with an 807 Dosing Unit as a titrating buret with a Titrando, two bottles (with titrant or auxiliary reagents) can be placed on the Titrando with dosing unit and Dosino mounted (see Figure 2, page 8). -
Page 16: Dosino With Bottle Holder
800 Dosino on the Titrando 3.2.2 Dosino with bottle holder If the 800 Dosino is utilized as a dosing drive for adding auxiliary ■ reagents, e.g. in operations with the Titrando, then the practical and stable 6.2061.010 bottle holder with storage vessel for buret tips can be used. -
Page 17: Dosino On The Canister
A Dosino with dosing unit can be mounted directly on a canister when a suitable thread adapter is used. Use for this purpose the 6.1618.050 thread adapter for the canister provided by Metrohm. Figure 4 800 Dosino on the canister 3.2.4... -
Page 18: Figure 6 Hanging Support Assembly
3 Insert the dosing unit with Dosino into the holder from above. 4 Screw the bottle tightly onto the dosing unit from below. Additional support assembly options: Figure 6 Hanging support assembly Figure 7 Free-standing support assembly ■■■■■■■■ 800 Dosino... -
Page 19: Dosino With Sample Processor
All four dosing unit ports can be used with the free-standing support assembly. 3.2.5 Dosino with Sample Processor With a Sample Processor, the 800 Dosino can be mounted on the side wall of the tower. Screwing on the holder for the dosing unit with Dosino 6.2057.040... - Page 20 1 Attach the Dosino on the dosing unit and engage in place. 2 Guide the tubing adapter GL 45 (6.1618.020) from below into the holder. 3 Attach the dosing unit with the Dosino onto the holder. 4 Screw the thread adapter tight ■■■■■■■■ 800 Dosino...
-
Page 21: Connecting The 800 Dosino
( MSB 1/MSB 2 to MSB 4 ). The position of the correct connection socket (Mini DIN plug) to be used with the 800 Dosino can be found in the manual for the control device. Connecting the Dosino Figure 9... - Page 22 ■■■■■■■■■■■■■■■■■■■■■■ 3.3 Connecting the 800 Dosino 2 Connect the connection cable of the Dosino to one of the sockets marked with MSB on the rear of the control instrument. Observe the reference mark on the socket. 3 Start the control software.
-
Page 23: Functioning
■■■■■■■■■■■■■■■■■■■■■■ 4 Functioning 4 Functioning The 800 Dosino forms, together with an 807 Dosing Unit (with 2, 5, 10, 20 or 50 mL cylinder), a buret unit for simple dosing tasks or complex liq- uid handling applications. The dosing units are normally mounted on reagent bottles in fixed posi- tion and the necessary dosing inputs and outputs are equipped with tub- ing. -
Page 24: Dosing/Filling The Dosing Cylinder
For ejecting and aspirating a solution. in the dosing unit. Cylinder Valve disc in the cylinder base Contains the solution for dosing. A hole in the valve disc guides the solution into one of four selected openings in the distributor disc. ■■■■■■■■ 800 Dosino... - Page 25 When a solution is ejected, the piston rod of the 800 Dosino propels the dosing piston in the cylinder downward. The solution in the cylinder is pressed through the valve disc in the base of the cylinder into one of the four openings of the distributor, depending on the valve position.
-
Page 26: Switching The Stopcock
The dosing unit has four ports. Two of these are located on the outside and two on the underside of the distributor. Depending on the position of the black valve disk, a connection is set up between the cylinder and the opening of the white distributor associated with the port. ■■■■■■■■ 800 Dosino... -
Page 27: Port Assignments
All ports of the 807 Dosing Unit can be used differently (see Chapter 4.4, page 20). This is an important precondition for complex liquid handling tasks. Titrandos use a standard port allocation which is the most suitable for titration tasks. ■■■■■■■■ 800 Dosino... -
Page 28: Standard Assignment Of The Dosino Ports
(6.1446.040). WARNING Never seal the VENT connector with a threaded stopper when the dosing unit is attached on top of a supply bottle. A vacuum could be created in the supply bottle – danger of implosion! ■■■■■■■■ 800 Dosino... -
Page 29: Operation
Function of the On and Status LEDs. ■ Attaching the Dosino onto the dosing unit The 800 Dosino can be attached to a dosing unit in both switched-off and switched-on modes. 1 Checking the position of the drive disk of the dosing drive... -
Page 30: Figure 14 807 Dosing Unit From Above
If necessary, use the piston tongs to pull out the piston until the ■ stop is reached. Turn the entire dosing unit upside-down and press it together on ■ a tabletop. 4 Attaching 800 Dosino on 807 Dosing Unit CAUTION Avoid using excessive force when attaching the dosing unit. ■■■■■■■■ 800 Dosino... -
Page 31: Figure 16 Mounting The 800 Dosino Onto The 807 Dosing Unit
Check the correct seating of the 800 Dosino. ■ CAUTION After the 800 Dosino has been attached to a dosing unit, the Status LED must light up when the control device is switched on. If this does not occur, then the dosing drive is not attached correctly. -
Page 32: Problems When Attaching The Dosino
5.2 Problems when attaching the Dosino Problems when attaching the Dosino If the 800 Dosino cannot be attached (Status LED does not light up), then it could be that either the drive disc of the Dosino or the centering tube of the dosing unit is not in exchange position (Port 2) (see Figure 12, page 19). -
Page 33: Removing The Dosino From The Dosing Unit
Should this not be the case, then the active process may need to be stopped and/or the dosing unit may need to be filled. Figure 18 Removing the 800 Dosino from the 807 Dosing Unit UNLOCK position Remove the Dosino from the dosing unit as follows: 1 Fill the dosing unit. -
Page 34: Reagent Exchange
If additional rinses are required, then the PREP/Preparing function must be run again. If there is a possibility of precipitation or chemical reactions occurring when old and new reagents are mixed, then an interim rinse with an inert solvent is to be recommended. ■■■■■■■■ 800 Dosino... -
Page 35: Function Of The Leds
The dosing drive is supplied with electricity for as long as the On LED is lit. Even if the 800 Dosino is not attached to a dosing unit, the drive pin on the underside of the dosing drive will still not be able to be adjusted by hand. - Page 36 5.5 Function of the LEDs The LED flashes fast The 800 Dosino has detected a malfunction. This could involve, for exam- ple, a blocked valve disc, a blocked dosing piston or problems reading from or recording on the data chip of the dosing unit.
-
Page 37: Handling And Maintenance
General information 6.1.1 Care In contrast to the dosing units, the 800 Dosino requires no special care. Take care to ensure however that it not exposed to any excessive contami- nation nor to any corrosive influences. These could under certain circum- stances result in functional disruptions and a reduction in the service life of the inherently sturdy mechanics and electronics. -
Page 38: Maintenance By Metrohm Service
6.1.2 Maintenance by Metrohm Service Maintenance of the 800 Dosino is best carried out as part of an annual service, which is performed by specialist personnel of the Metrohm com- pany. If working frequently with caustic and corrosive chemicals, a shorter maintenance interval could be necessary. - Page 39 ■■■■■■■■■■■■■■■■■■■■■■ 6 Handling and maintenance recommended that an accuracy inspection be performed when the dosing cylinders and dosing pistons of a dosing unit are replaced. ■■■■■■■■ 800 Dosino...
-
Page 40: Troubleshooting
Check whether the dosing drive is correctly ■ seated. Switch the control instrument off and on ■ again. If necessary contact Metrohm Service Dept. ■ Dosino becomes hot Dosing drive is overloaded. Switch off the instrument immediately. ■ Valve disc or dosing piston Disassemble the dosing unit (see the man- ■... - Page 41 Turn it upside down in its entirety. 3. Switch on the control device and trigger 'Filling'. If the rotation of the stopcock is clearly audible, then the dosing unit, with Dosino attached, can be reattached to the distributor. ■■■■■■■■ 800 Dosino...
- Page 42 The drive pin on the The electronics of the Dos- Send the dosing drive in to the Metrohm Serv- dosing drive rotates ino are damaged. ice Point for repair. without interruption...
-
Page 43: Appendix
■ ■ The 800 Dosino makes it possible to read and record data with the aid of a suitable device (e.g. Titrando). The contact surfaces for data exchange with the data chip are made of titanium and are exceptionally resistant to both chemicals and abrasion. -
Page 44: Figure 19 Data Chip And Contact Pin
■■■■■■■■■■■■■■■■■■■■■■ 8.1 Buret data Figure 19 Data chip and contact pin Contact surface Data chip with contact pins on the 800 Dosino on the 807 Dosing Unit ■■■■■■■■ 800 Dosino... -
Page 45: Technical Specifications
± 12 V, 5 V, 6W from control device Dosing device Mini DIN plug, 8-pin connector Ambient temperature Nominal function +5…+45 °C (at a maximum of 85 % relative humidity) range Storage -20…+60 °C Transport -40…+60 °C ■■■■■■■■ 800 Dosino... -
Page 46: Dimensions And Material
■■■■■■■■■■■■■■■■■■■■■■ 9.4 Dimensions and material Dimensions and material Height 98 mm Width 67 mm Depth 83 mm Weight approx. 410 g Material of hous- PBT (polybutylene terephthalate) ■■■■■■■■ 800 Dosino... -
Page 47: Accessories
The PDF file with the accessories data will be created. NOTE When you receive your new instrument, we recommend downloading the accessories list from the Internet, printing it out and keeping it together with the manual for reference purposes. ■■■■■■■■ 800 Dosino... -
Page 48: Index
In- / Outputs ....... 19 Validation ......... 30 Selecting ......18 Validation date ......35 VENT ........19 Valve disc ......16, 18 Electrostatic charge ....4 Power supply ......37 VENT ........19 Exchange position ....25 PREP ......... 20 ■■■■■■■■ 800 Dosino...
Need help?
Do you have a question about the 800 Dosino and is the answer not in the manual?
Questions and answers