Table of Contents
Advertisement
Advertisement
Table of Contents

Related Manuals for Metrohm Dosimat plus 876


Summary of Contents for Metrohm Dosimat plus 876
- Page 1 876 Dosimat plus Manual 8.876.8003EN / 2019-12-05...
- Page 3 Metrohm AG CH-9100 Herisau Switzerland Phone +41 71 353 85 85 Fax +41 71 353 89 01 info@metrohm.com www.metrohm.com 876 Dosimat plus Manual 8.876.8003EN / 2019-12-05...
- Page 4 Technical Communication Metrohm AG CH-9100 Herisau techcom@metrohm.com This documentation is protected by copyright. All rights reserved. This documentation has been prepared with great care. However, errors can never be entirely ruled out. Please send comments regarding possible errors to the address above.
-
Page 5: Table Of Contents
■■■■■■■■■■■■■■■■■■■■■■ Table of contents Table of contents 1 Introduction Instrument description ............1 1.1.1 Dosing modes ................. 1 1.1.2 Connectors ................1 Intended use ................. 2 About the documentation ........... 2 1.3.1 Symbols and conventions ............2 Safety instructions ..............3 1.4.1 General notes on safety ............ - Page 6 ■■■■■■■■■■■■■■■■■■■■■■ Table of contents 4.2.3 Navigating in the dialog ............19 4.2.4 Entering text and numbers ............. 19 4.2.5 Selecting from a selection list ..........20 Methods ................21 4.3.1 Method templates ..............21 4.3.2 Creating a new method ............21 4.3.3 Saving a method ..............
- Page 7 ■■■■■■■■■■■■■■■■■■■■■■ Table of contents 8 Appendix Exchange unit ..............53 8.1.1 Maximum dosing and filling rate ..........53 8.1.2 Parameters for the preparing (PREP) ........53 Stirring rate ................. 54 Balance ................54 USB devices ................. 55 8.4.1 6.2147.000 numerical USB keypad ........55 8.4.2 Key assignment of a USB keyboard ........
- Page 8 ■■■■■■■■■■■■■■■■■■■■■■ Table of figures Table of figures Figure 1 Front 876 Dosimat plus ..............6 Figure 2 Rear 876 Dosimat plus ..............7 Figure 3 Manual Dosing Controller 6.2107.100 ..........8 Figure 4 Connecting a stirrer ................9 Figure 5 Connecting the Manual Dosing Controller ........
-
Page 9: Introduction
USB flash drive. This function allows you to copy methods quickly and easily from one device to another. The remote connector makes it possible to integrate the device into a Metrohm automation system. 1.1.1 Dosing modes The following dosing modes are supported: ■... -
Page 10: Intended Use
■■■■■■■■■■■■■■■■■■■■■■ 1.2 Intended use Intended use The 876 Dosimat plus has been designed for use in laboratories and pro- duction companies. Its main area of use is the precise dosing of liquids. This includes simple dosing according to specific criteria and manual titra- tions. -
Page 11: Safety Instructions
Electrical safety The electrical safety when working with the instrument is ensured as part of the international standard IEC 61010. WARNING Only personnel qualified by Metrohm are authorized to carry out service work on electronic components. ■■■■■■■■ 876 Dosimat plus... -
Page 12: Tubing And Capillary Connections
■■■■■■■■■■■■■■■■■■■■■■ 1.4 Safety instructions WARNING Never open the housing of the instrument. The instrument could be damaged by this. There is also a risk of serious injury if live components are touched. There are no parts inside the housing which can be serviced or replaced by the user. -
Page 13: Flammable Solvents And Chemicals
■■■■■■■■■■■■■■■■■■■■■■ 1 Introduction 1.4.4 Flammable solvents and chemicals WARNING All relevant safety measures are to be observed when working with flammable solvents and chemicals. Set up the instrument in a well-ventilated location (e.g. fume cup- ■ board). Keep all sources of flame far from the workplace. ■... -
Page 14: Overview Of The Instrument
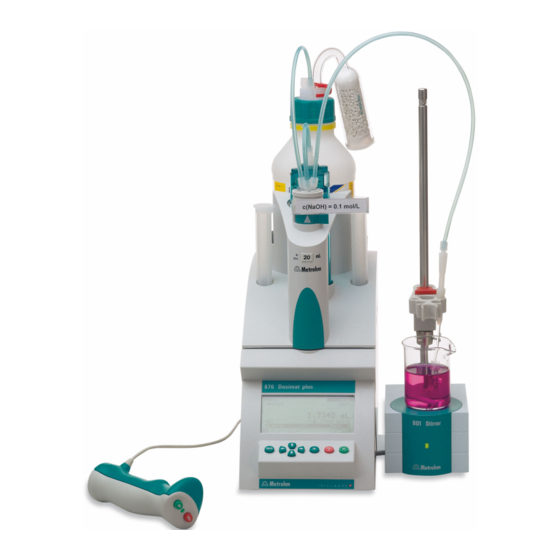
■■■■■■■■■■■■■■■■■■■■■■ 2.1 876 Dosimat plus 2 Overview of the instrument 876 Dosimat plus Figure 1 Front 876 Dosimat plus Piston rod Contact pins Of the dosing drive. For the data chip. Coupling Display For switching the flat stopcock. Keypad ■■■■■■■■ 876 Dosimat plus... -
Page 15: Figure 2 Rear 876 Dosimat Plus
Contains specifications concerning mains voltage and serial number. USB (OTG) connector MSB connector For connecting printers, USB sticks, USB Metrohm Serial Bus. hubs, etc. For connecting a stirrer or an 805 Dosimat. Mini DIN, 9-pin. Remote connector For connecting the Manual Dosing Control- ler or instruments with a remote interface. -
Page 16: Manual Dosing Controller
■■■■■■■■■■■■■■■■■■■■■■ 2.2 Manual Dosing Controller Manual Dosing Controller Figure 3 Manual Dosing Controller 6.2107.100 Dosing key Status LED To start the dosing. Indicates the readiness of the instrument. Stop key/Fill key Connection cable For stopping and filling the dosing cylinder. With 9-pin D-Sub plug. -
Page 17: Setting Up The Instrument
■■■■■■■■■■■■■■■■■■■■■■ 3 Installation 3 Installation Setting up the instrument 3.1.1 Packaging The instrument is supplied in protective packaging together with the sepa- rately packed accessories. Keep this packaging, as only this ensures safe transportation of the instrument. 3.1.2 Checks Immediately after receipt, check whether the shipment has arrived com- plete and without damage by comparing it with the delivery note. -
Page 18: Connecting The Manual Dosing Controller
■■■■■■■■■■■■■■■■■■■■■■ 3.3 Connecting the Manual Dosing Controller CAUTION Make sure that the flat side of the plug matches the marking on the socket. Connecting the Manual Dosing Controller Figure 5 Connecting the Manual Dosing Controller The Manual Dosing Controller is connected to the remote connector on the rear of the instrument. -
Page 19: Connecting A Keyboard, Printer And Other Usb Devi- Ces
■■■■■■■■■■■■■■■■■■■■■■ 3 Installation The parameters for the RS-232 interface on the instrument must match those on the balance (see "Editing the COM1 settings", page 37). Addi- tionally consult the user manual of the balance. Connecting a keyboard, printer and other USB devi- The 876 Dosimat plus has a USB (OTG) connector. -
Page 20: Figure 8 Connecting The Usb Stick
■■■■■■■■■■■■■■■■■■■■■■ 3.5 Connecting a keyboard, printer and other USB devices NOTICE Most of the USB devices need a so-called hub in order to work cor- rectly. A USB hub is a distributor to which several USB devices can be con- nected. -
Page 21: Connecting Instruments To The Remote Connector
The 876 Dosimat plus can be integrated in an automation system with the aid of a remote cable. Figure 11 Connecting a remote cable A variety of different connecting cables are available for connecting Metrohm instruments (e.g. sample changers) (see Optional Accessories chapter). ■■■■■■■■ 876 Dosimat plus... -
Page 22: Connecting The 805 Dosimat
■■■■■■■■■■■■■■■■■■■■■■ 3.7 Connecting the 805 Dosimat Connecting the 805 Dosimat For tandem operation (XDOS mode), an 805 Dosimat can be connected to the MSB 1 socket on the rear of the 876 Dosimat plus. Figure 12 Connecting the 805 Dosimat CAUTION Make sure that the flat side of the plug matches the marking on the socket. -
Page 23: Attaching The Exchange Unit
■■■■■■■■■■■■■■■■■■■■■■ 3 Installation Attaching the exchange unit Figure 14 Attaching the exchange unit To attach the exchange unit, proceed as follows: 1 Slide the exchange unit from the front onto the 876 Dosimat plus and push all the way to the rear. It must snap in audibly. -
Page 24: Connecting The Instrument To The Power Grid
Unplug the power plug immediately if you suspect that moisture has ■ gotten inside the instrument. Only personnel who have been issued Metrohm qualifications may ■ perform service and repair work on electrical and electronic parts. Connecting the power cord... -
Page 25: Switching The Instrument On And Off
■■■■■■■■■■■■■■■■■■■■■■ 4 Operation 4 Operation Switching the instrument on and off Switching on the instrument Proceed as follows: Press the red [FILL] key. ■ The instrument is initialized and a system test performed. This pro- cess takes some time. If a buret unit has been attached, then a request appears to carry ■... -
Page 26: Fundamentals Of Operation
■■■■■■■■■■■■■■■■■■■■■■ 4.2 Fundamentals of operation Proceed as follows: Keep the red [FILL] key pressed down for at least 3 s. ■ A progress bar is displayed. If the key is released during this time, then the instrument will not be switched off. Fundamentals of operation 4.2.1 The keypad... -
Page 27: Navigating In The Dialog
■■■■■■■■■■■■■■■■■■■■■■ 4 Operation busy A method has been started. hold A method has been paused. Some dialogs have a so-called function bar on the bottom line. The func- tions contained therein can be selected with the arrow keys [⇦] or [⇨] and executed with [OK]. -
Page 28: Selecting From A Selection List
■■■■■■■■■■■■■■■■■■■■■■ 4.2 Fundamentals of operation Editing function Description Accept The modification is applied and the editing dialog is exited. Cancel The editing dialog is exited without applying the modification. Clear The content of the input field is deleted com- pletely. The character left of the cursor is deleted (back- space). -
Page 29: Methods
■■■■■■■■■■■■■■■■■■■■■■ 4 Operation Methods 4.3.1 Method templates The 876 Dosimat plus contains method templates which are already con- figured and which can be adjusted to individual requirements. The following method templates can be selected: Manual interactive dosing with optional calculat- ing results. -
Page 30: Saving A Method
■■■■■■■■■■■■■■■■■■■■■■ 4.3 Methods 3 Load the method template Select the desired template and press [OK]. ■ The method template is now loaded and is displayed in the main dia- log under Method. If a new method has been created, then the individual parameters can be modified under Menu ▶... -
Page 31: Loading A Method
■■■■■■■■■■■■■■■■■■■■■■ 4 Operation 2 Modifying/applying the method name In the function bar, select Store and press [OK]. ■ A method name will be suggested for new methods. If the method has already been saved once, then the method name will be displayed: Applying the name: Press [BACK]. -
Page 32: Exporting A Method
■■■■■■■■■■■■■■■■■■■■■■ 4.3 Methods 3 Load the method In the function bar, select Load and press [OK]. ■ The method is now loaded and is displayed in the main dialog under Method. 4.3.5 Exporting a method The methods can be exported to a connected USB flash drive. NOTICE This function is possible only if a USB flash drive is connected as an external storage medium. -
Page 33: Stirrer Operation
■■■■■■■■■■■■■■■■■■■■■■ 4 Operation Stirrer operation You can control a connected stirrer directly in the main dialog. Proceed as follows: 1 Set the stirring rate Use the arrow key [↓] to select the Stirrer entry. ■ In the function bar, select the Stir- or Stir+ function. ■... -
Page 34: Entering Sample Data
■■■■■■■■■■■■■■■■■■■■■■ 4.5 Entering sample data Entering sample data Menu ▶ Sample data In the dosing mode DOS, a sample size can be used for calculation. The sample size can be entered using the keypad (in the main menu under Sample data) or transferred directly from a balance by means of a cable connection. -
Page 35: Preparing The Buret Unit (Prep)
■■■■■■■■■■■■■■■■■■■■■■ 4 Operation Preparing the buret unit (PREP) The PREP function is used to rinse the cylinder and tubings of the buret unit and fill them air bubble-free. You should carry out this function once per day. Proceed as follows: In the main dialog, select Menu and press [OK]. -
Page 36: Printing A Report Manually
■■■■■■■■■■■■■■■■■■■■■■ 4.7 Printing a report manually Printing a report manually Menu ▶ Print reports Proceed as follows to print a report manually: 1 Opening the main menu In the main dialog, select Menu and press [OK]. ■ 2 Opening the print dialog Select the menu item Print reports and press [OK]. - Page 37 ■■■■■■■■■■■■■■■■■■■■■■ 4 Operation PC/LIMS Machine-readable report with all of the data for a determination. This report can be saved as a TXT file to a connected USB flash drive or sent to a terminal program or a LIMS via an RS-232 interface.
-
Page 38: System Settings
■■■■■■■■■■■■■■■■■■■■■■ 5.1 Basic settings 5 System settings Basic settings Menu ▶ System ▶ Settings This chapter contains a description of general instrument settings. User name A user name can be entered here for the report. This parameter will only be printed if a user has been defined. Entry max. - Page 39 ■■■■■■■■■■■■■■■■■■■■■■ 5 System settings NOTICE In order to ensure that a second language can be selected, it must first be installed. This installation must be carried out by specialist personnel. In chapter Language files, page 39, you will find details regarding the installation of a second language.
- Page 40 ■■■■■■■■■■■■■■■■■■■■■■ 5.1 Basic settings Routine Limited dialog for routine operations. Contrast The contrast of the display can be adjusted with the arrow keys [⇦] and [⇨]. [⇦]: the contrast will be decreased by one step each time the key is ■...
-
Page 41: Managing Solutions
■■■■■■■■■■■■■■■■■■■■■■ 5 System settings Managing solutions 5.2.1 General Menu ▶ System ▶ Solutions Solutions can be used in intelligent buret units or in non-intelligent buret units. Intelligent buret units have a built-in data chip on which the data for the reagent is stored. This data is automatically read out during attach- ment and entered in the solution list. - Page 42 ■■■■■■■■■■■■■■■■■■■■■■ 5.2 Managing solutions Cylinder volume Cylinder volume of the buret unit in mL. The cylinder volume is automati- cally read out with intelligent buret units. Selection 1 | 5 | 10 | 20 | 50 Default value Concentration Concentration of the solution. Input range –999999999 - 9999999999 Default value...
-
Page 43: File Management
■■■■■■■■■■■■■■■■■■■■■■ 5 System settings Selection on | off Default value Time interval This parameter is visible only when Monitoring = on. You will be notified that this time interval (in days) has elapsed when start- ing a method. You can then select whether or not you would still like to start the method. -
Page 44: Configuring External Devices
■■■■■■■■■■■■■■■■■■■■■■ 5.4 Configuring external devices Directory structure on the USB flash drive A directory with the instrument number will be created on the USB flash drive. The structure within this directory appears as follows: Figure 16 Directory structure on the USB flash drive Backup All of the files of the backup are stored in this directory. - Page 45 ■■■■■■■■■■■■■■■■■■■■■■ 5 System settings The printers that have the designation ESC-POS are so-called POS printers (point-of-sale printers), i.e. they print on continuous paper. Citizen (ESC-POS) | Custom (ESC-POS) | Epson | Selection Epson (ESC-POS) | HP DeskJet | HP LaserJet | Seiko (ESC-POS) Default value HP DeskJet...
- Page 46 ■■■■■■■■■■■■■■■■■■■■■■ 5.4 Configuring external devices The interface parameters for the connected balance are set under COM1 settings. Baud rate Transfer rate in characters per second. Selection 1200 | 2400 | 4800 | 9600 | 19200 | 38400 | 57600 | 115200 Default value 9600 Data bits...
-
Page 47: Instrument Diagnosis
■■■■■■■■■■■■■■■■■■■■■■ 5 System settings Instrument diagnosis 5.5.1 Loading program versions and language files Menu ▶ System ▶ Diagnosis New program versions or language files can be loaded from a USB flash drive. The corresponding file must be saved on the USB flash drive in a directory with the instrument number (e.g. -
Page 48: Diagnosis Functions
No user intervention is required. 5.5.2 Diagnosis functions Electronic and mechanical functional groups in Metrohm instruments can and should be checked as part of regular maintenance by specialist per- sonnel from Metrohm. Please ask your local Metrohm representative regarding the precise terms and conditions involved in concluding a corre- sponding maintenance agreement. -
Page 49: Parameters And Dosing Modes
■■■■■■■■■■■■■■■■■■■■■■ 6 Parameters and dosing modes 6 Parameters and dosing modes Manual dosing (DOS) 6.1.1 General description The dosing mode DOS is particularly suited for carrying out manual titra- tions with an indicator. A result can be calculated and a result report can be printed automatically from the dosed volume. -
Page 50: Selecting A Solution
■■■■■■■■■■■■■■■■■■■■■■ 6.1 Manual dosing (DOS) report if the corresponding settings have been carried out, see the follow- ing Chapter. The result of the calculation is shown under the volume display. The result and the dosing volume can be deleted by pressing the [FILL] key once more. -
Page 51: Calculation
■■■■■■■■■■■■■■■■■■■■■■ 6 Parameters and dosing modes Selection Dosing ramp | Volume Default value Dosing ramp Dosing ramp Dosing with uniform dosing rate (Dosing ramp = 0 s) or with slowly increasing dosing rate. Volume Dosing a fixed volume per dosing step. Dosing ramp This parameter is visible only when Mode = Dosing ramp. - Page 52 ■■■■■■■■■■■■■■■■■■■■■■ 6.1 Manual dosing (DOS) where: Volume Dosed volume Blank Blank value Titer Titer of the solution used Conc. Concentration of the solution used Factor Factor Sample size Sample size. The sample size and associated unit can be specified under Menu ▶ Sample data. If a bal- ance is connected, the sample size (with unit) can also be applied directly from the balance.
-
Page 53: Reports
■■■■■■■■■■■■■■■■■■■■■■ 6 Parameters and dosing modes Delete the unit entered under User-defined. A blank entry will be gener- ated in the selection list. % | /pc | L | g | g/L | mL | mg | mg/mL | mol | Selection mol/L | ppm | User-defined Default value... -
Page 54: Pulse Control
■■■■■■■■■■■■■■■■■■■■■■ 6.1 Manual dosing (DOS) The file name of the TXT file is constructed as follows: PC_LIMS_Report- ID1-YYYYMMDD-hhmmss.txt. on | off Selection Default value 6.1.6 Pulse control Menu ▶ Parameters ▶ Pulse control Pulse control Activates/deactivates the pulse control. For details about the pulse control, see chapter Pulse control, page 61. -
Page 55: Extended Dosing (Xdos)
■■■■■■■■■■■■■■■■■■■■■■ 6 Parameters and dosing modes Extended dosing (XDOS) 6.2.1 General description Usage The XDOS dosing mode can be used for a variety of purposes. Fixed volume dos- The volume and the dosing rate are specified. Time-controlled The volume and the time are specified. dosing Dosing according The dosing rate and the time are specified. -
Page 56: Selecting A Solution
■■■■■■■■■■■■■■■■■■■■■■ 6.2 Extended dosing (XDOS) 6.2.2 Selecting a solution Menu ▶ Parameters Solution Selection of the solution from the solution list. We recommend always selecting the solution. Solutions are defined under System ▶ Solutions. For exchange units with integrated data chip, a check is made in the method run to verify whether the correct solution has been attached. -
Page 57: Dosing Parameters
■■■■■■■■■■■■■■■■■■■■■■ 6 Parameters and dosing modes Figure 18 Tandem operation The two Dosimats operate alternately during dosing. If the dosing cylinder of one Dosimat needs to be filled, then the second Dosimat will take over the control of the dosing. The same dosing and filling speeds apply respectively for both Dosimats. -
Page 58: Reports
■■■■■■■■■■■■■■■■■■■■■■ 6.2 Extended dosing (XDOS) Volume The volume to be dosed. Input range 0.0000 - 99999.9 mL Default value 10.0000 mL Dosing rate The rate at which dosing takes place. The maximum dosing rate depends on the cylinder volume (see chapter 8.1.1, page 53). Input range 0.01 - 150.00 mL/min Selection... - Page 59 ■■■■■■■■■■■■■■■■■■■■■■ 6 Parameters and dosing modes Selection off | on Default value PC/LIMS The PC/LIMS report is a machine-readable report with all of the data important for a determination. The PC/LIMS report can be saved as a TXT file on a USB storage medium or sent via an RS-232 interface to a LIMS. The output location is defined in the system settings (see "PC/LIMS report", page 36).
-
Page 60: Operation And Maintenance
■■■■■■■■■■■■■■■■■■■■■■ 7 Operation and maintenance The 876 Dosimat plus requires appropriate care. Excess contamination of the instrument may result in functional disruptions and a reduction in the service life of the sturdy mechanics and electronics of the instrument. Severe contamination can also have an influence on the measured results. Regular cleaning of exposed parts can prevent this to a large extent. -
Page 61: Appendix
■■■■■■■■■■■■■■■■■■■■■■ 8 Appendix 8 Appendix Exchange unit 8.1.1 Maximum dosing and filling rate The maximum dosing rate and maximum filling rate for the exchange unit depend on the cylinder volume: Cylinder volume Maximum rate 1 mL 3.00 mL/min 5 mL 15.00 mL/min 10 mL 30.00 mL/min... -
Page 62: Stirring Rate
■■■■■■■■■■■■■■■■■■■■■■ 8.2 Stirring rate Stirring rate The stirring rate can be adjusted in steps from –15 to +15. The approximate rotational speed for the internal magnetic stirrer (depends on the product version) can be calculated with the following for- mula: Rotational speed/min (r/min) = 125 ·... -
Page 63: Usb Devices
■■■■■■■■■■■■■■■■■■■■■■ 8 Appendix NOTICE With some balances, the sample identification and the method can be sent in addition to the sample size. Make sure that the balance does not send the sample size until the end. Mettler AX For the Mettler AX balance, the fields that contain the sample identifica- tion or the method must be designated as follows: Designation for the field with the method name: METHOD ■... -
Page 64: Key Assignment Of A Usb Keyboard
■■■■■■■■■■■■■■■■■■■■■■ 8.4 USB devices Key of the 876 Dosimat plus Key on the numerical USB or function in the editing dia- keypad [OK] [Enter] [BS] (backspace) Clear [Del] Accept [Home] 8.4.2 Key assignment of a USB keyboard A commercially available USB keyboard can be connected to make it eas- ier to enter text and numbers. -
Page 65: Printer
■■■■■■■■■■■■■■■■■■■■■■ 8 Appendix 8.4.3 Printer The range of USB printers available is extremely varied and constantly changing. The following points must be taken into account when select- ing a printer: USB interface necessary ■ Printer language: HP-PCL, Canon BJL Commands, Epson ESC P/2 or ■... -
Page 66: Remote Interface
Pin assignment of the remote interface Figure 20 Pin assignment of remote socket and remote plug The above figure of the pin assignment applies for all Metrohm instru- ments with 9-pin D-Sub remote connector. Table 3 Inputs and outputs of the remote interface Pin No. -
Page 67: Status Diagram Of The Remote Interface
■■■■■■■■■■■■■■■■■■■■■■ 8 Appendix Pin No. Assignment Function Output 3 Pulse Output 4 Error 0 volt (GND) +5 volts Input 0 Start/Go Input 1 Stop/Fill Inputs +5 V approx. 5 kΩ Pull-up > 100 ms active = low, inactive = high Outputs Open Collector >... -
Page 68: Figure 22 Remote Status Diagram Dos With Pulse Control
■■■■■■■■■■■■■■■■■■■■■■ 8.6 Remote interface Dosing mode DOS with pulse control [GO] ready Output 0 Output 1 Output 2 Output 3 Pulse Error Output 4 Start Input 0 Stop Input 1 [Fill] Figure 22 Remote status diagram DOS with pulse control Dosing mode XDOS [GO] Output 0... -
Page 69: Pulse Control
■■■■■■■■■■■■■■■■■■■■■■ 8 Appendix Pulse control The 876 Dosimat plus can be controlled by a control device via an elec- tronic pulse control for simple dosing. Controlling is carried out via the 9- pin remote interface. The pulse control is integrated in the DOS method (manual dosing), whereby the pulse control replaces the manual dosing. -
Page 70: Remote Control Via An Rs-232 Connection
■■■■■■■■■■■■■■■■■■■■■■ 8.8 Remote control via an RS-232 connection During a method run, modifying certain parameters is possible as it is in manual dosing. The instrument shows the "Hold" status during pulse control. Deactivated parameters Parameters which directly affect the dosing are inactive during pulse con- trol operation. -
Page 71: Commands And Variables
■■■■■■■■■■■■■■■■■■■■■■ 8 Appendix On the 876 Dosimat plus, adjust the interface parameters under Menu ▶ System ▶ External devices ▶ COM2 settings. Transfer protocol The data communication is synchronous. On each command there is an acknowledgement by the instrument. A command must be sent to the instrument with the control characters CR LF as terminator. - Page 72 ■■■■■■■■■■■■■■■■■■■■■■ 8.8 Remote control via an RS-232 connection Command Function Comment $Q(variable) Request variable value List of variables, see below. Variable Comment VOLUME Dosed volume TITER Titer of selected solution CONC Concentration of selected solution Sample size (DOS only) RESULT Result (DOS only) RATE Dosing rate (XDOS only)
-
Page 73: Technical Specifications
■■■■■■■■■■■■■■■■■■■■■■ 9 Technical specifications 9 Technical specifications Dosing drive Resolution 10,000 steps per cylinder volume Exchange unit Cylinder volume 1 mL ■ 5 mL ■ 10 mL ■ 20 mL ■ 50 mL ■ Accuracy Fulfills ISO/DIN standard 8655-3 Interfaces USB (OTG) connec- For connecting USB devices. -
Page 74: Ambient Temperature
■■■■■■■■■■■■■■■■■■■■■■ 9.4 Ambient temperature Ambient temperature Nominal function +5 - +45 °C range (at a maximum of 85% humidity) Storage –20 - +60 °C Transport –40 - +60 °C Reference conditions Ambient tempera- +25 °C (±3 °C) ture ≤ 60% Relative humidity Operating temper- Instrument in operation at least 30 min... -
Page 75: 10 Accessories
Internet. You can download this information using the article number as follows: Downloading the accessories list 1 Enter https://www.metrohm.com/ into your Internet browser. 2 Enter the article number (e.g. 876) into the search field. The search result is displayed. -
Page 76: Index
■■■■■■■■■■■■■■■■■■■■■■ Index Index Stirring ....... 25 805 Dosimat Factor ......... 44, 45 Connect ......14 Filling rate Maximum ......53 Parameters ....... 41 Fixed volume ......47 PC/LIMS report ......36 Adapter Formula ........43 Pin assignment ......58 Connect ......11 Piston rod ........ - Page 77 ■■■■■■■■■■■■■■■■■■■■■■ Index Stirrer Time-controlled dosing ..... 47 Printer ........ 57 Connect ....... 9 Titration ........41 USB (OTG) Operate ......25 Type plate ........7 Connector ......7 Stirring rate ......25, 54 USB device Stop key ........8 Adapter ......11 Uninterrupted ......
Need help?
Do you have a question about the Dosimat plus 876 and is the answer not in the manual?
Questions and answers
need errors massge table