Table of Contents
Advertisement
Quick Links
Advertisement
Table of Contents

Subscribe to Our Youtube Channel
Related Manuals for AVOCOR E-30 Series


Summary of Contents for AVOCOR E-30 Series
- Page 1 E-30 Series AVE-5530 / AVE-6530-A / AVE-7530-A / AVE-8630-A Quick Start Guide...
- Page 2 Welcome to your new Avocor E-30-A Series display Your Avocor E-30-A series 4K interactive touch display supports 4K@60Hz resolution, up to 20 simultaneous touch points, multiple source inputs for your computers and peripheral devices, and the new intuitive Avocor UiQ on-screen display (OSD) menu.
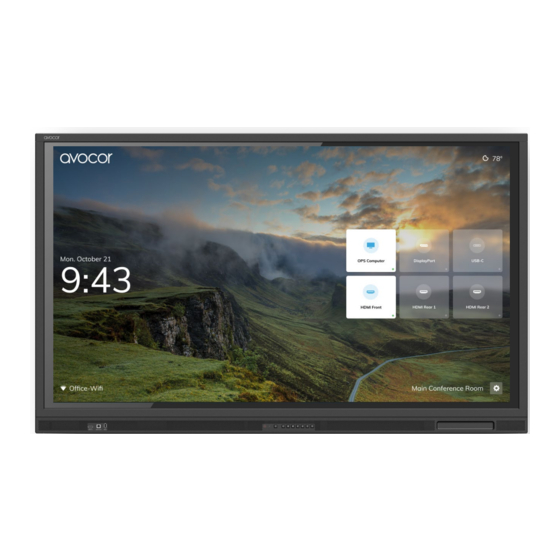
- Page 3 Welcome to Avocor UiQ Avocor’s UiQ is the new smart touch enabled dynamic user interface, with source preview and menu settings, that allows for remote control free usage.
- Page 4 Temperature C / F Source Preview & Selection Time, Date and Week Room Name & Settings Wi-Fi connection...
- Page 5 Select the gear icon to access the settings menu...
- Page 6 There are seven categorical tiles to choose from in the Settings menu: Display, Network, Language, Location & Time, Input, Security, and About. Touch one of these tiles to open a subset of configuration options for your chosen Settings category."...
- Page 7 • Name - Assign a name to the display. • Wallpaper - Set a default or custom user images for the Home Screen. • Energy Saving - Set Auto Power On/Off, Power On Time, Power Off Time, Eco Mode, OPS Always On, Display Sleep. •...
- Page 8 • Status - Shows Network & LAN status. • LAN - Set a Static IP or DHCP. • Wi-Fi - Configure Wi-Fi settings. • Wake On LAN - Toggle Wake On LAN.
- Page 9 Configure Wi-Fi settings • When the optional USB dongle is connected to the display you will see a list of available networks to choose from. • Now select your network and type in your password.
- Page 10 • Timezone - Set Timezone based on your city and region. • Auto Date & Time - Toggle Auto Date & Time on/off. • Use 24 Hour Time - Toggle 24 Hour Time on/off. • Date Format - Set a date format for the Home Screen.
- Page 11 • Favorite Source - Set the favourite source (Home Screen, OPS PC, HDMI Front, HDMI 1, HDMI 2, DisplayPort, Type C 55” Only). • Starting Source - Set the default source the display will show automatically upon powering on the display (Home Screen, OPS PC, HDMI Front, HDMI 1, HDMI 2, DisplayPort, Type C 55”...
- Page 12 • Require Passkey - Toggle Require Passkey on/off. • Set Passkey - Set a custom Passkey to access display settings.
-
Page 13: The Display At A Glance
The Display at a Glance 55” Guest Inputs Speakers Front Buttons Pen Tray Power Switch Power Socket OPS PC Slot Rear Ports... - Page 14 The Display at a Glance 65” Guest Inputs Speakers Front Buttons Pen Tray Power Switch Power Socket OPS PC Slot Rear Ports...
- Page 15 The Display at a Glance 75”|86” Guest Inputs Speakers Front Buttons Pen Tray Power Switch Power Socket OPS PC Slot Rear Ports...
- Page 16 Front Control Buttons and their Functions Control Buttons Description Red: Display is in stand-by mode (backlight is off) Green: Display is on (backlight is on) Power LED State Red/Green alternating: When display is shutting down Red/Green alternating: When Freeze or Blank is enabled Ambient Light Sensor Measures visible ambient light Press the button a notification will appear asking to turn off.
- Page 17 Display Input Sources 55”...
- Page 18 Display Input Sources 65” / 75” / 86”...
-
Page 19: Remote Control & Functions
Remote Control & Functions MUTE Toggle Mute on/off POWER Power on/off the display VOL. - Decreases the volume Navigate to the OPS input VOL. + Increases the volume Blanks the display. Press again BLANK to restore. SOURCE Open the Source selection menu Freezes the display. - Page 20 4. Press the Power button and the power LED indicator on the display will then light up in green, which tells you that the screen is switched 5. After a brief warm-up period, the Avocor UiQ interface will be displayed Switching off 1.
-
Page 21: Connecting The Display
Connecting the Display Proceed as follows to connect the display to your video sources, external controller. When connecting your equipment: 1. Turn off all equipment before making any connections. 2. Use the correct signal cables for each source. 3. For best performance and to minimise cable clutter, use high-quality cables that are only as long as necessary to connect two devices. - Page 22 1. Connect the enclosed Type C cable to the Type C port of the touchscreen and to the external PC. 2. Using the Avocor UiQ interface or Remote Control select the Type C source button or press the Source Button (see operating buttons) on the Front Connection bar to select Type C.
- Page 23 2. Connect the enclosed USB cable to the corresponding touch USB port (USB-A) of the touchscreen and to the USB port (USB-A) on the external PC. 3. Using the Avocor UiQ interface or Remote Control select the HDMI source button or press the Source Button (see operating buttons) on the Front Connection bar to select HDMI.
-
Page 24: Connecting To An External Pc Using A Displayport Connection
2. Connect the enclosed USB cable to the touch USB port (USB-A) of the touchscreen and to the USB port (USB-A) on the external PC. 3. Using the Avocor UiQ interface or Remote Control select the DisplayPort source button or press the Source Button (see operating buttons) on the Front Connection bar to select DisplayPort. -
Page 25: Enabling The Touch Screen
Enabling the Touch Screen Before setting up your display to support touch screen capability, ensure that: • The touch screen controller host computer is turned off. • The display is turned on. • The video output from the computer is connected to a video input on the display. -
Page 26: Installing An Ops Module
Step 5. Ensure the installation is complete before turning on the power. Step 6. Turn on the display. When using an Avocor OPS Pc you should see a green light on the side of the OPS, this will indicate that the OPS PC is switched on and operational. -
Page 27: Warranty & Support
(of on-site repair or unit exchange) Remember the first instance to look for known faults and how to resolve them on the avocor website www.avocor.com/support City State Please visit www.avocor.com/support to download the full E-30-A Postcode/ZIP County/State Series user manual. Days and hours of operation Loading &...
Need help?
Do you have a question about the E-30 Series and is the answer not in the manual?
Questions and answers