Table of Contents
Advertisement
Available languages
Available languages
Quick Links
Advertisement
Chapters
Table of Contents

Related Manuals for KNOVA KN SS-16LV


Summary of Contents for KNOVA KN SS-16LV
- Page 1 ” Variable speed scroll saw Sierra caladora de velocidad variable KN SS-16LV...
-
Page 2: Table Of Contents
Maintenance ..............11 Specific rules for the scroll saw .......... 3 Parts list ................12 Electrical information ............3 Schematic ................13 PRODUCT SPECIFICATIONS Model KN SS-16LV Blade stroke: 9/16” Motor: 120 V, 60 Hz, 1.2 A Cutting capacity: 2” to 90º... -
Page 3: General Safety Rules
GENERAL SAFETY RULES Safety is a combination of common sense, staying alert and 9. ALWAYS remove the power cord plug from the electrical knowing how your item works. outlet when making adjustments, changing parts, cleaning, or working on the tool. SAVE THESE SAFETY INSTRUCTIONS. -
Page 4: Specific Rules For The Scroll Saw
SPECIFIC RULES FOR THE SCROLL SAW - Carry the scroll saw by its base. Do not move the scroll - Do not start the saw with the work piece pressing saw by pulling on the power cord. Pulling on the power against the blade. -
Page 5: Know Your Scroll Saw
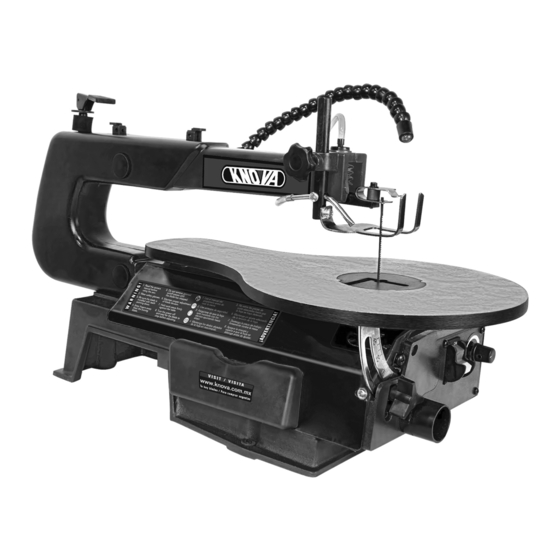
KNOW YOUR SCROLL SAW 1 - Blade tension knob 2 - Arm housing 3 - Rubber bearing covers 4 - Table 5 - Sawdust blower 6 - Storage area 7 - Base 8 - Bevel scale and pointer 9 - Table/bevel lock knob 10 - Lower blade holder 11 - Blade guard foot 12 - Blade guard root lock knob... -
Page 6: Assembly And Adjustments
ASSEMBLY AND ADJUSTMENTS UNPACKING 1. Remove the blade guard foot (1) using a Phillips head screwdriver (not included) to loosen the screw (2). Carefully unpack the scroll saw and all of its parts. Compare 2. Loosen the table bevel lock knob (3) and move the table them against the list below. - Page 7 ASSEMBLY AND ADJUSTMENTS 7. Loosen the screw (4) holding the bevel scale pointer and Blade guard foot adjustment (Fig. 7 and 8) position pointer to 0°. Tighten the screw. When cutting at angles, the blade guard foot should be 8. Attach the blade guard foot (1) so the foot rests flat adjusted so it is parallel to the table and rests flat above against the table.
- Page 8 ASSEMBLY AND ADJUSTMENTS CAUTION Any and all servicing should be performed by a qualified service center. BLADE REMOVAL AND INSTALLATION (Fig. 13 to 15) WARNING To prevent personal injury, always turn saw OFF and disconnect the plug from the power source before changing blades or making adjustments.
- Page 9 The KNOVA Scroll Saw accepts pinned blades in two of the workpiece. different positions to accommodate a wider variety of workpieces. Notice the two various slots for pinned blades 5.
-
Page 10: Operation
OPERATION RECOMMENDATIONS FOR CUTTING FREEHAND CUTTING (Fig. 21) A scroll saw is basically a curve-cutting machine. It can also 1. Lay out desired design, or secure design to the work piece. be used for straight cutting and beveling or angle cutting 2. - Page 11 OPERATION ANGLE CUTTING (BEVELING) (Fig. 22) 1. Layout or secure design to work piece. 2. Move the blade guard foot to the highest position by loosening the height adjustment knob (1). Retighten. 3. Tilt the table to the desired angle by loosening the table bevel lock handle (2).
-
Page 12: Maintenance
OPERATION CAUTION: In order to avoid uncontrollable lifting of the 9. Slowly feed the work piece into the blade, guiding work piece and reduce blade breakage, do not turn the the work piece against the straight edge and pressing switch on while the work piece is against the blade. the work piece down against the table. -
Page 13: Parts List
PARTS LIST I.D. No. I.D. No. D e s c r i p t i o n Qty. D e s c r i p t i o n Qty. Base Inner hex screw and spring washer assembly M5 x 16 Bolt M6 x 20 Clamping board Fix plate... -
Page 14: Schematic
SCHEMATIC (406.4 mm) -
Page 15: Especificaciones
Reglas especificas para la sierra caladora de banco ..15 Lista de piezas ..............25 Información eléctrica ............16 Esquema ................26 ESPECIFICACIONES Modelo Carrera de la segueta: KN SS-16LV 14.3 mm (9/16”) Motor: 120 V, 60 Hz, 1.2 A Capacidad de corte: 50.8 mm (2”) a 90º Velocidad: Inclinación de masa:... -
Page 16: Reglas Generales De Seguridad
REGLAS GENERALES DE SEGURIDAD La seguridad es una combinación de sentido común, 10. MANTENGA LAS PROTECCIONES EN SU LUGAR Y EN mantenerse alerta y saber cómo funciona su artículo.. FUNCIONAMIENTO. 11. EVITE ARRANQUES ACCIDENTALES. Asegúrese de GUARDE ESTAS INSTRUCCIONES DE SEGURIDAD. que el interruptor de encendido esté... -
Page 17: Información Eléctrica
REGLAS ESPECIFICAS PARA LA SIERRA CALADORA DE BANCO - No meta la mano debajo de la mesa de la sierra de calar 2. Antes de mover la sierra de calar, desenchufe el cable de cuando el motor esté funcionando. alimentación del tomacorriente. - No use ropa suelta o joyas. -
Page 18: Conozca Su Sierra Caladora De Banco
INFORMACION ELÉCTRICA Utilice un circuito eléctrico independiente para sus herramientas. placa de identificación del motor. Este circuito debe tener al menos de un cable # 12 y debe El funcionamiento a un voltaje más bajo dañará el motor. estar protegido con un interruptor ó pastilla eléctrica de 15 A. ADVERTENCIA: Esta herramienta debe estar conectada Antes de conectar el motor a la línea eléctrica, asegúrese de a tierra mientras esté... -
Page 19: Montaje Y Ajustes
MONTAJE Y AJUSTES DESEMBALAJE 1. Retire el pie del protector de la hoja (1) con un destornillador Phillips (no incluido) para aflojar Desempaquete con cuidado la sierra de calar y todas sus el tornillo (2). partes. Compárelos con la lista a continuación. No deseche 2. - Page 20 MONTAJE Y AJUSTES Ajuste del pie del protector de la hoja (Fig.7 y 8) 7. Afloje el tornillo (4) que sostiene el indicador de escala de bisel y coloque el indicador en 0 °. Ajustar el tornillo. Al cortar en ángulo, el pie del protector de la hoja debe 8.
- Page 21 MONTAJE Y AJUSTES PRECAUCION Todos y cada uno de los servicios deben ser realizados por un centro de servicio calificado. DESMONTAJE E INSTALACIÓN DE LA CUCHILLA (Fig.13 a 15) ADVERTENCIA Para evitar lesiones personales, siempre apague la sierra y desconecte el enchufe de la fuente de alimentación antes de cambiar las seguetas o hacer ajustes.
- Page 22 AJUSTE DE LA DIRECCIÓN DE LA HOJA (Fig.16 y 17) en la mesa después de insertar de segueta La sierra caladora de banco Knova acepta seguetas con perno con cuidado la segueta a través superior en dos posiciones diferentes para adaptarse a una variedad de la ranura del inserto de más amplia de piezas de trabajo.
-
Page 23: Operación
OPERACIÓN RECOMENDACIONES PARA EL CORTE ADVERTENCIA Para evitar lesiones por arranques accidentales, siempre apague el interruptor y Una sierra caladora es básicamente una máquina de corte de desenchufe la sierra de calar antes de mover la curvas. También se puede utilizar para operaciones de corte herramienta, reemplazar la hoja o hacer ajustes. - Page 24 OPERACIÓN CORTE EN ANGULO (BISELADO) (Fig.22) 1. Disposición o diseño seguro a la pieza de trabajo. 2. Mueva el pie del protector de la segueta a la posición más alta aflojando la perilla de ajuste de altura (1). Vuelva a apretar.
-
Page 25: Mantenimiento
OPERACIÓN PRECAUCIÓN: Para evitar el levantamiento incontrolable 9. Introduzca lentamente la pieza de trabajo en la segueta, de la pieza de trabajo y reducir la rotura de la segueta, no guiando la pieza de trabajo contra la regla y presionando encienda el interruptor mientras la pieza de trabajo está... -
Page 26: Lista De Piezas
LISTA DE PARTES D e s c r i p c i ó n Cant. D e s c r i p c i ó n Cant. Base Conjunto de arandela de resorte y tornillo hexagonal interior M5 x 16 Perno M6 x 20 Placa de sujeción Placa fija... -
Page 27: Esquema
ESQUEMA (406.4 mm) - Page 28 www.knova.com.mx...
Need help?
Do you have a question about the KN SS-16LV and is the answer not in the manual?
Questions and answers