Takara Belmont Lancer Operation Manual
Barber chair
Hide thumbs
Also See for Lancer:
- Operation manual (28 pages) ,
- Installation manual (4 pages) ,
- Operation manual (28 pages)
Table of Contents
Advertisement
Quick Links
Takara Belmont Barber Chair
L a n c e r
AB-HPEN
Model No.:
Operation Manual
Takara Belmont would like to thank you for purchasing
this Takara Belmont product.
Be sure to read this operation manual
before operating the chair and always
operate the chair properly according to
the instructions herein.
Failure to read this operation manual may lead to accidents.
This product is designed for commercial use in barber shops
and beauty salons.
Do not use this chair for any applications other than
hairdressing/beauty-related procedures.
Store this operation manual in a secure location and refer to
it whenever necessary.
Inform Takara Belmont of the book number on
the back cover to obtain a new operation manual
if this booklet becomes torn , damaged, unreadable,
or lost.
Contents
1 to 6
6
7
7
8
8 to 9
10
11 to 12
13
14 to 15
16 to 17
18
19
19
20 to 21
22
23
23
Advertisement
Table of Contents

Related Manuals for Takara Belmont Lancer


Summary of Contents for Takara Belmont Lancer
-
Page 1: Table Of Contents
20 to 21 Daily Inspection Procedures Specifications Standard Period of Use Takara Belmont would like to thank you for purchasing Disposing of this Product this Takara Belmont product. Be sure to read this operation manual before operating the chair and always operate the chair properly according to the instructions herein. - Page 3 All these precautions describe important items related to safety. Be sure to always obey all the precautions contained in this manual. Takara Belmont has absolutely no responsibility for accidents that might be caused by failure to obey "Safety Precautions", "Notes for Use" and "Notes Related to Synthetic (Natural) Leather" resulting in injury to users and other persons, or other damage.
- Page 4 Sudden operation of the chair can result in injury. Installation precautions Installation of this chair must be performed by specialized personnel (personnel from Takara Belmont or Takara Belmont specified representative). The chair must be installed on a perfectly flat and solid floor.
- Page 5 Safety Precautions (Must be Obeyed) WARNING Precautions when changing the preset positions Before and while setting the preset positions, thoroughly check that there are no bodies or limbs of persons, or possible obstacles in the operating range of the chair or the area around the chair. There is a danger of body parts being pinched by the chair, resulting in injury or damage.
-
Page 6: Safety Precautions (Must Be Obeyed) 1 To
Safety Precautions (Must be Obeyed) WARNING Precautions during chair rotation Please rotate the chair after confirming that your customer is surely sitting. Confirm that there is no one around chair and be careful that the step etc. do not come in contact with the customers or equipment. - Page 7 Be constantly careful of and inspect for looseness, rattling, tilting, vibration, noise, odors and other possible problems. If you feel that something seems slightly different or not normal, immediately stop using the chair, unplug the power plug, and contact your closest dealer or Takara Belmont. Be extremely careful not to mistake the switches when operating.
-
Page 8: Notes For Use
Safety Precautions (Must be Obeyed) CAUTION Be careful that the power supply code does not come in contact with the adjuster under the step. Be careful that the adjuster does not rub against the floor and does not catch on the power supply code when you rotate the chair for adjusting the adjuster. -
Page 9: Locations Of Warning Labels
Locations of Warning Labels Notes Related to Synthetic (Natural) Leather Clothing dye adhering The color of clothing or belts can be transferred to the synthetic leather of this chair by means of contact. If color adheres to the leather, wipe off the stain as soon as possible by using a soft cloth that has been dabbed with a neutral detergent diluted with water to approximately 10% in order to prevent the stain from soaking in due to the plasticizer. -
Page 10: Accessories
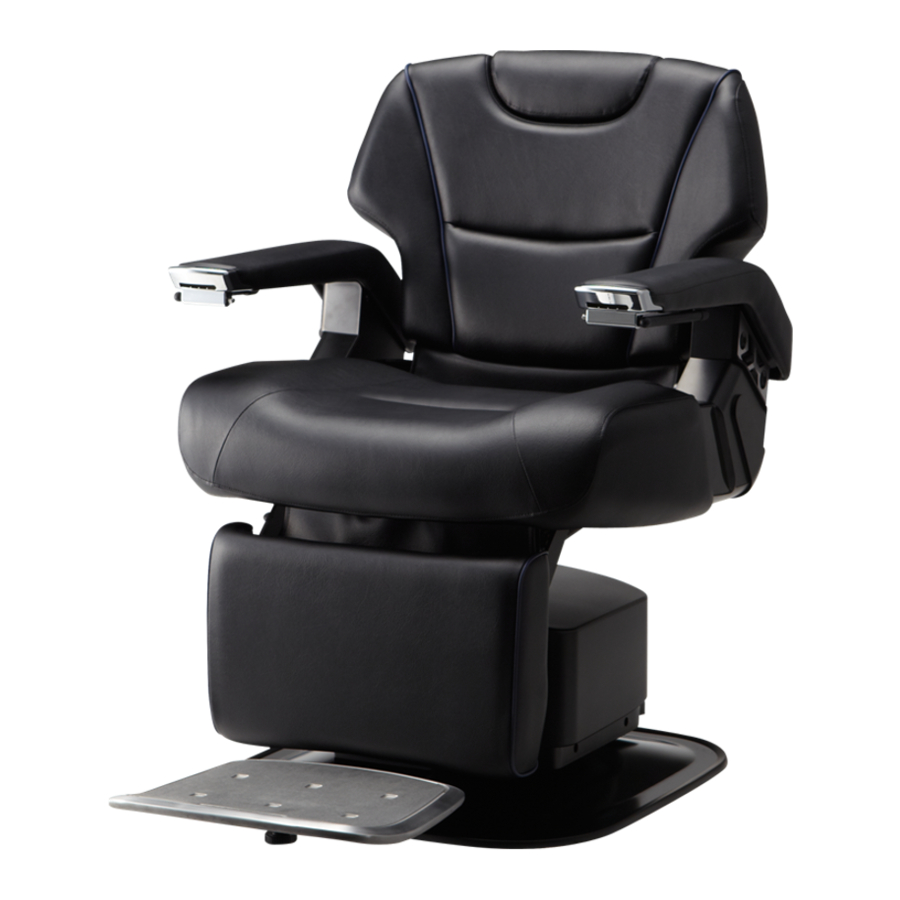
Accessories • Operation manual (this manual) • Installation manual • Flange nut (M6) 3 pcs. • Rubber ring • Step (with adjuster) Name of Components ■Main Unit Headrest (with headrest cover) Backrest Armrest Cape holder Control panel cover Seat Step post Step Headrest button Control panel... - Page 11 Name of Components ■Operating Section Control Panel (right) Right (1) Rotation lock switch (2) Backrest switch (3) UP/DOWN switch These are collectively referred to as the "Control Panel". (4) Preset switch P1 (5) Preset switch P2 (6) Auto-return switch Foot Control Power switch (Breaker) Base UP/DOWN foot switch...
-
Page 12: Preparation
Preparation ■Power Supply 1. Insert the power plug into the outlet. • Use an shared outlet with an attached ground terminal which is perfect for rated voltage and current of this production* Power cord outlet with an attached ground terminal. Using the same outlet together with the Grounded outlet box power plug of other devices can result in... -
Page 13: How To Use
How to Use (1) Guiding Customers 1. Rotate the chair so that the customer can be easily seated on the chair. 1 Release the base rotation with the rotation lock switch. <Control Panel> Pressing the rotation lock switch on the control panel releases the base rotation. - Page 14 How to Use 2. Using the cape holder Using the cape holder: Provides space between the customer and the cutting cape to provide good ventilation. Makes it easy to clean up the cut off hair. 1 Pull the cape holder located at the edge of the armrest outward, and rotate it forward. Pull out the cape holder outward by holding around the axis of the cape holder.
-
Page 15: Raising/Lowering The Chair
How to Use (2) Raising/Lowering the Chair 1. Raising the chair To raise the chair, step on the right side of the UP/DOWN foot switch at the foot control or press the UP/DOWN switch of the control panel upwards. The chair is raised while stepping on (pressing) the switch. ⇒If the chair rotation lock is released, the chair rotation gets locked automatically when you press the switch. -
Page 16: Reclining/Raising The Backrest 14 To
How to Use (3) Reclining/Raising the Backrest 1. Pull out the headrest. Use the headrest when supporting the customer's head is needed, such as for shaving. Do not use the headrest if it is not needed, such as for back shampooing. 1 Put your hand in between the headrest and backrest to pull up the headrest. - Page 17 How to Use 2. Reclining the backrest Push the backrest switch of the control panel in the direction of the arrow as shown in the below-left figure to recline the backrest. Push the switch toward the back of the chair. The backrest reclines while the switch is pressed.
-
Page 18: Using Preset Functions 16 To
How to Use (4) Using Preset Functions 1. Using the preset function A press of the preset switch moves the chair to the preset position. Two preset positions are available for this chair. 1 Pull the headrest out to the desired position previously if you need to use it. 2 Press the preset switch on the control panel once. - Page 19 How to Use 2. Using the auto-return function Press the auto-return switch on the control panel once. The chair height and backrest angle return to their initial position for getting in/out of chair. (An electronic "pough" sound is emitted to notify you that operation is starting.) ⇒If the chair rotation lock is released, the chair rotation gets locked automatically when you press the auto-return switch.
-
Page 20: Care And Maintenance
Care and Maintenance Clean this chair after use to maintain it in a clean state. Leaving dirt or grime on the chair can result in the formation of mold. Always be sure to unplug the power plug from the outlet when cleaning the chair. ■Cleaning of Each Part Leather Parts Plastic Parts... -
Page 21: Daily Inspection
If any of the problems described above are inspected and the chair does not work normally even after performing the recovery procedures, immediately stop using the chair, turn off the power, unplug the power plug, and contact your closest dealer or Takara Belmont. -
Page 22: Daily Inspection Procedures 20 To
Stop using the chair, turn off the power, unplug the power plug, and contact your closest dealer or Takara Belmont. □Check that the chair raises □Perform the procedures indicated in "(2) and lowers by using the Raising/Lowering the Chair"... - Page 23 Takara Belmont to inform of the abnormal situation. □Check that no oil is leaking. □Check that no oil has dripped on □Oil might be leaking from hydraulic parts.
-
Page 24: Specifications
Specifications Model No. AB-HPEN Weight 109 kg (240 lb) Max. load 1,350 N (135 kgf/300 lbf) Operating noise volume 70 dB or less Usage environment Temperature 0 〜 40ºC Humidity 10 〜 95% Air pressure 700 〜 1060 hPa Transportation / Storage environment Temperature -20 〜... -
Page 25: Standard Period Of Use
(including parts replacement). This is not a warranty period. The length of the "standard period" differs depending on the use environment and frequency of use of the customer. For maintenance after the standard period of use, contact your closest dealer or Takara Belmont. Disposing of this Product... - Page 26 MEMO...
- Page 27 MEMO...
- Page 28 NOTE TAKARA BELMONT CORPORATION 2-1-1, Higashishinsaibashi, Chuo-ku, Osaka, 542-0083, Japan TEL:81-6-6212-3523 FAX:81-6-6211-5745 Printed in Japan 1710 BOOK.No : 1E04KXDE Original instruction...
Need help?
Do you have a question about the Lancer and is the answer not in the manual?
Questions and answers