Rational iVario Original Instructions For Use
Hide thumbs
Also See for iVario:
- Original installation manual (120 pages) ,
- Original instructions for use (96 pages) ,
- Original installation instructions (20 pages)
Table of Contents
Advertisement
Advertisement
Table of Contents

Related Manuals for Rational iVario


Summary of Contents for Rational iVario
- Page 1 ® iVario Original instructions for use...
- Page 2 TO REDUCE THE RISK OF FIRE OR ELECTRIC SHOCK, DO NOT REMOVE THIS COVER. NO USER-SERVICEABLE PARTS INSIDE. REPAIR SHOULD BE DONE BY AUTHORIZED SERVICE PERSONNEL ONLY.
-
Page 3: Table Of Contents
Explanation of warnings .................................. 1.5.4 Illustrations ......................................1.5.5 Technical changes....................................2 The iVario........................................10 3 General safety information ..................................11 Personal protective equipment................................12 4 Working with the unit....................................13 Initial start-up ........................................ 13 Switching the unit on and off..................................13 Home screen........................................ - Page 4 5.2.5 Soups and sauces....................................30 5.2.6 Milk and desserts ....................................30 5.2.7 Finishing ....................................... 31 Prerequisites, information and warnings .............................. 31 Cooking food intelligently ..................................33 5.4.1 Accessing intelligent cooking paths............................. 33 5.4.2 Starting an intelligent cooking path ............................. 33 Fine-tuning your results.....................................
- Page 5 8.1.2 Creating your own tickets................................51 8.1.3 Editing the ticket board ................................... 52 Pan division ........................................53 8.2.1 Pre-set pan divisions ..................................53 8.2.2 Creating your own pan divisions ..............................54 8.2.3 Dividing the pan into zones................................55 Pan assignments ......................................56 8.3.1 Preset pan layout ....................................
- Page 6 11.7.3 Delete all programs................................... 70 11.7.4 Export and import images ................................70 11.7.5 Delete all own images ..................................71 11.7.6 Exporting and importing profiles..............................71 11.7.7 Delete all own profiles ..................................71 11.7.8 Exporting and importing unit default settings.......................... 71 11.7.9 Delete all user data ....................................
- Page 7 14 Inspiration and help ....................................85 14.1 Unit help function......................................85 14.2 Telephone help......................................85 14.3 Service-related help..................................... 85 14.3.1 Transmitting service data to ConnectedCooking automatically ..................85 14.3.2 Querying service data ..................................85 14.4 Troubleshooting ......................................85 14.4.1 Messages during cooking ................................86 14.4.2 Messages during pressure cooking (optional) ..........................
-
Page 8: Introduction
Do not use this device outdoors. This unit must not be used for continuous mass industrial food production. Any other use runs counter to its intended purpose, and could be dangerous. RATIONAL AG assumes no liability for consequences of improper use. -
Page 9: Explanation Of Pictograms
1 | Introduction 1.5.2 Explanation of pictograms The following pictograms are used in this document: Caution! Read the instructions for use before using the unit. General warning symbol Useful information to help you use your unit. 1.5.3 Explanation of warnings The following warnings are used to advise you of potentially dangerous situations and how to avoid them. -
Page 10: The Ivario
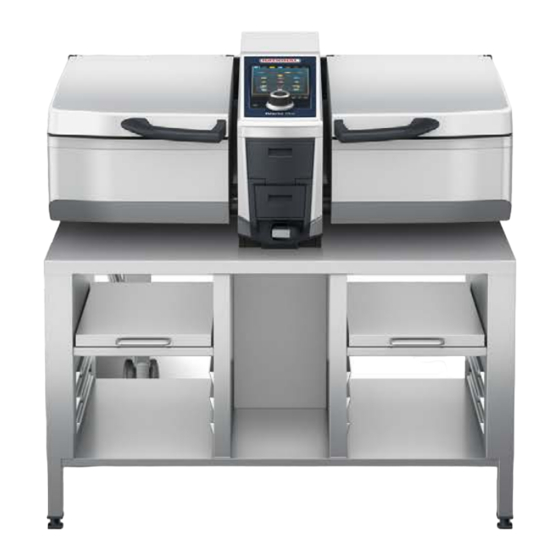
2 | The iVario The iVario Seal core temperature probe Automatic lifting and lowering arm (accessory) Display Steam nozzle Pan lid automatic water filling Locking system (optional) Central selection knob Plug USB port Pan valve Hand shower Type 2-XS Type 2-S Please note that units without pressure cooking function have one steam nozzle. -
Page 11: General Safety Information
All maintenance on this unit should be performed by your RATIONAL Service Partner. Do not modify the unit or the way your RATIONAL Service Partner has installed it. Do not use the unit if it is damaged. Damaged units are unsafe and could cause burns or other injuries. -
Page 12: Personal Protective Equipment
3 | General safety information – Exercise caution when opening the pan lid during use - Hot steam may escape. – Do not fill the preheated pan with cold water. – Always tilt full pans slowly and carefully. Quick, jerky movements can cause hot food or liquid to splash out. -
Page 13: Working With The Unit
Initial start-up When you start your unit for the first time, it will have already been properly installed by a RATIONAL Service Partner, so it will be ready to use. Information related to installation is available in the installation manual included in delivery. -
Page 14: Home Screen
4 | Working with the unit Home screen Programming mode iZoneControl iCookingSuite Height adjustment home search assistant Manual operating modes Favorites Intelligent operating modes cooking method Actions Back / Cancel Help Date, time, status Settings iZoneControl [} 50] Please note that this intelligent assistant is optional on 2-XS models. Intelligent cooking - iCookingSuite [} 26] Home Pressing this button will take you to the home screen. -
Page 15: General View And Focus View
4 | Working with the unit Pressing this button will take you back to the previous screen. Press and hold this button in order to cancel a cooking process. 4.3.1 General view and focus view If you switch on the unit, an overview of both pans is shown on the home screen. To start a cooking path, you will need to select one of the two pans. -
Page 16: Date, Time, Status
4 | Working with the unit 1. You can set cooking paths and programs as favorites while in iCookingSuite or programming mode. 2. Press this button: 3. Press this button: >> All cooking paths and programs marked as favorites will be displayed. 4.3.3 Date, time, status The footer bar always shows the current date and time, as well as the status of the following ports and... -
Page 17: Interacting With The Unit
4 | Working with the unit Symbol Function Close pan lid [} 18] Tilting the pan [} 20] Lower pan [} 20] Automatic water intake [} 19] Open pan valve [} 21] Close pan valve [} 21] Interacting with the unit NOTE Improper display operation Using a sharp object to operate the display could damage the display. 1. -
Page 18: Fill Levels For Pressure Cooking (Optional)
Mechanically defective pan lids can cause injury. 1. Open the pan lid fully and do not close it again. 2. Contact your RATIONAL Service Partner. NOTE Closing the pan lid when the pan is in a tilted position can damage the pan lid or the pan lid seal. -
Page 19: Filling The Pan Using The Automatic Water Intake
4 | Working with the unit Open pan lid CAUTION! Scalding hazard! If the unit is in operation, hot steam may billow out. Grasp the pan lid by the handle to open it. Closing the pan lid You can close the pan lid both manually and automatically. To close the pan lid automatically, the function must be activated in the settings: The pan is lowered [} 20]. -
Page 20: Tilting And Lowering The Pan
4 | Working with the unit > This button will begin flashing: Pressing that button or the central selection knob will cancel the automatic water intake process. Tilting and lowering the pan Tilting the pan WARNING Tilting the pan can result in hot food or liquid splashing out. Having hot food or liquid splashed onto you could cause scalding injuries. -
Page 21: Opening And Shutting The Pan Valve
4 | Working with the unit > This button will begin flashing: Pressing that button or the central selection knob will again will stop lowering the pan. > The process stops automatically just before the pan is all the way down. This is a safety precaution. 2. - Page 22 4 | Working with the unit CAUTION Sharp core temperature probe If you are not careful with the core temperature probe, you could injure yourself on the sharp tip. 1. Always wear gloves when working with hot core temperature probes. 2.
-
Page 23: Using The Hand Shower
4 | Working with the unit Vegetables, e.g., potatoes 1. Insert the core temperature probe into the thickest part of the meat, all the way to the handle. Soups, sauces, and desserts 1. Place the core temperature probe into the pan so that the core temperature probe is completely immersed in the liquid. -
Page 24: Adjusting The Height Of The Unit (Optional)
4 | Working with the unit WARNING Water evaporates explosively when poured into hot grease or oil. Using water to extinguish smoking grease or oil could cause an explosion. 1. Never pour water into hot oil or grease. 2. If a fire breaks out, close the pan lid in order to cut off the fire’s oxygen supply. Switch the unit off. If the fire has spread, use a fire extinguisher that is suitable for grease fires. - Page 25 If the height adjustment mechanism is defective, the unit may collapse to the ground, which could result in injuries. 1. Do not adjust the height any further. 2. Contact your RATIONAL Service Partner. NOTE Objects placed beneath the height-adjustable stand, or beneath a unit with height-adjustable feet When objects are underneath an adjustable stand or a unit with height-adjustable feet, adjusting the height of the unit could damage the stand and/or the unit.
-
Page 26: Intelligent Cooking - Icookingsuite
Intelligent cooking - iCookingSuite The iCookingSuite is the cooking intelligence in the iVario. You specify which type of food you want to prepare using which cooking method, and then you’ll be taken to a list of cooking paths to choose from in order to get the results you want. -
Page 27: Intelligent Cooking Paths
5 | Intelligent cooking - iCookingSuite Soups and sauces Egg dishes Milk and desserts Each operating mode is assigned a specific set of intelligent cooking paths. Intelligent cooking paths 5.2.1 Meat Fry natural + breaded Select this cooking process if you want to pan fry meat pieces. Steam Select this cooking process if you want to steam meat pieces. -
Page 28: Seafood
5 | Intelligent cooking - iCookingSuite Low-temperature braise Select this cooking path if you are braising pieces of meat typically cooked in sauce either overnight or while not in the kitchen. The recommended core temperature in the low-temperature braise cooking path is lower than in the braise cooking path. -
Page 29: Egg Dishes
5 | Intelligent cooking - iCookingSuite Boil potatoes Select this cooking process if you want to boil potatoes. Potatoes, pressure cooked Select this cooking path if you want to pressure cook potatoes. Boil Select this cooking process if you want to boil or blanch vegetables or side dishes in stock or water. Pressure cook Select this cooking path if you want to pressure cook side dishes or vegetables. -
Page 30: Soups And Sauces
5 | Intelligent cooking - iCookingSuite Pancakes Select this cooking process if you want to cook pancakes or blinis. Scrambled eggs Select this cooking process if you want to cook scrambled eggs. Fried eggs Select this cooking process if you want to cook fried eggs. Tamagoyaki Select this cooking path if you would like to prepare Japanese tamagoyaki. -
Page 31: Finishing
5 | Intelligent cooking - iCookingSuite Deep-fry Select this cooking process if you want to fry desserts in fat. Stew fruit Select this cooking process if you want to cook fruit compote from fresh or frozen fruit, marmalades, jams or chutneys. - Page 32 5 | Intelligent cooking - iCookingSuite Tilt pan completely This indicates that you have finished deep-frying food, and have not yet raised the pan all the way in order to drain out the frying oil. 1. Tilt the pan all the way [} 20]. 2.
-
Page 33: Cooking Food Intelligently
5 | Intelligent cooking - iCookingSuite You have not yet tilted the pan fully after deep-frying. Tilt the pan all the way [} 20]. Cooking food intelligently 5.4.1 Accessing intelligent cooking paths You can access intelligent cooking paths in three ways: About iCookingSuite About programming mode [} 58] About the search assistants... -
Page 34: Fine-Tuning Your Results
5 | Intelligent cooking - iCookingSuite 1. Select a pan. 2. In the menu bar, press this button: 3. Press this button: 4. Press this button: Braising / Stewing > The intelligent cooking path will start, and the pan will be preheated to the preset temperature. 5. -
Page 35: Prompts
5 | Intelligent cooking - iCookingSuite product size Use this parameter to specify the size of the individual products you are preparing. Select small for fillet strips or breast of quail. Select large for roast beef, whole duck, or pork belly. Select small for sesame seeds. -
Page 36: Information
5 | Intelligent cooking - iCookingSuite Core temperature probe in product Insert the core temperature probe into the food. Core temperature probe in cooking liquid Place the core temperature probe into the cooking liquid. Fill with oil Pour oil into the pan. Insert pan base rack Lay the pan base rack into the pan. -
Page 37: Options
5 | Intelligent cooking - iCookingSuite 5.5.4 Options When a cooking path finishes, you can continue it using one of the following options. Options are displayed in the cockpit and next to the cooking parameters. New batch Use this option to load another batch into the unit and resume the same cooking path with the defined cooking parameters. -
Page 38: Monitoring An Intelligent Cooking Path
5 | Intelligent cooking - iCookingSuite Monitoring an intelligent cooking path Once you have started an intelligent cooking path, the display switches to the cockpit after a short time. All cooking steps are shown here, which the intelligent cooking path runs through one after the other. The active cooking step is marked. -
Page 39: Manual Cooking
6 | Manual cooking Manual cooking With the manual modes, the iVario supports you in your personal craft. Select an operating mode to specify whether you’d like to boil, pan-fry, or deep-fry. Then set a pan temperature and a cooking time, and make any remaining decisions yourself. Manual modes give you total control over exactly how your food turns out. -
Page 40: Additional Functions
6 | Manual cooking Level 3: rolling boil 6.2.2 Additional functions Preheat This additional function is for preheating the pan to a defined temperature. Gentle simmer This additional function heats the pan in a way that prevents milk and other delicate foods from scalding or boiling over. -
Page 41: Boil Food
6 | Manual cooking 6.3.2 Boil food 1. Select a pan. 2. In the menu bar, press this button: 3. Press this button: 4. Set the temperature of the pan base. > PowerBoost level 1 is activated automatically. You can change the PowerBoost level, select the function Gentle cooking or the function Delta-T cooking. -
Page 42: Temperature Range
6 | Manual cooking – Never fill the pan above the maximum or below the minimum fill level. – Ensure that the core probe is dried off before starting the roasting. – Do not add large quantities of wet food to hot oil or fat. To prevent fire risk: –... -
Page 43: Deep-Fry
6 | Manual cooking 11. If the results are the way you want them, remove the food from the pan. Deep-fry 6.5.1 General safety information To avoid scalding and burn injuries: – Wear personal protective equipment to protect yourself against burns and scalding. -
Page 44: Filling And Emptying The Pan With Oil Or Fat
6 | Manual cooking 6.5.4 Filling and emptying the pan with oil or fat Use the oil cart to easily fill and empty the pan with oil or fat. You can pump oil or fat into the pan with a maximum temperature of 180 °C using the oil cart. -
Page 45: Deep-Frying Food
8. Set the temperature of the pan base. NOTE! If the oil or fat reaches a temperature of 230°C due to a technical problem, the unit switches off automatically for your safety. Contact your RATIONAL service partner to put the appliance back into operation. -
Page 46: Cancel Manual Cooking
6 | Manual cooking 16. If you are happy with the cooking result, remove the deep-frying baskets. Cancel manual cooking General view If you are cooking in both pans, you can cancel both cooking paths at the same time from the General view [} 15] screen. -
Page 47: Pressure Cooking (Optional)
In this case, RATIONAL recommends running the pressure cooking weekly using the minimum required quantity of water. This will help keep the pressure cooking system running smoothly. -
Page 48: Prompts
7 | Pressure cooking (optional) – Open the pan lid carefully after pressure cooking. Hot food can foam over or spray out. Prompts The following additional prompts are displayed during pressure cooking. Maximum fill level complied with You are asked to confirm that you have not exceeded the maximum fill level in the pan. More information is available here: Fill levels [} 17] 1. - Page 49 7 | Pressure cooking (optional) 1. Select a pan. 2. In the menu bar, press this button: 3. Press this button: > The unit is preheating. 4. To cook based on cooking time, press this button: 5. Set the cooking time. 6.
-
Page 50: Izonecontrol
8 | iZoneControl iZoneControl With iZoneControl, you can divide the pan base into individual heating zones and use them at different temperatures. Unused areas can even remain cold. All you have to do is specify the results you want and start cooking paths for each zone. -
Page 51: Creating Your Own Tickets
8 | iZoneControl 1. In the menu bar, press this button: 2. Press this button: > The preset tickets will be displayed. >> You can now place [} 57] the tickets or create your own tickets [} 51]. 8.1.2 Creating your own tickets You can add any desired manual operating mode, intelligent cooking path or any desired program to the ticket board. -
Page 52: Editing The Ticket Board
8 | iZoneControl Saving the ticket board 1. To give the ticket board a name, press this button: 2. To add the ticket temporarily to the ticket board, press the button: 3. To save the ticket board, press the button: >>... -
Page 53: Pan Division
8 | iZoneControl Programming mode 1. In the menu bar, press this button: 2. Press the following button after the desired program shopping cart: 3. Press this button: 4. In the menu bar, press this button: 5. Press this button: >... -
Page 54: Creating Your Own Pan Divisions
8 | iZoneControl 3. Select a preset pan division. 4. Select a pan. >> The pan base is automatically divided into zones. You can now assign tickets to the zones. 8.2.2 Creating your own pan divisions 1. In the menu bar, press this button: 2. -
Page 55: Dividing The Pan Into Zones
8 | iZoneControl 1. To edit a pan division, press this button: 2. Press this button: 3. Tap the additional areas of the pan you would like to include. > The zone is adapted in line with your wishes. 4. To confirm the zone, press 5. -
Page 56: Pan Assignments
8 | iZoneControl > The zone will be confirmed. 9. To add another zone, tap a part of the pan that has not yet been assigned to a zone. 10. To delete a confirmed zone, press 11. Press this button: Pan assignments 8.3.1 Preset pan layout... -
Page 57: Cooking With Izonecontrol
8 | iZoneControl Cooking with iZoneControl You can cook food using one of 4 methods: Preset tickets [} 50] Preset pan layouts [} 56] Manual operating modes [} 57] Intelligent cooking paths [} 57] 8.4.1 Manual operating modes 1. In the menu bar, press this button: 2. -
Page 58: Programming Mode
9 | Programming mode Programming mode You can create, save, and manage your own manual programs [} 59], intelligent cooking paths [} 61] and shopping carts [} 58] in programming mode. You can choose from among any of the available manual operating modes, intelligent cooking paths and pre-programmed shopping carts. Create new program Manual operating modes shopping cart... -
Page 59: Creating Programs Manually
9 | Programming mode Saving a shopping cart 1. To give the shopping cart a name, press this button: 2. Enter a name. 3. To save the shopping cart, press this button: >> The shopping cart will be shown in the list of programs. Creating programs manually The following operating modes are available to you: Boil... - Page 60 9 | Programming mode 7. To edit a cooking step, press this button: > The cooking parameters and additional functions available for that operating mode will be displayed. 1. Adjust the cooking step as desired. 2. To save your changes, press this button: Pre-selected start times and program images Use this function once you have imported images [} 70].
-
Page 61: Creating An Intelligent Program
9 | Programming mode Creating an intelligent program On intelligent cooking paths, you can only adjust the cooking parameters - it is not possible to re-sequence the individual cooking steps. 1. In the menu bar, press this button: 2. Press this button: + New element 3. -
Page 62: Editing And Deleting Programs
9 | Programming mode 2. Press this button: > Any editable cooking parameters and additional functions for that cooking path will be displayed. Standard settings for the cooking path are marked with this symbol: 3. Adjust the cooking parameters as desired. 4. -
Page 63: Starting Programs And Shopping Carts
9 | Programming mode 1. To edit a program, press this button: The following editing options are available: Edit element Duplicate element Delete element Starting programs and shopping carts Manual programs 1. To start a manual program, tap the program you want to use. 2. -
Page 64: Switching Between Operating Modes
10 | Switching between operating modes Switching between operating modes With iVario, you can switch easily between manual cooking, iCookingSuite and iProductionManager at any time. This offers the optimal mix of automatic, work-saving cooking intelligence and individually desired control options. -
Page 65: Settings
11 | Settings Settings You can permanently change the factory settings on your unit to suit your requirements. 1. Press this button: > You will see a list of all available settings options: Favorites [} 65] Display [} 65] Light [} 67] Sound [} 67] cooking system [} 69] Cook [} 69] cleaning... -
Page 66: Temperature Format
11 | Settings > A calender is shown. 2. Select the desired date. >> The date is applied automatically. Time of day 1. Press this button: Time > The time is shown. 2. Press the time. 3. Set the desired time. >>... -
Page 67: Light
11 | Settings 11.3 Light 1. Press this button: 2. Press this button: Light 11.3.1 Display brightness Here, you can adjust the display brightness on a scale of 0 - 100 %. 1. Press this button: Display brightness 2. Select the desired value on the scale. >>... -
Page 68: End Of Cooking Time
11 | Settings 5. Tap in the icon bar to return to the overview screen. 6. If you want the sound to play continuously until the cooking system has been loaded or the action has been confirmed, press this button: Continuous playback ON 7. -
Page 69: Cooking System
11 | Settings 11.5 Cooking system 1. Press this button: 2. Press this button: Cooking system 11.5.1 Information on the unit type Here, you can see the model of your unit and the software version installed. 11.5.2 Demo mode You switch your unit to demo mode here. This function is useful if you want to present the functions of your unit without cooking in it. -
Page 70: Exporting Haccp Data
11 | Settings Exporting and importing unit default settings [} 71] 11.7.1 Exporting HACCP data Here, you can export the HACCP data recorded by the unit to a USB stick. You can also have the HACCP data sent automatically to ConnectedCooking. Start by inserting a USB stick in to the unit. -
Page 71: Delete All Own Images
11 | Settings 1. Press this button: Export images >> The stored images will be saved to the USB stick. 11.7.5 Delete all own images Use this function to delete the images you have imported. 1. Press this button: Delete all own images >... -
Page 72: Network Settings
11 | Settings 1. Press this button: Copying error statistics log to a USB stick >> The error statistics log is saved on the USB stick. 11.8 Network settings 1. Press this button: 2. Press this button: Network settings You can find out how to connect your unit to a WLAN network here: Establish WLAN connection [} 78] You can find out how to connect your unit to a network here: Establish network connection [} 77] 11.8.1 Wireless LAN... -
Page 73: 11.10.1 Information On The Unit Type
11 | Settings Service level This function is only available to RATIONAL service partners. Software update info [} 73] Installed software version [} 73] 11.10.1 Information on the unit type Identifying information for your unit and the current software version are shown here. -
Page 74: Kitchen Management
5. Enter a password and press the Enter key on the keyboard. Make note of the password and make sure no unauthorized third parties can access it. If you forget the password, you will no longer be able to access the settings. If this happens, please contact your RATIONAL service partner. >... -
Page 75: Activate Profile
12 | Kitchen management Adjusting the menu bar Define which functions and intelligent assistants should be shown on the menu bar. 1. Press this button: Adjusting the menu bar 2. Any of the following intelligent assistants or functions can be hidden for a user profile by pressing this button:OFF Home Manual cooking modes... -
Page 76: Hygiene Management
12 | Kitchen management You have created a profile [} 74]. 1. Press this button: Edit profile 2. Select the desired profile. 3. Press this button: Profile settings 4. Press this button: Delete profile >> The profile is deleted. 12.2 Hygiene management 12.2.1 Recorded HACCP data The following HACCP data is recorded for each batch:... -
Page 77: Connecting The Network Cable
12 | Kitchen management 12.3.1 Connecting the network cable Your unit is optionally equipped with a network connection. To connect your unit with the network and to ensure that your unit is protected from water jets from all directions, use a network cable with the following properties: Network cable category 6 Maximum plug length of 45 mm Plug diameter of 18.5 mm... -
Page 78: Establish Wlan Connection
12.4 ConnectedCooking ConnectedCooking is RATIONAL’s state-of-the-art networking solution. Whether you own one RATIONAL unit or several, ConnectedCooking opens up a wealth of new and convenient possibilities. All you have to do is connect your RATIONAL unit to a network and then visit connectedcooking.com to register. -
Page 79: Connect The Unit With Connectedcooking
12 | Kitchen management In ConnectedCooking, you can see the online status, operating statistics and whether HACCP specifications are complied with at a glance. The following features are also available: Push notifications Any time a unit is ready to load, finishes a cooking process, or needs service, you’ll receive real-time information no matter where you are. -
Page 80: Run Software Update
12 | Kitchen management >> You will receive an email confirming that the cooking system has been registered successfully. 12.5 Run software update Automatic software updates via ConnectedCooking Start by connecting your unit to ConnectedCooking. 1. Press this button: 2. Press this button: ConnectedCooking 3. -
Page 81: Care
13 | Care Care NOTE Hygiene regulations can only be upheld with foam sealing With cooking system feet at a height of 45 mm or greater, you will not be able to clean underneath the system properly. As a result, the cooking system will need to be placed atop foam sealing. The foam sealing prevents liquids or food from getting underneath the cooking system. -
Page 82: Cleaning The Pan
13 | Care Hydrochloric acid, lye, sulphurous substances, or other oxygen-consuming agents Pot scrubber with steel wool Steel wool Sharp or pointed tools 13.4 Cleaning the pan CAUTION When the pan base is hot, cold water may heat up very quickly and sizzle out of the pan. Coming into contact with hot water droplets can cause scalding injuries. -
Page 83: Cleaning The Hand Shower
13 | Care 3. Clean the steam nozzle using the hand shower or in the dishwasher. 4. Reinsert the steam nozzle. Cleaning the automatic water intake 1. Clean the automatic water intake every morning and evening using dish soap and a soft sponge. Cleaning the pan valve 1. -
Page 84: Cleaning Units With Pressure Cooking Systems (Optional)
13 | Care 13.8 Cleaning units with pressure cooking systems (optional) Locking system Steam nozzle Locking system Cleaning the pressure cooking system 1. Clean the pan [} 82]. 2. Fill the pan with water to the minimum-fill line. 3. Close the pan lid. 4. -
Page 85: Inspiration And Help
RATIONAL Service Partners Our units are reliable and built to last. Should you ever encounter technical issues, our RATIONAL Service Partners can provide fast, efficient assistance. Spare part supplies are guaranteed, and weekend emergency service is included. -
Page 86: Messages During Cooking
14 | Inspiration and help Please contact your RATIONAL Service Partner regarding all error messages. Always have your unit’s serial number and the installed software version number at the ready. You can find both in the error message. 14.4.1 Messages during cooking... - Page 87 14 | Inspiration and help Error report Message text Lid position error Pressure cooking process stopped. Pressure release initiated. Locking and pan valve motor error Attention: cooking loss possible. Only pan-frying applications available. Locking and pan valve motor error Open lid and retract locking system! Locking and pan valve motor error Pressure cooking process stopped.
-
Page 88: Maintenance
You can perform the following maintenance yourself: Replacing the pan lid seal [} 88] Replacing the pan valve seal [} 88] Defective power cables must only be replaced by RATIONAL, or by your RATIONAL Service Partner. 15.1 General safety information Wear gloves to protect yourself from being cut on sharp edges of the metal housing. -
Page 89: Decommissioning And Disposal
16 | Decommissioning and disposal Decommissioning and disposal 16.1 Decommissioning If you want to take your unit out of operation, please contact your RATIONAL Service Partner. 16.2 Disposal Old units contain recyclable materials. Dispose of old units in an environmentally safe way, using appropriate collection systems. -
Page 90: Technical Data
175°C. As the manufacturer, RATIONAL guarantees that temperature settings are maintained to the exact degree, and will not exceed their target levels. - Page 91 17 | Technical data Directive 2011/65/EU on the restriction of the use of certain hazardous substances in electrical and electronic equipment, including 2015/863/EU This unit conforms to the following European standards: EN 60335-1:2020 + A1:2013 + A2:2016 + C1:2016 EN 60335-2-36:2017 EN 60335-2-37:2017 EN 60335-2-39:2002 + A1 EN 60335-2-47:2002 + A1 + A2...
-
Page 92: Regulatory Information
18 | Regulatory Information Regulatory Information Canada This device complies with Industry Canada license-exempt RSS standard(s). Operation is subject to the following two conditions: (1) this device may not cause interference, and (2) this device must accept any interference, including interference that may cause undesired operation of the device. -
Page 93: Directory Of Keywords
Directory of keywords cleaning 83 Cleaning the central selection knob 83 Deep-fry 43 Convenience sauces 30 Convenience soups 30 cooking time 35 Basket 35, 40 core temperature 35 Boil core temperature probe Eggs 29 Error report 23 Fruit 31 Fish fillets 22 Meat 27... - Page 94 Nuts and seeds 31 Insert pan base rack 36 Sauces Bound sauces 30 Load capacities 85 Convenience sauces 30 Load unit 35 Stock 30 Lock pan lid 48, 49 Selecting a pan 15 Low temperature cooking Soups Overnight casserole 27 Creamed soups 30 Veloutés...
- Page 96 RATIONAL AG RATIONAL Wittenheim SAS Siegfried-Meister-Straße 1 4 Rue de la Charente 86899 Landsberg am Lech F-68270 Wittenheim Tel. +49 8191 327-387 Tel. +33 (0)389 570135 Fax +49 8191 327-231 Fax +33 (0)389 570136 info@rational-online.com info@rational-online.com rational-online.com rational-online.com...
Need help?
Do you have a question about the iVario and is the answer not in the manual?
Questions and answers