Table of Contents
Advertisement
Quick Links
Advertisement
Table of Contents

Related Manuals for go-e go-eCharger HOMEfix


Summary of Contents for go-e go-eCharger HOMEfix
- Page 2 Copyright by go-e GmbH. The content of this document may not be copied partly or published or circulated in any form other than that approved by go-e GmbH without the written permission of go-e GmbH. Page 2...
- Page 3 The Charger is intended for permanent installation at a fixed mounting location. Great advantage compared to the classic wallbox - the go-eCharger HOMEfix can be connected to an existing junction box by an electrician very quickly. This saves time and costs.
- Page 4 The technology for this is already built into each of our charging boxes. For more information, please visit https://www.awattar.com/services/goe go-e will continue to work on making its products more energy-efficient and environmentally friendly in the future for a major goal: a future without emissions.
-
Page 5: Table Of Contents
Table of Contents Prelude Page 6 Registration information Page 6 Operating instructions Page 7 Product overview Page 9 Scope of delivery Page 10 Technical specifications Page 11 Installation Page 12 Commissioning Page 13 Error indication Page 14 The app Page 15 WiFi settings Page 22 Troubleshooting: What does the... -
Page 6: Prelude
Up to 12 kW charging power (like the go-eCharger HOMEfix 11 kW), you only need to inform the operator where you use the charging box. You can then immediately start charging your vehicle. -
Page 7: Operating Instructions
(MCB) Any modification or repair of hardware or software may only be carried out by qualified personnel of go-e GmbH or personnel trained for this purpose. The removal of warnings attached to the go-eCharger or the opening of the device will result in the loss of any liability by go-e GmbH. - Page 8 In case of uncertainty, please contact your vehicle manufacturer. The go-eCharger HOMEfix has the communication interfaces WiFi 802.11b/g/n 2.4GHz and RFID. WiFi is operated on a frequency of 2.4Ghz, channels 1-13 with the frequency band 2412-2472Mhz.
-
Page 9: Product Overview
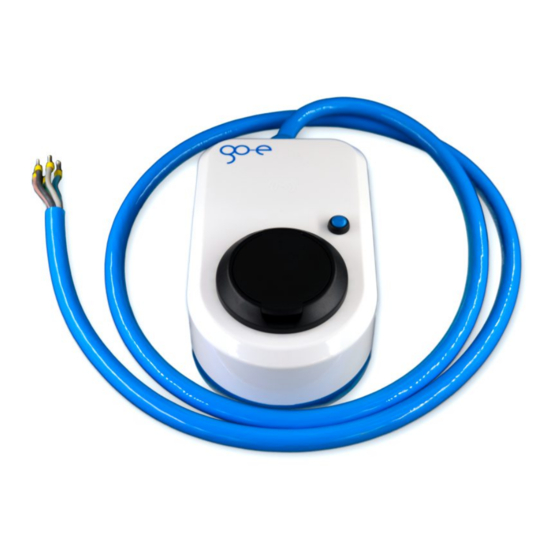
Product overview (1) Connection cable (2) Strain relief (3) Housing (4) Button (5) Typ 2 socket (6) LED ring (7) Fine-wire fuse on the back Page 9... -
Page 10: Scope Of Delivery
Scope of delivery 11 kW charging box 22 kW charging box Wall mounting plate Mounting set RFID chip Reset card 4 x dowels/screws for mounting plate 1 x u-piece for optional cable protection 1 x dowel/screw for u-piece Spare fine-wire fuse Optional 22 kW type 2 cable 2.5 meters... -
Page 11: Technical Specifications
Protection class = I Ÿ Pollution degree = II Ÿ go-e network operator API for authorised access of the electricity network operator to the go-eCharger for network related power control App an connectivity: Ÿ Local (WiFi hotspot) or worldwide (via WiFi) usable Ÿ... -
Page 12: Installation
This person must have a recognised electrical enginee- ring qualification that allows him/her to carry out all the electrical WARNING work required to install the go-eCharger HOMEfix in accordance ATTENTION with the applicable national regulations. The go-eCharger has a built-in RCD protection device with DC current detection (30 mA AC and 6 mA DC). -
Page 13: Commissioning
(in amps). The button (4) can be used to select between 6 A and 16 A (go-eCharger HOMEfix 11 kW) or between 6 A and 32 A (go-eCharger HOMEfix 22 kW). The levels of the selection can be individually adjusted in the app. -
Page 14: Error Indication
Error indication ATTENTION: If the power supply is interrupted, the charging cable remains locked in the charging unit for reasons of theft protection. To unlock it, it is necessary to re- energise the charging unit. Error Indication The go-eCharger executes a whole series of safety queries in order to check the power source used for possible errors. -
Page 15: The App
The app gives you full access to a wide range of go-eCharger functions via direct (via hotspot) or worldwide (via the Internet). The app can be found in the Apple App Store, the Google Play Store or at http://app.go-e.co/. Connect the app to the go-eCharger by either manually pairing the charging station in your WiFi settings or by scanning the QR code of the reset card. - Page 16 The app Activation (2) You can activate or deactivate your charging processes via the regulator (2). If "Activation" is permanently switched on, charging starts automatically. With the corresponding default setting under "Settings/Access control" (12), you have to authorise each charging process via this button of the app or RFID chip/card.
- Page 17 The app Charging details (7) If you touch the button "Show more" (7), an overview opens below it in which you receive further information about the current and the total amount of electricity charged with the Charger (in kWh). In addition, you can see, for example, data on the current charging power or current intensity on the individual phases.
- Page 18 The app configure the following detailed settings. Electricity prices (13) After selecting the access control option Electricity prices, you define via the button "Electricity prices" (13) further details (14). You have to deposit your country (zone) and define how many hours the car should charge at least.
- Page 19 The app charger in the app by scrolling all the way down in the section "Settings" and clicking on "Show RFID card settings" (17). You manage them by selecting the desired "Card". The charged kWh (without decimal places) is stored for each card (chip). The RFID chip included in the scope of delivery is already learned as "Card 1"...
- Page 20 The app is required for this. Combine several go-eChargers to a group, which are supplied by the same power line so that it is not overloaded, by using load balancing. This is how you do it: Define the maximum permissible total current for the charger group (21) and define the minimum charging current for several chargers that are charging simultaneously (22).
- Page 21 The app LED colour (28) You can use this menu item (28) to individually adjust the LED colours for the charging states "Ready", "Charging" and "Finished". Tap on the charging mode whose colour you want to change. Then select a point in the colour spectrum in the submenu (31) or enter RGB values manually.
-
Page 22: Wifi Settings
The WiFi settings of your smartphone should then open. Select the go-eCharger (go-e-XXXXXX) from the Ÿ list of displayed devices. Then enter the password that you will find on the reset card under "Hotspot key". - Page 23 WiFi settings Establish internet connection If the connection between the charging unit and Ÿ W-LAN the app is established (indicated by the blue arrow), tap on the graphic of the WiFi router in the app. A pop-up window opens. Enter the SSID (name of your WiFi network) and Ÿ...
- Page 24 WiFi settings To switch between Internet access and hotspot, use the WiFi settings of your mobile phone. If your Charger has permanent access to the Internet via your WiFi network at home, you should use the connection via WiFi by default. If it is outside the WiFi range, you can use the "automatically connect"...
- Page 25 Troubleshooting What does the colours of the LED ring mean? (Colour codes correspond to the factory setting) LED colours / error Reason Solution No LEDs light up No current in Check the overload protection of the connection. although the charger is the supply line Check the device fuse on the back of the go- connected.
-
Page 26: Warranty
Warranty The statutory liability for defects law and the statutory warranty period of two years shall apply. After six months from delivery of the goods, the burden of proof of the statutory warranty shall pass to the customer. Shipping costs for repeated repairs due to technical defects by the manufacturer shall be borne by the manufacturer. -
Page 27: Confirmation For Subsidy
Confirmation for subsidy GmbH We hereby confirm that our product go-eCharger HOMEfix 11 kW or go- eCharger HOMEfix 22 kW has the following product characteristics: Ÿ ICCB (In-cable control box) with 2 meters cable and type 2 socket Ÿ 3-phase 16 A charging power max. (version with 11 kW) or 3-phase 32 A charging power max. -
Page 28: Ce Declaration Of Conformity
CE Declaration of Conformity Page 28... -
Page 29: Contact Details
A T 9 5 6 0 F e l d k i r c h e n M a i l : o f fi c e @ g o - e . c o T e l : + 4 3 4 2 7 6 6 2 4 0 0 1 0 www.go-e.co Page 29... - Page 30 Please dispose of the device and the packaging after use in accordance with the national legal regula- tions. Old appliances are not allowed to be disposed of with household waste. Help protect the environ- ment! go-eCharger HOMEfix...
Need help?
Do you have a question about the go-eCharger HOMEfix and is the answer not in the manual?
Questions and answers