Table of Contents
Advertisement
Quick Links
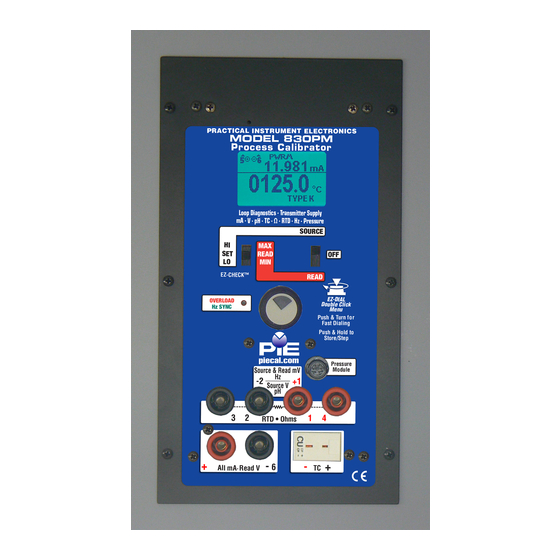
Multifunction Process Calibrator
Multifunction Process Calibrator
mA • V • pH • TC • Ω • RTD • Freq • Pressure
mA • V • pH • TC • Ω • RTD • Freq • Pressure
Copyright © 2018 All rights reserved • 830PM-9002 - Rev A 19 June 2018
PIE 830PM
PIE 830PM
Panel Mounted
Panel Mounted
Operating Instructions
Operating Instructions
Advertisement
Table of Contents

Related Manuals for PIE PIE 830PM


Summary of Contents for PIE PIE 830PM
- Page 1 PIE 830PM PIE 830PM Panel Mounted Panel Mounted Multifunction Process Calibrator Multifunction Process Calibrator mA • V • pH • TC • Ω • RTD • Freq • Pressure mA • V • pH • TC • Ω • RTD • Freq • Pressure...
-
Page 2: Table Of Contents
Contents Basic Operation Switches & Knobs ................2 Connections..................2 MAIN Menus - Functions, Units & Ranges ........3 FEATURE Menu - Stepping & Ramping / Auto Off / Backlight ..4 Storing EZ-CHECK Outputs & Automatic Stepping ....... 5 Functions and Hookup Diagrams 2-Wire Transmitter Calibration Simulate sensor while powering 2-Wire Transmitters .... - Page 3 ‘beeper’ quickly finds broken wires or shorts in instrumentation wiring. Also handy for checking operation of relays and controller outputs. The PIE Model 830PM is more than a multifunction calibrator. It is also a loop detective that is able to diagnose common problems that other test equipment just can’t find.
-
Page 4: Basic Operation
1 through 6. thermocouple wire terminated with a miniature thermocouple plug. PIE external pressure modules may be plugged into the jack marked Pressure Module Practical Instrument Electronics Tel: 585.872.9350 • Fax: 585.872.2638 • sales@piecal.com • www.piecal.com... -
Page 5: Main Menus - Functions, Units & Ranges
Configuration Double Click Menus - Main Page Double Click Menus - Main Page Move POWER SWITCH to “SOURCE” or Source & Read Thermocouples “READ”. MAIN DOUBLE CLICK > EXIT EZ-DIAL KNOB FUNCTION T/C FOR CONFIGURATION UNITS °C °F V#.## T/C TYPE K E T R S B N L U G C D P COLD JUNC ON Turn the... -
Page 6: Feature Menu - Stepping & Ramping / Auto Off / Backlight
Operating Instructions Double Click Menu - STEPPING, AUTO OFF & BACKLIGHT STEPS/RAMP - pressing the knob will cycle To change the Automatic Stepping settings through 2, 3, 5, 11 and RAMP. The endpoints of Double click the DIAL KNOB at any time the the steps or ramp are based on the values unit is on and the following typical display (will stored in the HI and LO EZ-CHECK outputs. -
Page 7: Storing Ez-Check Outputs & Automatic Stepping
Storing EZ-CHECK Outputs STORING HI and LO EZ-CHECK Outputs Choose this function to provide a simulated thermocouple signal into controllers, temperature transmitters, indicators or any other input device that measure thermocouple sensors. 1) Store your high (SPAN) output temperature by moving the EZ-CHECK switch to the HI position and turn the EZ-Dial knob until the desired temperature is on the display. -
Page 8: Functions And Hookup Diagrams 2-Wire Transmitter Calibration Simulate Sensor While Powering 2-Wire Transmitters
Operating Instructions Calibrate a 2-Wire Transmitter by sourcing the input while monitoring the output. Works with SOURCE pH, T/C, DC V, OHMS, RTD, FREQ and READ PRESSURE. Move the power switch to READ and Double click the DIAL KNOB and the MAIN menu for the function in use will appear for 15 seconds: MAIN >... - Page 9 Operating Instructions Calibrate a 2-Wire Transmitter by sourcing the input while monitoring the output. PRACTICAL INSTRUMENT ELECTRONICS MODEL 830PM Process Calibrator PWRM 18.300 mA 830.0 °C Type K Loop Diagnostics · Transmitter Supply mA · V pH · TC · Ω · RTD · Hz · Pressure SOURCE READ READ...
-
Page 10: Universal Isolated Transmitter
Operating Instructions Universal Isolated Transmitter Swap out a transmitter to diagnose control issues. The 830PM acts as an isolated universal T/C, mV, OHMS, RTD, FREQ and PRESSURE transmitter. Choose this function to temporarily replace a transmitter when you suspect the transmitter is faulty or to diagnose the parameters of the loop. - Page 11 Operating Instructions MODE - pressing the knob will cycle through OFF, LINEAR, NONLINEAR. When setup to read pressure SQ ROOT replaces NONLINEAR. LINEAR turns on the mA display and regulates the loop current linear with the input signal. For thermocouples & RTDs this is linear relative to the temperature between zero and span of the sensor input.
- Page 12 Operating Instructions Setting up the 830PM as a transmitter Configure your 830PM to the same Span (URV) and Zero (LRV) by storing Span & Zero setting with the q EZ-CHECK switch. 1) Store your SPAN input by moving the q EZ-CHECK switch to the MAX posi- tion and turning the e EZ-Dial knob until the desired output value is on the display.
- Page 13 Operating Instructions Connecting the 830PM in place of a transmitter Connect the 830PM in place of the transmitter. The 4-20 mA loop connects to the mA jacks of the 830PM and the sensor (or pressure module) connects to the other jacks of the 830PM. PRACTICAL INSTRUMENT ELECTRONICS MODEL 830PM Typical...
-
Page 14: Simulate 2 Wire Transmitters
Operating Instructions 2 Wire SIM mA, 2 Wire SIM % (Percent of 4 to 20 mA) Choose this function to simulate a 2 Wire Transmitter output from 0.000 to 24.000 milliamps. Operates in loops with power supply voltages from 2 to 60 VDC. - Page 15 Operating Instructions 2 Wire SIM mA, 2 Wire SIM % (Percent of 4 to 20 mA) Connect the output leads of the 830PM to the inputs of the device being calibrated, making sure to check polarity. Red lead from jack (5) to the plus (+) input and black lead from jack (6) to the minus (-) input.
- Page 16 Operating Instructions SOURCE mA / SOURCE % (Percent of 4 to 20 mA) Choose this function to provide an output from 0.000 to 24.000 milliamps or -25.00 to 125.00%. The compliance voltage is a nominal 24 VDC to provide the driving power to your milliamp receivers.
- Page 17 Operating Instructions READ mA, READ % (Percent of 4 to 20 mA) Choose this function to measure from from 0.000 to 24.000 milliamps or -25.00 to 125.00%. Move the power switch w to READ then Double Click the EZ-DIAL knob to get into the Double Click Menu.
-
Page 18: Source Ma, Read Ma
Operating Instructions Power/Measure mA, Power/Measure % (Percent of 4 to 20 mA) Choose this function to simultaneously supply power to a 2 Wire Transmitter while displaying the 4 to 20 mA output of the transmitter. Move the power switch w to READ then Double Click the EZ-DIAL knob to get into the Double Click Menu. -
Page 19: Using Ground Leak Detection
Operating Instructions Using Ground Leak Detection mA OUT, % OUT (Percent of 4 to 20 mA) Find current leaks in loops caused by ground faults, moisture or corrosion. The 830PM simultaneously supplies power to a 2 Wire Transmitter (or loop with a transmitter) while displaying the 4 to 20 mA output and the amount of current leaking in the loop. - Page 20 Operating Instructions Using Ground Leak Detection 12.280 PROCESS PWRM LEAK 00.28 mA INDICATOR 12.280 + IN - REF +OUT- Transmitter Input Sensor Typical Process Signal 2-Wire Simulated Input Transmitter Typical Error Conditions PWRM LEAK PWRM LEAK 00.28 mA 12.280 OVER RANGE The 830PM is supplying the The 830PM is supplying the loop loop voltage.
-
Page 21: Source V & Mv; Read V & Mv
Operating Instructions SOURCE mV / V Choose this function to provide an output from -20.000 to 99.999 mV, -500.00 to 999.99 mV or from 0.000 to 10.250 V. The source current is a nominal 20 mA to provide the driving power to your voltage receivers. Move the power switch w to SOURCE then Double Click the EZ-DIAL knob to get into the Double Click Menu. - Page 22 Operating Instructions Read mV / V Choose this function to measure from -99.999 to 99.999 millivolts, -999.99 to +999.99 mV, 0.000 to 10.250 V dc or 0.00 to 60.00 V dc. Move the power switch to READ then Double Click the EZ-DIAL knob to get into the Menu.
-
Page 23: Source Ph
Operating Instructions pH SOURCE Choose this function to provide an output from 0.000 to 14.000 pH @ 25°C (77°F) which corresponds to 414.12 to -414.12 mV. The source current is a nominal 20 mA to provide the driving power to your pH receivers. Move the power switch w to SOURCE then Double Click the EZ-DIAL knob to get into the Menu. -
Page 24: Source T/C & Read T/C Sensors
Operating Instructions Source Thermocouple Choose this function to provide a simulated thermocouple signal into controllers, temperature transmitters, indicators or any input devices that measure thermocouple sensors. Move the power switch w to SOURCE then Double Click the EZ-DIAL knob to get into the Double Click Menu. - Page 25 Operating Instructions Read Thermocouple Sensors Choose this function to measure temperatures with a thermocouple probe or sensor. Move the power switch w to READ then Double Click the EZ-DIAL knob to get into the Double Click Menu. Turn the knob to scroll through the settings and press the knob to make your selection.
-
Page 26: Source Resistance, Read Resistance & Continuity
Operating Instructions Source Resistance Choose this function to provide a simulated resistance into any device that measures resistance. Move the power switch w to SOURCE then Double Click the EZ-DIAL knob to get into the Double Click Menu. Turn the knob to scroll through the settings and press the knob to make your selection. - Page 27 Operating Instructions Read Resistance & Check Continuity Choose this function to measure resistance or check continuity. Move the power switch w to READ then Double Click the EZ-DIAL knob to get into the Double Click Menu. Turn the knob to scroll through the settings and press the knob to make your selection.
-
Page 28: Source Rtd & Read Rtd Sensors
Operating Instructions Source RTD Choose this function to provide a simulated RTD signal into controllers, temperature transmitters, indicators or any input devices that measure RTD sensors. Move the power switch w to SOURCE then Double Click the EZ-DIAL knob to get into the Double Click Menu. - Page 29 (1) and the black lead into jack (2). For 3 wire RTDs add a black lead plugged into jack (3) and for 4 wire RTDs add a red lead plugged into jack (4). The PIE 830PM automatically detects how many wires are connected using a patented circuit and indicates each wire that is connected.
-
Page 30: Source Khz, Hz & Cpm; Read Khz, Hz & Cpm
Operating Instructions Source Frequency Choose this function to provide a frequency signal into any input devices that measure frequency. Move the power switch w to SOURCE then Double Click the EZ-DIAL knob to get into the Double Click Menu. Turn the knob to scroll through the settings and press the knob to make your selection. - Page 31 Operating Instructions Read Frequency Choose this function to count frequency. Move the power switch w to READ then Double Click the EZ-DIAL knob to get into the Double Click Menu. Turn the knob to scroll through the settings and press the knob to make your selection. Select FREQ for the FUNCTION and 20KHZ, 10000HZ, 1000HZ or 2000CPM for the RANGE.
-
Page 32: Read Pressure
Read Pressure Choose this function to measure pressure in one of 32 different engineering units using a PIE Pressure Module. 1) Move the power switch w to READ then Double Click the EZ-DIAL knob to get into the Menu. Turn the knob to scroll through the settings and press the knob to make your selection. -
Page 33: Pressure Module Ranges & Specifications
Operating Instructions Read Pressure Optional Pressure Modules Sensor Code Application DNxxxx Differential, Non-isolated 0 to 0010*, 0028, 0200, 0415, 2000” H2O DIxxxx Differential, Isolated 0 to 0001, 0005, 0015, 0030, 0100, 0300, 0500 PSID GIxxxx Gauge, Isolated 0 to 0015, 0030, 0050, 0100, 0300, 0500, 1000, 3000 PSIG CIxxxx Compound, Isolated -14.7 to +0015, 0030, 0050, 0100, 0300, 0500, 1000, 3000 PSIG... -
Page 34: Pressure Module
Pressure Module Practical Instrument Electronics Tel: 585.872.9350 • Fax: 585.872.2638 • sales@piecal.com • www.piecal.com Page 32... -
Page 35: Warranty
Claims under warranty can be made by returning the equipment prepaid to our factory. The equipment will be repaired, replaced or adjusted at our option. The liability of Practical Instrument Electronics (PIE) is restricted to that given under our warranty. No responsibility is accepted for damage, loss or other expense incurred through sale or use of our equipment. -
Page 36: Specifications
Specifications General Operating Temp Range -20 to 60 °C (-5 to 140 °F) Storage Temp Range -30 to 60 °C (-22 to 140 °F) Temperature effect ≤ ± 0.01 %/°C of Full Scale; Cold Junction Sensor ≤ ±25 ppm/°C Relative Humidity Range 10 % ≤RH ≤90 % (0 to 35 °C), Non-condensing 10 % ≤RH≤... - Page 37 Specifications DC Voltage Read Ranges and Resolution ±99.999 mV, ±999.99mV, 0 to 10.250 V, 0.00 to 60.00 V DC Accuracy ≤ ± (0.02 % of Reading + 0.01% Full Scale) Input resistance ≥ 1 MΩ Source V dc Ranges & Resolution -20.000 to 99.999 mV, -500.00 to 999.99 mV, 0.000 to 10.250V Accuracy ≤...
- Page 38 Specifications RTD and OHMS Source Accuracy From 1 to 10.2 mA ±(0.025% of Full Scale + 0.075 Ohms) External Excitation Current 0.025 mV Below 1 mA of External ±(0.025% of Full Scale+0.075 Ohms + mA Excitation Current Excitation Current Resistance Ranges 0.00 to 401.00, 0.0 to 4010.0 Ohms Allowable Excitation Current Range <401 Ohm:10.2 mA max;...
-
Page 39: Thermocouple Ranges & Accuracies
Thermocouple Ranges & Accuracies ≤ ± Table based on (0.02 % of Reading + 0.01 mV) Note: Doesn’t include cold junction error of ±0.05°C Degrees C Accuracy Degrees F Accuracy ISA/ANSI Type Range °C Range °F Material Color -200.0 to -50.0 ±0.5°... - Page 40 Thermocouple Ranges & Accuracies ≤ ± Table based on (0.02 % of Reading + 0.01 mV) Note: Doesn’t include cold junction error of ±0.05°C Degrees C Accuracy Degrees F Accuracy ISA/ANSI Type Range °C Range °F Material Color -230.0 to -150.0 ±1.9°...
-
Page 41: Rtd Ranges & Accuracies
RTD Ranges & Accuracies RTD Accuracy Based on ±(0.025% of Reading in Ohms + 0.075 Ohms) Degrees C Degrees F Type Range °C Range °F Pt 100 Ohm -200.0 to 0.0 ±0.2° -328.0 to 32.0 ±0.4° DIN/IEC/JIS 1989 0.0 to 340.0 ±0.3°... -
Page 42: Panel Cutout Dimensions
Panel Cutout Dimensions Bezel Cutout 0.125” Dia (x6) 0.196” 0.35” 4.40” 4.554” 4.75” Practical Instrument Electronics Tel: 585.872.9350 • Fax: 585.872.2638 • sales@piecal.com • www.piecal.com Page 40... -
Page 43: Mounted In Panel
Mounted in Panel Practical Instrument Electronics Tel: 585.872.9350 • Fax: 585.872.2638 • sales@piecal.com • www.piecal.com Page 41... - Page 44 Mounted in Panel Rear view of 830PM mounted in a panel with AC Adapter Practical Instrument Electronics Tel: 585.872.9350 • Fax: 585.872.2638 • sales@piecal.com • www.piecal.com Page 42...
Need help?
Do you have a question about the PIE 830PM and is the answer not in the manual?
Questions and answers