
Related Manuals for Lectrosonics DBu/E01


Summary of Contents for Lectrosonics DBu/E01
- Page 1 INSTRUCTION MANUAL DBu/E01 Digital Belt Pack Transmitter Fill in for your records: Serial Number: Purchase Date: Rio Rancho, NM, USA www.lectrosonics.com...
-
Page 2: Table Of Contents
Lectrosonics WipeKey ................10 introduces Encryption Keys. Truly entropic encryption SendKey ................10 keys are first created by a Lectrosonics receiver, such LectroRM ................11 as the DSQD Receiver. The key is then synced with the Whip Antennas ..............12 DBu via the IR port. -
Page 3: Dsp-Controlled Input Limiter
Digital Belt-Pack Transmitter Servo Bias Input and Wiring DSP-controlled Input Limiter The DBu/E01 input preamp is a unique design that deliv- The transmitter employs a digitally-controlled analog ers audible improvements over conventional transmitter audio limiter prior to the analog-to-digital converter. -
Page 4: Battery Installation
DBu/E01 Battery Installation The transmitter is powered by two AA batteries. We The battery contacts can be cleaned with alcohol and recommend using alkaline, lithium, or rechargeable bat- a cotton swab, or a clean pencil eraser. Be sure not teries for longest life. -
Page 5: Belt Clips
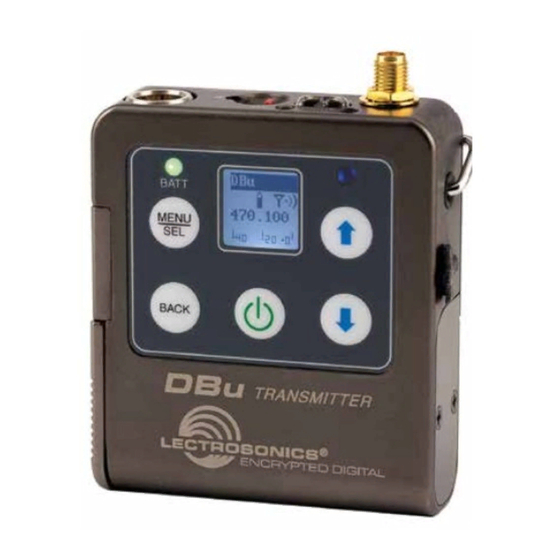
Digital Belt-Pack Transmitter Operating Instructions Modulation Programmable Full access to all settings is provided through the key- IR Port Indicators* Function Switch pad and LCD. The transmitter can also be configured as a “one button” device by locking the ability to make Antenna changes with the keypad, and configuring the top panel Audio... -
Page 6: Operating Instructions
DBu/E01 Operating Instructions Power Menu Options Powering On in Operating Mode Entering the Power Menu Press and hold the Power Button until a status bar on With the unit turned on, press the power button once the LCD is completed. -
Page 7: Lcd Menu Map
Digital Belt-Pack Transmitter LCD Menu Map Use arrow buttons Gain to select value Gain BACK Level meter at bottom of screen NOTE: The settings will be stored when the BACK button Press MENU/SEL to highlight MHz or kHz Freq. is pressed. Freq. -
Page 8: Main Menu And Setup Screen Details
DBu/E01 Main Menu and Setup Connecting the Signal Source Microphones, line level audio sources and instruments Screen Details can be used with the transmitter. Refer to the section entitled Input Jack Wiring for Different Sources for details on the correct wiring for line level sources and... -
Page 9: Selecting Frequency
Digital Belt-Pack Transmitter Selecting Frequency Selecting Audio Polarity (Phase) The setup screen for frequency selection offers two Audio polarity can be inverted at the transmitter so the ways to browse the available frequencies. audio can be mixed with other microphones without comb filtering. -
Page 10: Locking/Unlocking Changes To Settings
DBu/E01 Locking/Unlocking Changes to Settings • Universal: This is the most convenient encryp- tion option available. All encryption-capable Lec- Changes to the settings can be locked to prevent inad- trosonics transmitters and receivers contain the vertent changes being made. Universal Key. The key does not have to be gener- ated by a receiver. -
Page 11: Lectrorm
Each version also has a • Remote control must be enable on the transmitter. mechanism to prevent accidental activation of the tone. Please be aware this app is not a Lectrosonics product. It is privately owned and supported by New Endian LLC, www.newendian.com. -
Page 12: Whip Antennas
DBu/E01 Whip Antennas Because the transmitter tunes across such a broad fre- quency range, it is best to use the appropriate antenna for maximum operation. Two antennas are included with the transmitter, and are shipped from the factory pre-cut and fully assembled. Each antenna covers three blocks. -
Page 13: Accessories
Digital Belt-Pack Transmitter Accessories MI33PRA Instrument cable; passive type for use with very high output pickups; right angle 1/4” plug P/N 26895 Wire belt clip MI33PST Instrument cable; passive type for use BCSLEBN Spring-loaded belt clip with very high output pickups; straight 1/4”... -
Page 14: 5-Pin Input Jack Wiring
DBu/E01 5-Pin Input Jack Wiring Audio input jack wiring: The wiring diagrams included in this section represent the basic wiring necessary for the most common types PIN 1 of microphones and other audio inputs. Some micro- Shield (ground) for positive biased electret lavaliere phones may require extra jumpers or a slight variation microphones. -
Page 15: Microphone Cable Termination For Non-Lectrosonics Microphones
VHF transmitters with 5-pin shield jacks require a different termination. Lectrosonics lavaliere microphones are terminated for compatibility with VHF and UHF transmitters, which is different from what is shown here. Rio Rancho, NM... -
Page 16: Input Jack Wiring For Different Sources
In addition to the microphone and line level wiring hook- A lot of information regarding microphone wiring is also ups illustrated below, Lectrosonics makes a number of available in the FAQ section of the web site at: cables and adapters for other situations such as con- http://www.lectrosonics.com/faqdb... -
Page 17: Microphone Rf Bypassing
Line Level More Headroom Use 330 pF capacitors. Capacitors are available from (20 dB) Lectrosonics. Please specify the part number for the desired lead style. Leaded capacitors: P/N 15117 Leadless capacitors: P/N SCC330P All Lectrosonics lavaliere mics are already bypassed and do not need any additional capacitors installed for proper operation. -
Page 18: Wireless Designer Software
DBu/E01 Wireless Designer Software Download the Wireless Designer software installer from the web sites under the SUPPORT tab at: http://www.lectrosonics.com/US http://www.lectrosonics.com/europe/ Wireless Designer only needs to be installed the first time the software is used. Once the software is in- stalled, updates are available by simply clicking on an item in the Help Menu. -
Page 19: Specifications
Digital Belt-Pack Transmitter Specifications Frequency Range: 470.100 - 614.375 MHz Frequency Selection: Steps: 25 kHz RF Power Output: Selectable; 25 or 50 mW Frequency Stability: ± 0.002% Digital Modulation: 8 PSK Equivalent Input Noise: –128 dBV Input Level: Nominal 2 mV to 300 mV, before limiting Greater than 1V maximum, with limiting. -
Page 20: Troubleshooting
DBu/E01 Troubleshooting It is important that you follow these steps in the sequence listed. Symptom: Possible Cause: Transmitter Battery LED off 1. Batteries are inserted incorrectly. when Power Switch “ON” 2. Batteries are low or dead. No Transmitter Modulation LEDs 1. -
Page 21: Service And Repair
LECTROSONICS’ Service Department is equipped and staffed to quickly repair your equipment. In warranty repairs are made at no charge in accordance with the terms of the warranty. Out-of-warranty repairs are charged at a modest flat rate plus parts and shipping. - Page 22 Hierbij verklaart Lectrosonics dat het toestel radio microfoon in overeenstemming is met de essentiële eisen en de andere relevante bepalingen van Richtlijn 2014/53/EU. Bij deze verklaart Lectrosonics dat deze radio microfoon voldoet aan de essentiële eisen en aan de overige relevante bepalingen van Richtlijn 2014/53/EU.
- Page 23 Digital Belt-Pack Transmitter Rio Rancho, NM...
- Page 24 This warranty does not apply to used or demonstrator equipment. Should any defect develop, Lectrosonics, Inc. will, at our option, repair or replace any defective parts without charge for either parts or labor. If Lectrosonics, Inc. cannot correct the defect in your equipment, it will be replaced at no charge with a similar new item.
Need help?
Do you have a question about the DBu/E01 and is the answer not in the manual?
Questions and answers