
Subscribe to Our Youtube Channel
Related Manuals for Lectrosonics DCHT


Summary of Contents for Lectrosonics DCHT
- Page 1 INSTRUCTION MANUAL DCHT Digital Transmitter Fill in for your records: Serial Number: Purchase Date: Rio Rancho, NM, USA www.lectrosonics.com...
-
Page 2: Table Of Contents
DCHT Table of Contents Introduction Introduction ................2 The DCHT transmitter is designed to work with a com- DSP-controlled Input Limiter ..........2 panion receiver (such as the Lectrosonics M2R, part DCHT Block Diagram ............3 of the Duet IEM system) as an audio relay between an Features and Functions ............ -
Page 3: Dcht Block Diagram
Digital Transmitter DCHT Block Diagram Input Jack 1 2 3 4 5 6 CHANNEL 1 CHANNEL 2 (analog/digital selectable) Servo Bias Bias Voltage Servo Bias Bias Voltage Supply 0, 2 or 3.6V Supply 0, 2 or 3.6V Converter Converter HI/Lo... -
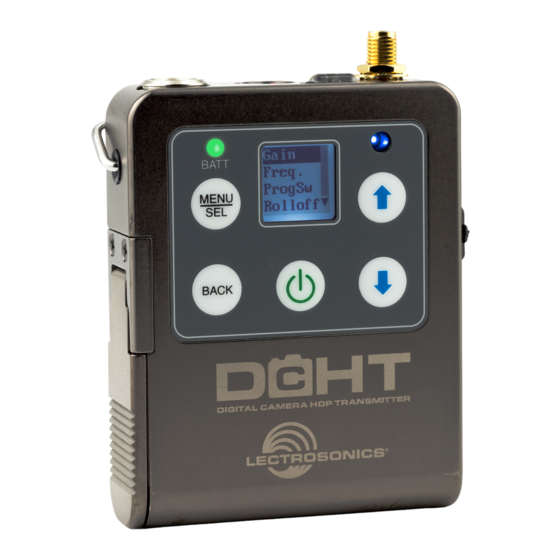
Page 4: Features And Functions
DCHT Features and Functions Status Ready LED Battery status LED Menu navigation Enter menu/Select item USB Port Return to previous screen Power/Power Menu access Bi-directional IR port Programmable function switch Whip Antennas Because the transmitter tunes across such a broad frequency range, it is best to use the ap- propriate antenna for maximum operation. -
Page 5: Battery Status Led Indicator
Digital Transmitter Battery Installation Battery Status LED Indicator The Power/Function LED on the top panel will mirror The transmitter is powered by two AA batteries. Lithium the keypad LED unless the programmable switch is set batteries are recommended for longest life. to Mute, and the switch is turned on. -
Page 6: Powering On And Off
DCHT Powering On and Off Power Button Menu Powering On in Operating Mode Entering the Power Menu Press and hold the Power Button for several seconds When the unit is turned on and the Main Window is dis- until a counter on the LCD progresses from 1 through 3. -
Page 7: Lcd Menu Map
Digital Transmitter LCD Menu Map SEL button to Use arrow buttons Gain Gain select channel to select value Gain NOTE: When StMode is set (gain value BACK Level meter at bottom of screen highlighted) to Linked, a single gain value field will be shown Press MENU/SEL to highlight MHz or kHz Freq. -
Page 8: Main Menu And Setup Screen Details
DCHT Main Menu and Setup Connecting the Signal Source Microphones, line level audio sources and instruments Screen Details can be used with the transmitter. Refer to the section entitled for details on the correct wiring for line level sources and microphones to take full advantage of the Entering the Main Menu Servo Bias circuitry. -
Page 9: Selecting Frequency
Press the MENU/SEL button to select each field. Use arrow buttons to adjust the frequency. • Name... - Name the DCHT to allow easy identifica- Each field will step through the available frequencies in tion on the M2R FlexList. The following are available a different increment. -
Page 10: Selecting Programmable Switch Functions
Linked mode Independent mode MKE 2* Sennheiser MKE 2; 4V, Low-Z, (+) M152* Lectrosonics M152; 4V, Low-Z, (+) Selecting StMode (stereo mode) Oth Lav* Other lavaliere; 4V, Low-Z, (+) The two channels can be set to Indep (independent) or Custom Manually configurable microphone level Linked. -
Page 11: Selecting Battery Type
Digital Transmitter Enable/Disable Remote Control Function The Custom option opens a setup screen that provides a variety of settings. Press SEL to select the custom The “dweedle tone” remote control is turned on or off setup item, then press the arrow buttons to with the Remote menu, setting the transmitter to react adjust the setting. - Page 12 PLUG viewed from outside NOTE: The Sanken CUB-01 is wired using pin 2 for the bias and will not work with the DCHT and MCTA6TA5M2 adapter. Refer to the Accessories section of this manual for details on the available adapter cables.
-
Page 13: Microphone Cable Termination For Non-Lectrosonics Microphones
Digital Transmitter Microphone Cable Termination for Non-Lectrosonics Microphones TA6F Connector Assembly Mic Cable Stripping Instructions 0.15" VIEWED FROM OUTSIDE 0.3" Crimping to Shield and Insulation Strip and position the cable so that the clamp can be crimped to contact both the mic cable shield and the insulation. -
Page 14: Firmware Update
USB Device Driver is not installed on your system. USB port. Follow the TROUBLESHOOTING steps to fix the error. Go to www.lectrosonics.com/US. In the top menu, hover the mouse over Support, and click on Wireless Support. On the right-hand-side Wireless Support Menu, choose Wireless Downloads. - Page 15 Step 7: Refer to Step 1 to return to Firmware web page. Down- In Lectrosonics USB Firmware Updater, choose the load Firmware Update and save to a local file on your detected device, browse to local Firmware File and click PC for easy locating when updating.
-
Page 16: Accessories
MCTA6TA5M2: Microphone and line level signals from LTBATELIM: Replaces the batteries for powering the microphones and other devices configured with TA5F DCHT from external DC, 5 to 25 volts. connectors for Lectrosonics wireless transmitters. 6 inch length. MCTA6XLRF2: Line level signals from two XLR-M outputs. -
Page 17: Troubleshooting
Digital Transmitter Troubleshooting Symptom: Possible Cause: Transmitter Battery LED off 1. Batteries are inserted incorrectly. when Power Switch “ON” 2. Batteries are low or dead. No Transmitter Modulation LEDs 1. Gain control turned all the way down. when Signal Should be Present 2. -
Page 18: Specifications
For body worn operation, this transmitter model has been tested and meets the FCC RF exposure guidelines when used with the Lectrosonics accessories supplied or designated for this product. Use of other accessories may not ensure compliance with FCC RF exposure guidelines. Contact Lectrosonics if you have any questions or need more information about RF exposure using this product.. -
Page 19: Service And Repair
LECTROSONICS’ Service Department is equipped and staffed to quickly repair your equipment. In warranty repairs are made at no charge in accordance with the terms of the warranty. Out-of-warranty repairs are charged at a modest flat rate plus parts and shipping. - Page 20 This warranty does not apply to used or demonstrator equipment. Should any defect develop, Lectrosonics, Inc. will, at our option, repair or replace any defective parts without charge for either parts or labor. If Lectrosonics, Inc. cannot correct the defect in your equipment, it will be replaced at no charge with a similar new item.
Need help?
Do you have a question about the DCHT and is the answer not in the manual?
Questions and answers