Table of Contents
Advertisement
Quick Links
9889 Garrymore Ln
Missoula, MT 59808
888-687-3552 | +1-406-549-0769
www.aquacreek.com
Check entire box and all packing materials for parts. Before beginning assembly, read the
instructions and identify parts using the fi gures and parts listed in this document.
It is critical that all parts be carefully inspected prior to installation. If any damage occurred in
transit, Aqua Creek Products, LLC must be notifi ed within three days of receipt of unit.
Proper installation cannot be overstressed, as an improper installation voids Aqua Creek's
warranty and may affect the safety of the user.
Copyright © 2019 Aqua Creek Products All Rights Reserved
US PATENT NUMBER: [D507,769 S] [7,249,386 B2]
300 LB. [136 kg] MAXIMUM WEIGHT CAPACITY
Lift safety can only be ensured if the lift is installed and
operated according to these instructions.
• NEVER permit children to play on or around the lift
• Do not allow children to use the lift without adult
supervision
• NEVER apply direct water pressure to the electronics
• NEVER use the lift with a dry pool
ADA COMPLIANT
READ CAREFULLY
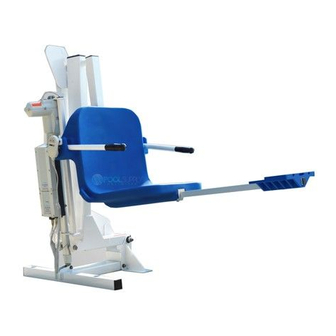
Ambassador
Pool Lift
PART #: F-PPXRD-NA-03
MANDATORY
LEAVE THIS MANUAL WITH LIFT OWNER
Read and follow all instructions.
1
Revised 6/17/19
Advertisement
Table of Contents

Related Manuals for Aqua Creek Products Ambassador


Summary of Contents for Aqua Creek Products Ambassador
- Page 1 It is critical that all parts be carefully inspected prior to installation. If any damage occurred in transit, Aqua Creek Products, LLC must be notifi ed within three days of receipt of unit. Proper installation cannot be overstressed, as an improper installation voids Aqua Creek’s warranty and may affect the safety of the user.
-
Page 2: Table Of Contents
2. 24V VITO BATTERY 3. VITO BATTERY CHARGER 4. VITO HANDSET 5. SAFETY BELT 6. VITO BATTERY TEST CABLE 7. ANCHOR JIG PLATE & HARDWARE (IF ORDERED WITH ANCHOR) Copyright © 2019 Aqua Creek Products All Rights Reserved Revised 6/17/19... - Page 3 2 " 12" CHAIR C L 2 " 16" (ADA REQ'D MIN.) *NOTE: 22 1/2" IS THE POOL WALL MINIMUM SETBACK 38" IS THE MAXIMUM LIFT SETBACK. FIGURE 1 Copyright © 2019 Aqua Creek Products All Rights Reserved Revised 6/17/19...
-
Page 4: Anchor Installation: Core-Drill Retro-Fit
NOTE: We recommend using masking tape around the holes on the bottom of the anchor jig plate to help prevent the anchor plate from being accidentally epoxied to the pool deck. Copyright © 2019 Aqua Creek Products All Rights Reserved Revised 6/17/19... - Page 5 OBSTRUCTION) LIFT OUTLINE USE JIG-PLATE (LARGER HOLES) USE JIG-PLATE TO MARK LOCATIONS ASSEMBLY FOR TEST-FITTING AND TO HOLD ANCHORS IN PLACE AS EPOXY CURES FIGURE 3 Copyright © 2019 Aqua Creek Products All Rights Reserved Revised 6/17/19...
-
Page 6: Anchor Installation: Saw-Cut Retro-Fit
10. Once the concrete has cured, the lift is ready *SETBACK DIMENSIONS ARE FOR FLAT DECK APPLICATIONS. FOR SLOPED DECKS OR OTHER FEATURES, CONTACT AQUA CREEK BEFORE INSTALLATION. to be mounted to the anchoring system. FIGURE 5 Copyright © 2019 Aqua Creek Products All Rights Reserved Revised 6/17/19... - Page 7 680.26) SEE FIGURE 5, PAGE 6 6. Pour your concrete and fi nish the pool deck surface. 7. Once the concrete has cured the lift is ready to be mounted to the anchoring system. Copyright © 2019 Aqua Creek Products All Rights Reserved Revised 6/17/19...
- Page 8 1. Attach seat belt to the seat. SEE FIGURE 7 FOR EASY ACCESS 2. Install the Ambassador pool lift onto the three (3) anchors using the supplied 1/2 inch x 1 1/2 inches stainless steel hex-head bolts and 1/2 inch stainless steel washers.
- Page 9 2. Using the supplied 1/4” hardware, fasten the legrest assembly to the 2 x 2 tubing using a 5/32” allen wrench. LEGREST ASSEMBLY 1/4" FLAT WASHER 1/4" LOCK WASHER 1/4" X 1/2" BUTTON-HEAD LEGREST IN LEGREST OUT Copyright © 2019 Aqua Creek Products All Rights Reserved Revised 6/17/19...
-
Page 10: Basic Troubleshooting
Note: If you feel your lift is malfunctioning due to a faulty battery or connections, contact Aqua Creek Products for a testing kit. Copyright © 2019 Aqua Creek Products All Rights Reserved Revised 6/17/19... -
Page 11: Battery Test Cable Instructions
24V BATTERY BATTERY CONNECTOR MALE CONNECTOR BATTERY TEST CABLE INSERT TEST PROBES TO CHECK VOLTAGE Copyright © 2019 Aqua Creek Products All Rights Reserved Revised 6/17/19... -
Page 12: Pinch Point Locations
Pinch Point Locations CAUTION! PINCH POINT AREA! Copyright © 2019 Aqua Creek Products All Rights Reserved Revised 6/17/19... -
Page 13: Proper Care Of Pool & Spa Lifts
3M Scotch Brite™ pad. Use white epoxy paint to touch up the finish. Apply wax to protect when dry. For service and/or replacement parts, contact Aqua Creek Products Toll free: (888) 687-3552 Copyright © 2019 Aqua Creek Products All Rights Reserved... -
Page 14: Ambassador Parts List
5/16”-18 F-45ACB-C RESISTANT BOLT, 18-8 SS, 3/8 X 1 BOLT, 316 SS, 1/2” X 1 3/4” BS 3/8 X 1-3/4 18-8 3/4 SHOULDER, 5/16- PPB-CCB-10 FHSCS, CUSTOM 18 THREAD Copyright © 2019 Aqua Creek Products All Rights Reserved Revised 6/17/19... - Page 15 SHALL AQUA CREEK’S LIABILITY EXCEED THE ENTIRE AMOUNT PAID TO AQUA CREEK BY THE ORIGINAL PURCHASER FOR THE FAILED OR DEFECTIVE PRODUCT. IN NO EVENT SHALL AQUA CREEK PRODUCTS, LLC BE LIABLE FOR ANY INCIDENTAL, CONSEQUENTIAL, SPECIAL, INDIRECT, PUNITIVE OR EXEMPLARY DAMAGES OR LOST PROFITS FROM ANY BREACH OF THIS LIMITED WARRANTY OR OTHERWISE.
Need help?
Do you have a question about the Ambassador and is the answer not in the manual?
Questions and answers