Table of Contents
Advertisement
Quick Links
Advertisement
Table of Contents

Subscribe to Our Youtube Channel
Related Manuals for MIR MIR600


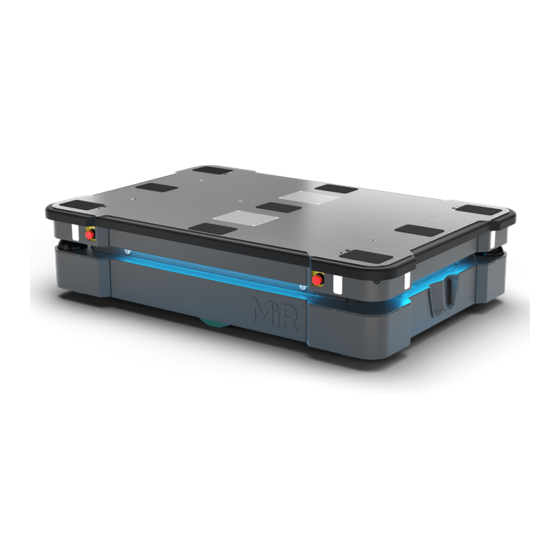
Summary of Contents for MIR MIR600
- Page 1 Quick Start (en) Date: 08/2021 Revision: v.1.1...
-
Page 2: Table Of Contents
4.2 The Operating mode key 5. Accessing the internal parts 5.1 Front compartment 5.2 Rear compartment 5.3 Side compartments 5.4 Top compartments 6. IT security 6.1 Managing users and passwords MiR600 Quick Start (en) 08/2021 - v.1.1 ©Copyright 2021: Mobile Industrial Robots A/S. - Page 3 7.6 Connecting the robot to a WiFi network 7.7 Driving the robot in Manual mode 7.8 Checking the hardware status 7.9 Mounting the nameplate 7.10 Shutting down the robot 7.11 Charging the robot MiR600 Quick Start (en) 08/2021 - v.1.1 ©Copyright 2021: Mobile Industrial Robots A/S.
-
Page 4: Version History
1. Version history This table shows current and previous versions of this document. MiR600 Revision Release date Description 2021-08-12 General improvements throughout the document. 2021-07-23 First edition. MiR600 Quick Start (en) 08/2021 - v.1.1 ©Copyright 2021: Mobile Industrial Robots A/S. -
Page 5: Safety
Alerts against unsafe practices. Carefully read the message that follows to prevent minor or moderate injury. NOTICE Indicates important information, including situations that can result in damage to equipment or property. MiR600 Quick Start (en) 08/2021 - v.1.1 ©Copyright 2021: Mobile Industrial Robots A/S. -
Page 6: General Safety Precautions
The robot may drive into a ladder, scaffold, or similar equipment that has a person standing on it. Personnel risk fall injuries, and equipment may be damaged. • Don't place ladders, scaffolds, or similar equipment in the robot's work environment. MiR600 Quick Start (en) 08/2021 - v.1.1 ©Copyright 2021: Mobile Industrial Robots A/S. - Page 7 Using a charging device different from the one supplied by the manufacturer can cause a fire and thereby burn injuries to nearby personnel and damage to the robot and equipment. • Only use an original MiR charger. MiR600 Quick Start (en) 08/2021 - v.1.1 ©Copyright 2021: Mobile Industrial Robots A/S.
- Page 8 Modifications or manipulations of the battery may lead to considerable safety risks and are therefore prohibited. • Do not use the battery for anything other than MiR600. MiR600 Quick Start (en) 08/2021 - v.1.1 ©Copyright 2021: Mobile Industrial Robots A/S.
-
Page 9: Intended Use
For details about the environmental conditions in which MiR600 should operate, see specifications for MiR600 on the MiR website. MiR600 is intended to be commissioned according to the guidelines in your robot's user guide. This is a prerequisite for safe usage of MiR600. - Page 10 If used with custom modules, all obligations of a manufacturer apply to the individual who performs the modifications. All modifications must be in accordance with the machinery directive. MiR600 is designed for and all risks are considered when used with one of the following types of top modules: •...
-
Page 11: Users
2. Safety 2.4 Users MiR600 is only intended to be used by personnel that have received training in their required tasks. There are three types of intended users for MiR600: commissioners, operators, and direct users. Commissioners Commissioners have thorough knowledge of all aspects of commissioning, safety, use, and maintenance of MiR600 and have the following main tasks: •... -
Page 12: Foreseeable Misuse
2. Safety All other persons in the vicinity of MiR600 are considered indirect users and must know how to act when they are close to the robot. For example, they must be aware that visibly marked operating hazard zones must be respected. -
Page 13: Warning Label
2.7 Warning label MiR600 is supplied with a warning label that specifies that it is strictly prohibited to ride on the robot. The label must be placed on the robot or top module so that it is clearly visible. -
Page 14: Light Indicators And Speakers
The LED light bands running all the way around the robot indicate the robot’s current operational state. Colors may also be used as part of missions, but as standard, status lights indicate the statuses described in Table 3.2. MiR600 Quick Start (en) 08/2021 - v.1.1 ©Copyright 2021: Mobile Industrial Robots A/S. - Page 15 Waiting for MiR Fleet resource or for another MiR robot to connected to MiR Fleet move only) When the robot's battery reaches a critically low level of power (0-1%), the ends of the status lights flash red. MiR600 Quick Start (en) 08/2021 - v.1.1 ©Copyright 2021: Mobile Industrial Robots A/S.
-
Page 16: Signal Lights
CAUTION Changing the safety system can cause the robot to not comply with safety standards. • Do not disable the sound in the safety system. MiR600 Quick Start (en) 08/2021 - v.1.1 ©Copyright 2021: Mobile Industrial Robots A/S. - Page 17 Make sure to adjust the volume of the robot's warning sounds so they are audible in the robot's work environment. • Implement warning sounds from the robot in missions and areas where it can reduce the risk of hazardous situations. MiR600 Quick Start (en) 08/2021 - v.1.1 ©Copyright 2021: Mobile Industrial Robots A/S.
-
Page 18: Control Panel
Pressing this button stops the robot. After pressing this button, you must press the Resume button to let the robot continue operating. Color indication: • Red: It is possible to engage the Manual stop. MiR600 Quick Start (en) 08/2021 - v.1.1 ©Copyright 2021: Mobile Industrial Robots A/S. -
Page 19: The Operating Mode Key
Locks the robot. The robot blocks the wheels; you cannot start a mission or drive the robot manually. • Right position: Manual mode Puts the robot in Manual mode. MiR600 Quick Start (en) 08/2021 - v.1.1 ©Copyright 2021: Mobile Industrial Robots A/S. - Page 20 Remove the Operating mode key during normal operation. The vibrations from the robot's driving may shake the key and plug, and can cause an unwanted Protective stop. MiR600 Quick Start (en) 08/2021 - v.1.1 ©Copyright 2021: Mobile Industrial Robots A/S.
-
Page 21: Accessing The Internal Parts
5. Accessing the internal parts 5. Accessing the internal parts Most internal parts of MiR600 are accessed through maintenance hatches that open to different compartments. CAUTION Opening or removing hatches from the robot exposes parts connected to the power supply, risking damage to the robot from a short circuit and personnel getting burnt. -
Page 22: Front Compartment
5. Accessing the internal parts 5.1 Front compartment To open the front compartment, turn the two screws 90° with a flat-head screwdriver, and pull out the compartment. MiR600 Quick Start (en) 08/2021 - v.1.1 ©Copyright 2021: Mobile Industrial Robots A/S. -
Page 23: Rear Compartment
5. Accessing the internal parts 5.2 Rear compartment To open the rear compartment, follow these steps: Push the two white buttons to unlock the hatch. MiR600 Quick Start (en) 08/2021 - v.1.1 ©Copyright 2021: Mobile Industrial Robots A/S. - Page 24 5. Accessing the internal parts Pull open the hatch. You can now access the Manual brake release switch and MiR Controller interface. To access the motor controller carrier board and dynamic brake contactors, follow these steps: Disconnect the status light connector.
- Page 25 Remove the hatch by twisting the two hinges. Remove the seven screws on the rear panel. Loosen the top three screws while holding the bottom of the panel. MiR600 Quick Start (en) 08/2021 - v.1.1 ©Copyright 2021: Mobile Industrial Robots A/S.
- Page 26 5. Accessing the internal parts Remove the panel by sliding it downwards and out to access the rear maintenance compartment. MiR600 Quick Start (en) 08/2021 - v.1.1 ©Copyright 2021: Mobile Industrial Robots A/S.
-
Page 27: Side Compartments
5. Accessing the internal parts 5.3 Side compartments To open a side compartment, push the two white buttons to unlock the hatch, and pull it open. MiR600 Quick Start (en) 08/2021 - v.1.1 ©Copyright 2021: Mobile Industrial Robots A/S. -
Page 28: Top Compartments
5. Accessing the internal parts 5.4 Top compartments To open a top compartment, remove the four screws and lift off the top cover. MiR600 Quick Start (en) 08/2021 - v.1.1 ©Copyright 2021: Mobile Industrial Robots A/S. -
Page 29: Security
• Create dedicated user accounts under the relevant user group for each person accessing MiR600, and ensure that the users change the password on their first sign-in. It is not recommended to have several users share the same account. •... - Page 30 2.9.0, the security patches will still be installed when you update to 2.9.1 or higher. MiR600 Quick Start (en) 08/2021 - v.1.1 ©Copyright 2021: Mobile Industrial Robots A/S.
-
Page 31: Getting Started
7. Getting started 7. Getting started This section describes how to get started with MiR600. NOTICE To be able to use MiR600, your robot must be running software version 2.12.0 or higher. NOTICE Read Safety on page 5 before powering up MiR600. - Page 32 Figure 7.1. The box containing the robot and accessories. The box contains: • The MiR600 robot • A MiR600 document folder containing a USB flash drive and the following printed documents: • MiR600 Quick Start • The CE Declaration of Conformity for your robot •...
-
Page 33: Unpacking Mir600
Place the box with the robot so that there is at least three meters of free space at the front or the back of the box. This is necessary as the robot drives out of the box on a ramp. MiR600 Quick Start (en) 08/2021 - v.1.1 ©Copyright 2021: Mobile Industrial Robots A/S. - Page 34 Remove the screws that attach the walls of the box to the box lid and the base of the box. Remove the lid from the box, and remove the wooden lath beneath the lid. MiR600 Quick Start (en) 08/2021 - v.1.1 ©Copyright 2021: Mobile Industrial Robots A/S.
- Page 35 Place the lid of the box so that you can use it as a ramp. Align the lid so that it is flush with the base of the box. Take the folder with the printed documents and the USB flash drive out of the box. MiR600 Quick Start (en) 08/2021 - v.1.1 ©Copyright 2021: Mobile Industrial Robots A/S.
- Page 36 7. Getting started Remove the walls of the box and the protective foam blocks. Cut the protective straps. MiR600 Quick Start (en) 08/2021 - v.1.1 ©Copyright 2021: Mobile Industrial Robots A/S.
-
Page 37: Connecting The Battery
Once you have accessed the left side compartment, pull the Battery lock pin out, and pull the Battery lever to the top position. The battery is now connected, and you can close the side maintenance hatch. MiR600 Quick Start (en) 08/2021 - v.1.1 ©Copyright 2021: Mobile Industrial Robots A/S. -
Page 38: Powering Up The Robot
Press the Power button for five seconds. The robot turns on the red signal lights and yellow wavering status lights and starts the software initialization process. MiR600 Quick Start (en) 08/2021 - v.1.1 ©Copyright 2021: Mobile Industrial Robots A/S. -
Page 39: Connecting To The Robot Interface
Once connected, you can configure the robot's settings and connect it to a wireless network. You can purchase a WiFi access point dongle from MiR to be able to connect to the robot wirelessly. Otherwise, you will need to use your own access point or an Ethernet cable to connect to the robot. - Page 40 Connect the WiFi access point dongle to the Ethernet port for a wireless connection, or connect your device directly to the robot using an Ethernet cable. If you are using an access point, connect your device to the access point. The MiR WiFi dongle name has the following format: MiRXXXXXX.
- Page 41 This also applies to newly supplied robots, as there may have been important software updates during the storage time and shipment of the robot. Contact your distributor for the latest recommended update file. MiR600 Quick Start (en) 08/2021 - v.1.1 ©Copyright 2021: Mobile Industrial Robots A/S.
-
Page 42: Connecting The Robot To A Wifi Network
This enables you to access the robot interface via your WiFi network by entering the assigned IP address of your robot in a web browser. MiR600 Quick Start (en) 08/2021 - v.1.1 ©Copyright 2021: Mobile Industrial Robots A/S. - Page 43 To connect the robot to a WiFi network, follow these steps: Connect to your robot as described in Connecting to the robot interface on page 39. Go to System > Settings > WiFi, and select + Add connection. MiR600 Quick Start (en) 08/2021 - v.1.1 ©Copyright 2021: Mobile Industrial Robots A/S.
- Page 44 7. Getting started Select the network you want the robot to be connected to, and fill out the displayed fields. MiR600 Quick Start (en) 08/2021 - v.1.1 ©Copyright 2021: Mobile Industrial Robots A/S.
-
Page 45: Driving The Robot In Manual Mode
Drive carefully to avoid collisions with any personnel or objects when driving the robot in Manual mode. • Avoid driving the robot manually without a clear visual of the robot. MiR600 Quick Start (en) 08/2021 - v.1.1 ©Copyright 2021: Mobile Industrial Robots A/S. - Page 46 On the robot, press the Resume button. The status lights turn blue, indicating that the robot is in Manual mode. Drive the robot off the ramp using the joystick. MiR600 Quick Start (en) 08/2021 - v.1.1 ©Copyright 2021: Mobile Industrial Robots A/S.
-
Page 47: Checking The Hardware Status
To check that all hardware components work as intended, follow these steps: Sign in to the robot interface—see Connecting to the robot interface on page 39. Go to Monitoring > Hardware health. MiR600 Quick Start (en) 08/2021 - v.1.1 ©Copyright 2021: Mobile Industrial Robots A/S. -
Page 48: Mounting The Nameplate
For more information, see Hardware health in MiR Robot Reference Guide on the MiR website. 7.9 Mounting the nameplate Before using MiR600, you must mount its unique nameplate to it. The nameplate contains information specific to your MiR application. NOTICE The nameplate must be mounted as described in the following steps. - Page 49 To mount the nameplate correctly, follow these steps: Locate the right side hatch. Clean the area marked in the image below with a degreasing agent. Mount the nameplate on the cleaned area. MiR600 Quick Start (en) 08/2021 - v.1.1 ©Copyright 2021: Mobile Industrial Robots A/S.
-
Page 50: Shutting Down The Robot
Ensure that the robot is not moving or executing an action. Press the Power button for three seconds. The robot starts the shutdown process. The status lights waver yellow, and the Power button blinks red. MiR600 Quick Start (en) 08/2021 - v.1.1 ©Copyright 2021: Mobile Industrial Robots A/S. -
Page 51: Charging The Robot
7.11 Charging the robot This section describes how to charge MiR600 using a MiR cable charger. A MiR cable charger is not part of the MiR600 standard delivery. Contact your distributor for more information. To charge MiR600 with a standard MiR cable charger, you will also need an adapter for the cable to fit to the battery connector. The adapter is supplied by... - Page 52 On the robot, pull out the Battery lock pin, and pull the Battery lever down to the bottom position. The battery is now disconnected and unlocked. Grab the handle, and pull the battery out approximately 10 cm. MiR600 Quick Start (en) 08/2021 - v.1.1 ©Copyright 2021: Mobile Industrial Robots A/S.
- Page 53 Use only an original MiR cable charger. Once the robot has finished charging, reconnect the battery, and close the maintenance hatch. For information about the charging time, see specifications on the MiR website. MiR600 Quick Start (en) 08/2021 - v.1.1 ©Copyright 2021: Mobile Industrial Robots A/S.
- Page 54 Copyright © 2021 by Mobile Industrial Robots A/S. Contact the manufacturer: Mobile Industrial Robots A/S Emil Neckelmanns Vej 15F DK-5220 Odense SØ www.mobile-industrial-robots.com Phone: +45 20 377 577 Email: support@mir-robots.com CVR: 35251235 MiR600 Quick Start (en) 08/2021 - v.1.1 ©Copyright 2021: Mobile Industrial Robots A/S.
Need help?
Do you have a question about the MIR600 and is the answer not in the manual?
Questions and answers