Advertisement
Quick Links
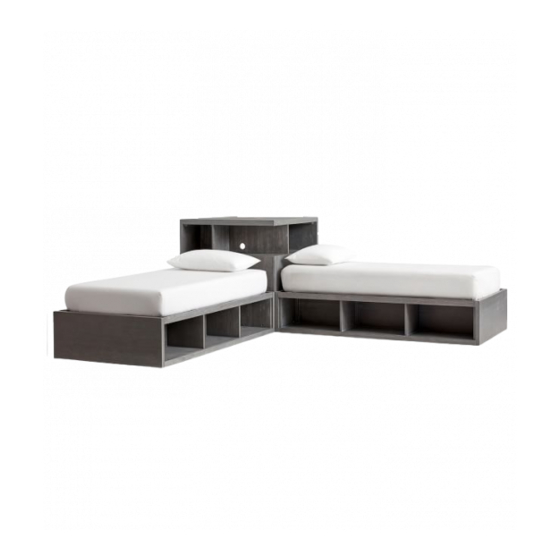
Store-It Bed
Parts Included:
A - Top Panel (2)
B2 - Right Panel (2)
D - Back Panel (2)
F - Foot Part (1)
Hardware Included:
H - Screw (3.5 x 12 mm) (Twin and Full Bed 40 pcs,
Queen 44 pcs)
J - Lock Washer (8)
L - Allen Key (1)
B1 - Left Panel (2)
C - Center Panel (2)
E - Bottom Panel (2)
G - Center Platform (1)
I - Flat Washer (8)
K - Allen Head Bolt (M6 x 32 mm) (8)
M - Cam Bolt (16)
www.pbteen.com
Advertisement

Related Manuals for PB TEEN Store-It Bed


Summary of Contents for PB TEEN Store-It Bed
- Page 1 Store-It Bed Parts Included: A - Top Panel (2) B1 - Left Panel (2) B2 - Right Panel (2) C - Center Panel (2) D - Back Panel (2) E - Bottom Panel (2) F - Foot Part (1) G - Center Platform (1) Hardware Included: H - Screw (3.5 x 12 mm) (Twin and Full Bed 40 pcs,...
- Page 2 N - Cam Lock (16) O - Screw (4 x 20 mm) (Twin and Full - 24 pcs, Queen - 27pcs ) Tools Required: Phillips Head Screwdriver (not included) Assembly Instructions: Find a carpeted or scratch-free surface to do the assembly 1.
- Page 3 Picture 2 5. Insert 6 remaining Cam Bolts (M) into 6 inside pre-drilled holes on Top Panel (A). (Outside pre-drilled holes on this panel are places for wood dowels fit into. 6. Continue by placing the Top Panel (A) down on the Left, Right and Center Panel that has just been assembled. See Picture 3.
- Page 4 8. Attach the Back Panel (D) to the part just assembled by inserting Screws (H) into the pre-drilled holes. Use Phillips Head Screwdriver to tighten all. (See Picture 4) Picture 4 Repeat Steps 1-8 to create another piece that’s exactly the same. 9.
- Page 5 Store-It Bed Corner Unit Part Included: A - Top Part – 1 pc B – Leg – 4 pcs C1 - Side Panel (With V-Groove) – 1 pc C2 - Side Panel – 1 pc D - Top Panel – 1 pc Hardware Enclosed: E - Flat Washer φ...
- Page 6 Step 1: Attaching Legs (Fig. 1 ) • Carefully lay the Top Part (A) upside down on a carpet or scratch-free surface. • Insert the exposed bolt on each Leg (B) into the pre-drilled holes on the Top Part (A). Turn clock wise to tighten.
- Page 7 Store-It Corner Unit Hutch Pre-Assembly: • Please read all instructions before beginning assembly. • Save all packing materials until assembly is complete to avoid accidentally discarding smaller parts or hardware. • Two adult assembly is recommended. Parts Included: B1 - Left Side Part - 1 pc B2 - Right Side Part - 1 pc A - Center Part - 1 pc (has two pre-drilled holes on the...
- Page 8 Phillips Head Screwdriver (not included) Assembly Instructions: 1. Attach the Left Side Part (B1) and Right Side Part (B2) to the Center Part (A) by aligning the pre-drilled holes of the Center Part (A) with inserted nut on the side panel of Left Side Part (B1) and Right Side Part (B2), as shown in Figure 1 below.
- Page 9 the Left Side Part (B1) and Right Side Part (B2) in 8 places. See Figure 3. Figure 3 4. Attach the Support Leg (D) underneath the Top (C) by aligning the pre-drilled holes on the Support Leg (D) (which has inserted nuts) with the pre-drilled holes at the corner of the Top (C). Secure with Flat Washer (F), Lock Washer (G) and Allen Head Bolt (M) and tighten with the Allen Key (I) in 4 places.
- Page 10 over the Store-It Corner Unit and the pre-drilled holes located in the rear of the Store-It Corner Hutch. Secure with Wood Screws (L). See Figure 5. Figure 5 6. Determine the desired height for the Shelves (E) using the pre-drilled holes located within the hutch as a guide. Insert the Shelf Pegs (J) into the pre-drilled holes on the interior sides of the Left Side Part (B1) and Right Side Part (B2) until fully inserted.
- Page 11 Store-It Bed Twin with Corner Unit Hardware Enclosed: A - (8) Flat Washer φ 6.5 – 8 pcs B - Lock Washer φ 6.5 – 8 pcs C - (8) Carriage Bolt - 8 pcs (M6 x 38mm) D - Allen Key – 1 pc...
Need help?
Do you have a question about the Store-It Bed and is the answer not in the manual?
Questions and answers