Table of Contents
Advertisement
Available languages
Available languages
Quick Links
Advertisement
Chapters
Table of Contents

Subscribe to Our Youtube Channel
Related Manuals for Fantini Cosmi O81RF


Summary of Contents for Fantini Cosmi O81RF
- Page 1 TERMOSTATO WIRELESS PER RADIATORE italiano pag. 2 english pag. 14...
-
Page 2: Table Of Contents
IMPORTANTE: Questo manuale deve essere letto attentamente prima di utilizzare il dispositivo ed inoltre, deve essere conservato in un luogo tale da poterlo consultare facilmente in caso di necessità. INDICE Pagina 1. Introduzione e utilizzo previsto 2. Descrizione delle segnalazioni e funzionalità dei tasti 3. -
Page 3: Introduzione E Utilizzo Previsto
C801, il quale può gestire sino ad otto termostati ubicati nello stesso locale/zona. Le comunicazioni radio fra il termostato O81RF ed il cronotermostato C801 sono bidirezionali, in tal modo si garantisce che le informazioni trasmesse pervengano al destinatario ed inoltre si possono gestire le segnalazioni diagnostiche riguardanti la corretta funzionalità... -
Page 4: Istruzioni Per La Sicurezza
TASTI Tasto per il cambio del modo di funzionamento da Automatico (Auto) a Manuale (Manu) e viceversa. Tasto per attivare/disattivare la funzione “Incremento temperatura” (BOOST) e per attivare la funzione di apprendimento. Tasto per il cambio del regime di funzionamento da Economy a Comfort e viceversa. -
Page 5: Istruzioni Per Lo Smaltimento
4. ISTRUZIONI PER LO SMALTIMENTO Non smaltire il dispositivo insieme ai rifi uti domestici indifferenziati! Le apparecchiature elettroniche devono essere smaltite presso gli appositi centri di raccolta per componenti e apparecchiature elettroniche usate, nel rispetto della Direttiva riguardante i Rifi uti di Apparecchiature Elettriche ed Elettroniche. -
Page 6: Montaggio Sul Radiatore
6. MONTAGGIO SUL RADIATORE Il termostato O81RF è di facile installazione e, inoltre, non occorre procedere con lo scarico dell’acqua di riscaldamento o effettuare interventi nell’impianto del riscaldamento. Non occorrono attrezzi speciali, né occorre disinserire il riscaldamento. La ghiera di fi ssaggio di cui dispone il termostato permette il montaggio diretto in presenza di valvole con attacco fi... -
Page 7: Anello Di Supporto
di valvole di tipo RAV, la prolunga del perno (F) deve essere collocata sul perno della valvola prima del montaggio. Importante: verifi care sporgenze presenti all’interno dell’adattatore (D) corrispondano alle posizioni delle tacche (E) presenti sulla valvola. Bloccare a fondo l’adattatore (corrispondente alla valvola) sul corpo della valvola. -
Page 8: Ciclo Di Adattamento
“apprendimento” da parte del cronotermostato di ciascun termostato che si desidera attivare nel locale/zona. Per effettuare l’apprendimento, procedere nel modo seguente: • Predisporre il cronotermostato C801 da associare in modalità “apprendimento” (vedere manuale C801); • Attivare la modalità apprendimento sul termostato O81RF, italiano... -
Page 9: Ripristino Parametri Di Fabbrica (Res)
Ripetere l’operazione per ciascun termostato da apprendere. Non appena il termostato O81RF è stato acquisito dal cronotermostato, tutti i parametri (es. data, ora, programma settimanale ecc.) vengono trasferiti nel termostato tramite la connessione wireless. -
Page 10: Funzionamento Automatico/Manuale
Ad ogni breve pressione del tasto “Auto/Manu”, il termostato passa da una modalità operativa alla successiva. Nota: il cambio di modalità operativa o di temperatura effettuata su un termostato O81RF, viene acquisito da tutti i dispositivi appartenenti al gruppo del locale/zona. 11. FUNZIONE “INCREMENTO TEMPERATURA” (BOOST) La funzione “BOOST”... -
Page 11: Temperature Comfort Ed Economy
“Economy” e viceversa; i valori sono impostati tramite il cronotermostato. Nota: il cambio di regime Comfort/Economy eseguita su un termostato O81RF, viene acquisito da tutti i dispositivi appartenenti al gruppo del locale/zona. L’impostazione verrà adottata fi no all’inizio della successiva fascia oraria giornaliera. -
Page 12: Individuazione E Soluzione Dei Problemi
14. INDIVIDUAZIONE E SOLUZIONE DEI PROBLEMI CODICE DI PROBLEMA SOLUZIONE ERRORE ED INDICAZIONI VISUALIZZATE SUL DISPLAY Tensione batteria troppo Sostituire le batterie Simbolo “ ” bassa. Azionamento valvola lento. Controllare l’instal- lazione, verifi cando l’eventuale blocco del perno presente sulla valvola del radiatore. -
Page 13: Dati Tecnici
R&TTE ed alle norme EN 60730-1 e parti seconde. La Dichiarazione CE completa è scaricabile dal sito web “www.fantinicosmi.it”. Fantini Cosmi S.p.A. si riserva la facoltà di introdurre tutte le modifi che tecniche e costruttive che riterrà necessarie, senza obbligo di preavviso. - Page 14 Important notice: Read this manual carefully before starting to use the device. Keep the manual so you can refer to it at a later date should you need to. INDICE Page 1. Introduction and intended use 2. Display and keyboard description 3.
-
Page 15: Introduction And Intended Use
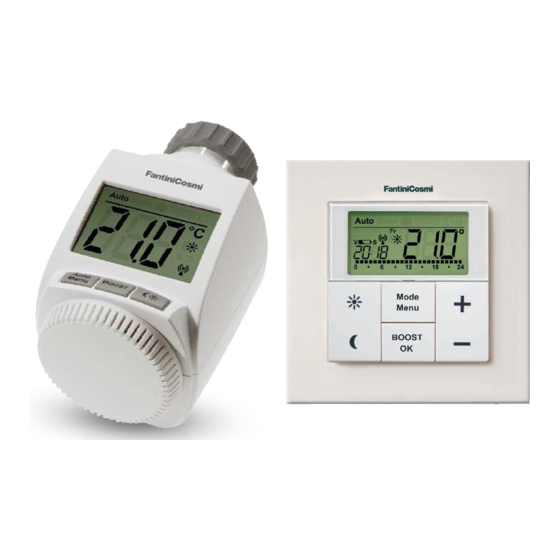
1. INTRODUCTION AND INTENDED USE The radiator thermostat O81RF can conveniently regulate the single radiator according to the wireless commands received from the C801 weekly thermostat that can manage up to 8 radiator thermostat. The weekly thermostat C801 has an internal sensor that measures the temperature in the room/zone and cyclically transmits it to the radiator thermostats O81RF. -
Page 16: Safety Instructions
Hand-wheel used for defi ne the manual setpoint settings. INFORMATION DISPLAYED DURING NORMAL OPERATION The current temperature is displayed during normal operation, along with the mode. In the example, the O81RF radiator thermostat is in automatic mode (Auto) and the comfort temperature ( ) of 21.0°C is set. -
Page 17: Instructions For Disposal
4. INSTRUCTIONS FOR DISPOSAL Do not dispose of the device with regular domestic waste! Electronic equipment must be disposed of at local collection points for waste electronic equipment in compliance with the Waste Electrical and Electronic Equipment Directive. Used batteries should not be disposed of with regular domestic waste! Instead, take them to your local battery disposal point. -
Page 18: Mounting On A Radiator
6. MOUNTING ON A RADIATOR The O81RF radiator thermostat is easy to install, and can be done without draining heating water or intervening in the heating system. No special tools are required, nor does the heating have to be switched off. -
Page 19: Support Ring
have been latched onto the valve body, fasten the adapters with the enclosed screw and nut. With the RAV type of valve, the tappet extension (F) should be placed on the valve pin before installation. The RAVL adapter does not have to be screwed on. -
Page 20: Adapter Run
Note: Teach-in mode can be activated even whilst “InS” is still displayed. 8. TEACHING-IN OF C801 PROGRAMMABLE THERMOSTAT The O81RF radiator thermostat must work with a C801 weekly thermostat; for this reason, each radiator thermostat will be taught-in to the weekly thermostat directly. These then take over the settings of the weekly thermostat (e.g. -
Page 21: Restore The Factory Setup (Res)
C801 weekly thermostat. 9. RESTORE THE FACTORY SETUP (rES) The O81RF radiator thermostat can be reset to the initial state manually. Restoring the initial state deletes all settings and information about taught-in devices. To restore the initial setup, proceed as follows: •... -
Page 22: Automatic/Manual Setting
• Manu: the temperature set manually using the hand-wheel is maintained permanently. Note: If the operating mode or the temperature on one O81RF radiator thermostat in the room/zone is changed, the change will be adopted by all devices associates. 11. SET “BOOST” OPERATING (BOOST) The Boost function can create the sensation of a rise in room/zone temperature to the human body. -
Page 23: Comfort Ed Economy Temperature
The temperature values are setting by the C801 weekly thermostat. Note: If the operating mode on one O81RF radiator thermostat in the room/zone is changed, the change will be adopted by all devices associates. -
Page 24: Troubleshooting
14. TROUBLESHOOTING PROBLEM OR POSSIBLE CAUSE PROPOSED SOLUTION ERROR CODE Battery simbol “ ” Battery voltage too low. Replace batteries. Valve drive sluggish. Check the installation; check whether the pin on the heating valve is stuck. Actuating range too wide. Check the fastening of the actuator. -
Page 25: Technical Data
Fantini Cosmi S.p.A. declares that the “O81RF Wireless Radiator Thermostat” device conforms to the 1995/5/CE R&TTE Directive and rules EN60730-1 e 2nd part. The full EC Declaration is available for download from “www.fantinicosmi.it” web site. Fantini Cosmi S.p.A. reserves the right to modify its products without notice. english... - Page 26 NOTE english...
- Page 27 NOTE english...
- Page 28 FANTINI COSMI S.p.A. Via dell’Osio, 6 20090 Caleppio di Settala, Milano Tel. +39 02 956821 | Fax +39 02 95307006 info@fantinicosmi.it supportotecnico@fantinicosmi.it www.fantinicosmi.it...
Need help?
Do you have a question about the O81RF and is the answer not in the manual?
Questions and answers