Table of Contents
Advertisement
Quick Links
Advertisement
Table of Contents

Subscribe to Our Youtube Channel
Related Manuals for Fantini Cosmi CH150TS Series


Summary of Contents for Fantini Cosmi CH150TS Series
- Page 1 WEEKLY PROGRAMMABLE THERMOSTAT BACKLIGHTED TOUCH SCREEN...
-
Page 2: Table Of Contents
separate probe ..........15 INDEX Statistical data ..........15 Introduction ..............3 Maintenance ............16 Controls and indications ..........4 Keyboard lock ..........16 Controls .............4 Touch Screen ..........16 Indications ............5 Replacing the batteries ........16 User manual ............6 Installation .............18 Setting the date and time ........6 Fastening the base ..........18 Summer/Winter selection ........7 Electric connections ........19... -
Page 3: Introduction
mote management via SMS messages. Introduction Chronothermostat CH150TS/151TS/152TS is The telephone activator enables the following: suitable to measure the ambient temperature • remote communication with the chronother- and to control the heating and air conditioning mostat to know the ambient temperature or system to which it is connected. -
Page 4: Controls And Indications
6. Button used for the “Programming” or “Copy” Controls and indications or “Statistical data displaying” functions * 7. Rotary selector for temperature correction: Controls T1, Manual temperature, Jolly temperature, Antifreeze temperature * 8. Rotary selector for correcting temperature T2 or the Jolly operating mode duration * 9. -
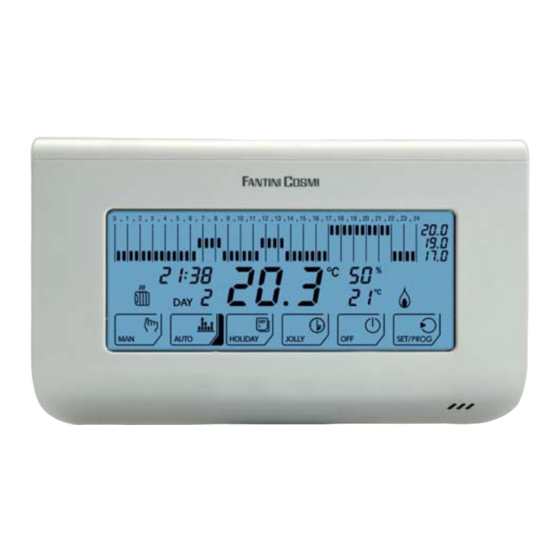
Page 5: Indications
13. Summer operation Indications 14. Battery charge level 15 3 4 15. keyboard lock Note: Pressing of a key is signalled by a short acoustic signal. When ON, backlighting will stay on for about three seconds after pressing a key 13 12 1. -
Page 6: User Manual
2. Modify the hour setting by means of the ▲ User manual and ▼ buttons, then go to the minute setting To operate the chronothermostat after it has by means of the ► button. been installed, proceed as follows: 1. Set the date and time. 2. -
Page 7: Summer/Winter Selection
5. Press ENTER again to exit the programming Operating modes menu. The chronothermostat operating mode The CH150/151/152 chronothermostat fea- previously interrupted will be resumed. tures four different operating modes: Manual, Automatic, Holiday and Jolly (in addition to the OFF function). “Manual”... -
Page 8: Automatic" Operating Mode
The temperature level can be modifi ed during “Automatic” operating mode operation by means of the lower rotary selec- With the “Automatic” operating mode, the tor located on the right side of the chronother- chronothermostat adjusts the operation of the mostat. - Page 9 Temperature T3 cannot be lower than tem- Temperature T1 cannot be higher than tem- perature T2 or higher than 40 °C. perature T2 or lower than 2 °C. During Summer operation, temperature T3 features an upper limit of 30°C. When this value is exceeded, T3 will take the OFF value, which will involve switching the system off.
-
Page 10: Holiday" Operating Mode
“Holiday” operating mode “Jolly” operating mode With the “Holiday” operating mode, the CH150 With the “Jolly” operating mode, the CH150 chronothermostat CH150 adjusts the opera- chronothermostat interrupts the current oper- tion of the heating or cooling system by fol- ating mode and adjusts the operation of the lowing one single temperature profi... - Page 11 Use the lower rotary selector to modify the To set the “Jolly” operating mode duration, i.e. temperature level. days («d»), use the upper rotary selector. The temperature can be modifi ed from 2°C to The days can range from 0 to 99. 40 °C, by 0.1 °C increments.
-
Page 12: Off" Function
“OFF” function The “OFF” function can be activated by press- ing OFF. Winter operation Summer operation The chronothermostat adjusts the operation of the heating system to keep the “Antifreeze” temperature, in order to reduce the energy consumption and, at the same time, avoid any damage caused by extremely low tempera- The system will be fully turned off and the tures. -
Page 13: Preset Programs
Preset programs Chronothermostat programming The CH150 chronothermostat features two You can customize the temperature profi les for preset programs (i.e. “Winter” and “Summer”) the “Automatic” and “Holiday” operating modes, for quicker start-up. so as to adapt them to your own needs. To set new temperature profi... - Page 14 2. The Monday profi le (DAY 1) for “Winter” op- 4.To directly duplicate the temperature profi le eration (icon ) will be displayed. Use the ◄ by going to the next day, press COPY (to cus- and ► buttons to move the bar chart blinking tomize every single day separately, refer to segment to the time at which the temperature step 5 below).
-
Page 15: Displaying The Temperature Detected By The
Preset parameter reset Statistical data To resume the preset temperature profi les and The CH150 chronothermostat provides a set of values (T1-T2-T3-Temperature used with the statistical data concerning the system opera- Manual mode, Temperature used with the Jolly tion. To access this data, proceed as follows: mode, Antifreeze temperature, OFF function), keep the ▲... -
Page 16: Maintenance
3. Page 2: total number Maintenance of hours during which To clean the chronothermostat use a soft cot- the system has been ton cloth and no detergent. Do not use paper switched on and operat- handkerchiefs to clean the touch screen. ing since its fi... - Page 17 thermostat>>) and batteries are not replaced Important: Standard battery life is approx. 1 within 15 days, the chronothermostat will turn year. You are recommended to replace bat- off automatically and the display will show the teries at the beginning of system operating message “OFF”...
-
Page 18: Installation
Installation Caution: The chronothermostat shall be in- stalled by qualifi ed personnel only, in compli- ance with the current regulations in force. Chronothermostat installation involves the fol- lowing operations: • Fastening the base. • Electric connections. • Fitting the batteries. •... -
Page 19: Electric Connections
2.5 mm2 max section. Electric connections Before making connections, remove the termi- Terminal 4 is free and may be used for signal- nal protection guard (keep it together with the ling or other use, as necessary. fastening cross-slotted screw). Neutral Phase LOAD Chronothermostat relay... -
Page 20: Fitting The Batteries
CTx terminal block Connect the two wires of the separate tem- perature probe to terminals A and B, as shown 1 2 3 in the fi gure. Connecting the telephone activator Separate CH150 temperature terminal block probe Fitting the batteries Connect the three wires of the telephone acti- Fit two long-life 1.5 V AA alkaline batteries into vator to terminals 1, 2 and 3, as shown in the... -
Page 21: Confi Guring The Chronothermostat
To go back to the initial page of the program- Confi guring the chronothermostat Warning: The chronothermostat shall be con- ming menu, press the ENTER key [key 5] fi gured by qualifi ed personnel only. which will save changes. If no key is pressed within 3 minutes, the Chronothermostat confi... - Page 22 Parameter Writing Values Preset Parameter Writing Values Preset value value Type of connected rEL / rAd / --- none Low battery bAtt --- / On / card Temperature scale CELS o °C / °F °C Software release SOFt FHAr Type of regulation Std Std / ProP ProP Type of connected card...
- Page 23 when choosing the differential temperature is determined by this parameter. regulation mode. Continuous switching on and • Probe off (---): the temperature value de- off can be avoided by choosing a proper differ- tected by the probe is not used (although the ential value according to the thermal inertia of probe is connected).
- Page 24 Ambient temperature correction Low Battery To sum/subtract an offset value to/from the To determine the relay status when batteries temperature value read by the chronothermo- are fl at for over 15 days. If this parameter is ex- stat. cluded (---), the chronothermostat will keep on controlling the relay as required by regulation until the remaining battery charge allows for it.
-
Page 25: Technical Data
Temperature regulation 2 °C – 40 °C range Anti-freeze temperature 2 °C – 7 °C regulation range Fantini Cosmi S.p.A. reserves the right to Max. temperature make whatever technical and manufacturing Local indication Backlighted LCD display modifi cation without prior notice. - Page 26 NOTES...
- Page 27 DISPOSAL OF PRODUCTS The crossed out wheeled dust bin symbol indicates that products must be collected and disposed of separately from household waste. Integrated batteries and accumulators can be disposed of with the product. They will be separated at the recycling centres. The black bar indicates that the product was placed on the market after August 13, 2005.
- Page 28 FANTINI COSMI S.p.A. Via dell’Osio, 6 20090 Caleppio di Settala, Milano - ITALY Tel. +39 02 956821 Fax +39 02 95307006 | info@fantinicosmi.it EXPORT DEPARTMENT Ph +39 02 95682229 export@fantinicosmi.it www.fantinicosmi.com...
Need help?
Do you have a question about the CH150TS Series and is the answer not in the manual?
Questions and answers