Table of Contents
Advertisement
Quick Links
Advertisement
Table of Contents

Related Manuals for Fantini Cosmi CH150RF


Summary of Contents for Fantini Cosmi CH150RF
- Page 1 Radio wave weekly program chronothermostat CH150RF / CH151RF / CH152RF...
-
Page 2: Table Of Contents
INDEX separate probe ������������������������������������������������15 Statistical data �������������������������������������������������15 Introduction ��������������������������������������������������������������3 Setting the desired humidity level ��������������������16 Controls and indications ������������������������������������������4 Maintenance ����������������������������������������������������������17 Controls �������������������������������������������������������������4 Replacing the batteries ������������������������������������17 Indications ���������������������������������������������������������5 Installation �������������������������������������������������������������18 User manual ������������������������������������������������������������6 Installing the batteries �������������������������������������18 Setting the date and time ����������������������������������6 Configuring the chronothermostat �������������������18 Summer/Winter selection ����������������������������������7 Actuator registration ����������������������������������������23... -
Page 3: Introduction
Both the settings and the data are stored in a non-volatile memory capable of keeping them even when the batteries are down� The following external interfaces are available for the CH150RF chronothermostat: • Radio actuator • Separate temperature probe • Telephone actuator for fixed telephone lines,... -
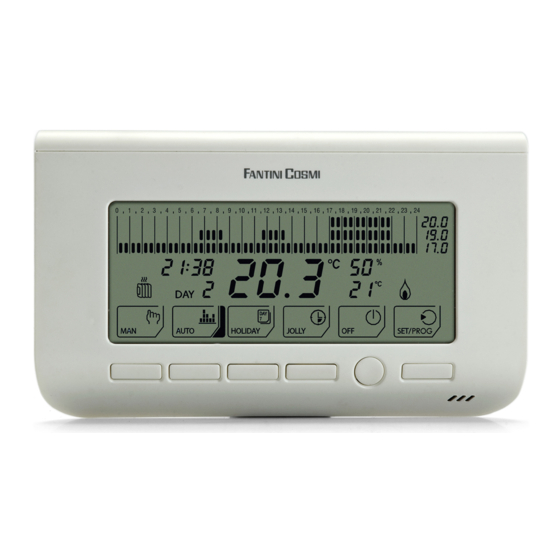
Page 4: Controls And Indications
Controls and indications 7� Rotary selector for temperature correction: T1, Manual temperature, Jolly temperature, Controls Antifreeze temperature * 8� Rotary selector for correcting temperature T2 or the Jolly operating mode duration * 9� Rotary selector for correcting temperature T3 or the Jolly operating mode duration 10�... -
Page 5: Indications
Indications 1� Time 2. Temperature profile 3� Temperature value T1 or “Jolly” operating mode duration (days) 4� Temperature value T2 or “Jolly” operating mode duration (hours) 5� Temperature value T3 6� System ON in Summer operation 7� System ON in Winter operation 13 12 8�... -
Page 6: User Manual
User manual 2. Modify the hour setting by means of the ▲ and ▼ buttons, then go to the minute setting by means of the ► button. To operate the chronothermostat after it has been installed, proceed as follows: 1� Set the date and time� 2�... -
Page 7: Summer/Winter Selection
5� Press ENTER again to exit the programming Operating modes menu� The chronothermostat operating mode The CH150/151/152 chronothermostat fea- previously interrupted will be resumed� tures four different operating modes: Manual, Automatic, Holiday and Jolly (in addition to the OFF function)� “Manual”... -
Page 8: Automatic" Operating Mode
The temperature level can be modified during “Automatic” operating mode operation by means of the lower rotary selec- With the “Automatic” operating mode, the tor located on the right side of the chronother- chronothermostat adjusts the operation of the mostat� The temperature can be changed from heating or cooling system by following the pro- 2°C to 40 °C by 0�1°C increments�... - Page 9 Temperature T3 cannot be lower than tem- Temperature T1 cannot be higher than tem- perature T2 or higher than 40 °C� perature T2 or lower than 2 °C� During Summer operation, temperature T3 features an upper limit of 30°C� When this value is exceeded, T3 will take the OFF value, which will involve switching the system off�...
-
Page 10: Holiday" Operating Mode
“Holiday” operating mode “Jolly” operating mode With the “Holiday” operating mode, the CH150 “Jolly” operating mode chronothermostat CH150 adjusts the opera- With the “Jolly” operating mode, the CH150 tion of the heating or cooling system by fol- chronothermostat interrupts the current oper- lowing one single temperature profile, which ating mode and adjusts the operation of the is valid for all days�... - Page 11 Use the lower rotary selector to modify the To set the “Jolly” operating mode duration, i�e� temperature level� days («d»), use the upper rotary selector� The The temperature can be modified from 2°C to days can range from 0 to 99� 40 °C, by 0�1 °C increments�...
-
Page 12: Off" Function
“OFF” function The “OFF” function can be activated by press- ing OFF� Winter operation Summer operation The chronothermostat adjusts the operation of the heating system to keep the “Antifreeze” temperature, in order to reduce the energy consumption and, at the same time, avoid any damage caused by extremely low tempera- tures�... -
Page 13: Preset Programs
Preset programs Chronothermostat programming The CH150 chronothermostat features two You can customize the temperature profiles for preset programs (i�e� “Winter” and “Summer”) the “Automatic” and “Holiday” operating modes, for quicker start-up� so as to adapt them to your own needs� To set new temperature profiles, proceed as follows: 1�... - Page 14 2. The Monday profile (DAY 1) for “Winter” op- 4� To directly duplicate the temperature pro- eration (icon ) will be displayed. Use the ◄ file by going to the next day, press COPY (to and ► buttons to move the bar chart blinking customize every single day separately, refer to segment to the time at which the temperature step 5 below)�...
-
Page 15: Separate Probe
Preset parameter reset Statistical data To resume the preset temperature profiles and The CH150 chronothermostat provides a set of values (T1-T2-T3-Temperature used with the statistical data concerning the system opera- Manual mode, Temperature used with the Jolly tion� To access this data, proceed as follows: mode, Antifreeze temperature, OFF function), keep the ▲... -
Page 16: Setting The Desired Humidity Level
3� Page 2: total number Setting the desired humidity level of hours during which The CH150RF/151RF/152RF chronothermo- the system has been stat allows you to actuate a humidistat by set- switched on and operat- ting the desired humidity value� To be able to... -
Page 17: Replacing The Batteries
Maintenance 2. Use the ► button to move and highlight the set humidity value� The chronothermostat can be cleaned by us- ing a soft cotton cloth (no detergent must be used)� Replacing the batteries When the battery charge level starts to read low, the symbol will start blinking on the display�... -
Page 18: Installation
Important! The standard battery service life Installing the batteries is more than 1 year� It is recommended that Separate the socket from the chronothermo- the batteries should be replaced at the start of stat by levering on the slot found at the socket bottom by using a suitable tool�... - Page 19 Parameter Writing Values Preset value Type of con- rEL/ rAd / --- None nected card Heating actuator rF t -- - registration radio control Each configuration parameter, which features Humidity adjust- ON/OFF its own preset settings, is identified on the dis- ment enable play by an index and a writing�...
- Page 20 Type of connected card Parameter Writing Values Preset The chronothermostat is capable of verifying value whether the socked is connected� If the socket Ambient tem- Corr -4�0 °C to 0�0 °C perature +4�0 °C is not connected, the dashes will be displayed; correction it if is, the “rAd”...
- Page 21 for more information� This menu item will be Adjustment band displayed only if the humidity adjustment has It sets the adjustment band when the propor- been enabled� tional temperature adjustment mode is chosen� Select an appropriate value on the basis of the Temperature scale system’s temperature gradient (wide band for It selects the scale, i�e�...
- Page 22 detected by the probe reaches the value set in Ambient temperature correction the Floor temperature limit parameter, the sys- It makes it possible to sum/subtract an offset tem will be switched off regardless of the tem- value to/from the temperature value measured perature detected by the chronothermostat�...
-
Page 23: Actuator Registration
5 seconds, to display the initial page of the pro- Prior to starting up the system, the radio ac- gramming menu� tuators shall be registered to the CH150RF, 2C. Press ► [button 4] to select the second CH151RF, CH152RF chronothermostat� To parameter (the “rF t”... - Page 24 3� Repeat the operations described in steps 1 rameter (the “rF rH” message will appear on and 2 in the event that several actuators are the display; the displayed index will be number used� 3A)� 2E� Press [button 1] to send the humidity Humidification system actuator registration: adjustment system actuator registration radio 1�...
-
Page 25: Fastening The Socket
cur in time, not affect the correct equipment Separate the socket from the chronothermo- operation� stat by levering on the slot found at the socket bottom by using a suitable tool� Fastening the socket The chronothermostat is supplied complete Make sure that the socket is properly secured with a socket suitable for fitting both to a wall and is not deformed�... -
Page 26: Electric Connections
Electric connections Connecting the telephone actuator Prior to making the connections, remove the Connect the three telephone actuator wires terminal protection guard (the latter shall with screw clamps 1, 2 and 3, as illustrated in be kept together with the fastening crossed the figure. -
Page 27: Technical Features
Technical features CTx TERMINAL BLOCK Power supply 2 AA alkaline batteries (1�5 V) 1 2 3 Battery life More than 1 year Inputs Telephone actuator Separate temperature probe Electric connections Screw clamps 3�5 mm two-pole jack connector SEPARATE Insulation CH150 TERMINAL TEMPERATURE Double type BLOCK... - Page 28 Radio signal features 868�350 MHz <= 15mW Signal maximum range (*) 30 m (indoors), Fantini Cosmi S�p�A� reserve the right to make 70 m (outdoors) any necessary technical and construction modifications without giving advance notice. FANTINI COSMI S�P�A�...
Need help?
Do you have a question about the CH150RF and is the answer not in the manual?
Questions and answers