Advertisement
Available languages
Available languages
Quick Links
OptiHeat 2000MP
OptiHeat 2000EWP
OptiHeat 2000GTP
EN
Please read these instructions before installing
or using this appliance fort he first time
SLO
Navodila preberite pred postavitvijo
ali prvo uporabo grelnika.
Pročitajte upute prije postavljanja
HR
ili prve uporabe grijalice.
SRB Uputstva pročitajte pre postavljanja
ili prve upotrebe grejača.
Пожалуйста, прочтите данную инструкцию
RU
перед установкой и первой эксплуатацией прибора.
Návod si pečlivě přečtěte před prvím použitím
CZ
a instalací ohřívače.
Proszę przeczytać instrukcję przed instalacją
PL
lub użytkowaniem grzejniku.
Prečítajte si,prosím, tieto návody pred inštaláciou alebo
SK
pred prvým použitím ohrievača.
Будь ласка, прочитайте цю інструкцію перед установкою
UA
і першою експлуатацією приладу.
www.gorenje.com
INSTRUCTIONS FOR USE
NAVODILA ZA UPORABO
UPUTE ZA UPORABU
UPUTSTVA ZA UPOTREBU
РУКОВОДСТВО ПО
ЭКСПЛУАТАЦИИ
NÁVOD K POUŽITÍ
INSTRUKCJA OBSŁUGI
NÁVOD NA POUŽITIE
ІНСТРУКЦІЯ З
ВИКОРИСТАННЯ
Advertisement

Related Manuals for Gorenje OptiHeat 2000MP


Summary of Contents for Gorenje OptiHeat 2000MP
- Page 1 OptiHeat 2000MP OptiHeat 2000EWP OptiHeat 2000GTP INSTRUCTIONS FOR USE NAVODILA ZA UPORABO UPUTE ZA UPORABU UPUTSTVA ZA UPOTREBU РУКОВОДСТВО ПО ЭКСПЛУАТАЦИИ Please read these instructions before installing or using this appliance fort he first time NÁVOD K POUŽITÍ Navodila preberite pred postavitvijo ali prvo uporabo grelnika.
- Page 2 MODELS OptiHeat 2000MP OptiHeat 2000EWP OptiHeat 2000GTP...
-
Page 3: Technical Specification
TECHNICAL SPECIFICATION Details OptiHeat 2000MP OptiHeat 2000EWP OptiHeat 2000GTP Voltage 220-240V~ 220-240V~ 220-240V~ Frequency 50/60Hz 50/60Hz 50/60Hz Power 1000/2000W 1000/2000W 1000/2000W IP Waterproof IP24 IMPORTANT Before plugging the unit into the mains, ensure by visual inspection that the unit is intact and has not suffered any damage during transit. - Page 4 6. Always use the heater in an upright position. 7. Do not place the heater against walls, furniture, curtains, etc. 8. Do not use the appliance in rooms less than 4m² area. 9. Always unplug the heater when not in use. Do not pull the cord to unplug the heater. 10.
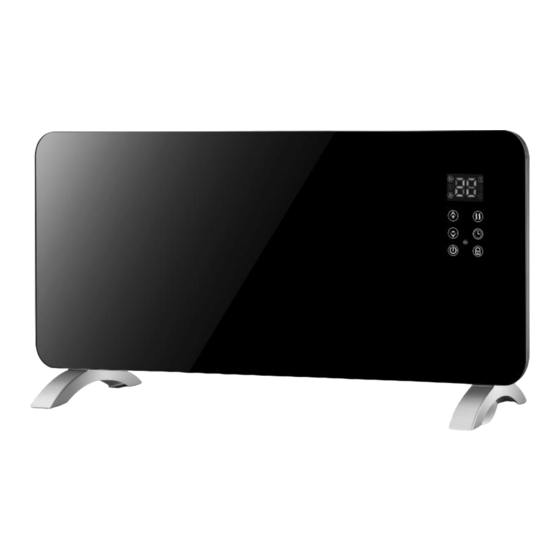
- Page 5 DESCRIPTION OptiHeat 2000MP 1. Back panel 2. Control Panel 3. Power switch 4. Temperature control 5. Front panel 6. Castors OptiHeat 2000EWP OptiHeat 2000GTP...
-
Page 6: Product Features
Touch control (OptiHeat 2000EWP and 2000GTP) Timer Thermostat Mechanical control (OptiHeat 2000MP) LED display (OptiHeat 2000EWP and 2000GTP) WiFi (OptiHeat 2000EWP) INSTALLATION The panel convector heaters should be wall-mounted. All items can be also stand with feet. - Page 7 OPERATING INSTRUCTIONS Attention! Do not cover the product! OptiHeat 2000MP Place the heater on flat stable surface Switch thermostat knob in off position Plug the heater in AC socket By turning the handle of thermostat clockwise or counter clockwise set the required temperature.
- Page 8 Temperature Press button to select the desired temperature from a range of 15°-35°C. Timer The timer button can be set to start or stop the appliance at the desired time, with a time interval between 1 hour and 24 hours. WiFi function 1.Use your phone to scan the QR code below or search “Tuya Smart”...
- Page 9 c.If the light is not flashing as the status as above described, please long press the device’s reset button for 5 seconds or longer until it flashes correctly as shown in the picture below, 6.Select Wi-Fi, enter password and tap “Next”, as shown in the picture 2 below, For quick connect mode, the App interface will go through the changes during the network configuration on processas shown in the picture 3,Picture 4 shows the...
- Page 10 Pic 5 Pic 6 Pic 7 8.“My profile” is where users could manage personal information. The key informaton is as follows see picture 6: a.Personal information:including account name and cellphone number b.Information of shared devices c.Message center d.Entry to submit feedback e.F.A.Q f.Phone binding: if you sign in with social network account, you could bind your phone number with your account...
- Page 11 OptiHeat 2000GTP Insert the plug into a suitable socket outlet on an A.C. power supply having the same voltage as that shown on its rating label. The touch screen buttons located on the product correspond to the remote control functions: 1.Display 2.Temperature“+”...
- Page 12 Child clock Press the child clock botton 3 seconds,” ” will be display on the screen,so you can not make any operate,and same ways to touch to delete the child clock function. Operation for Remote Control Insert the plug in a suitable power socket. The touch screen buttons located on the product correspond to the remote control functions: 1.
- Page 13 CLEANING Before cleaning the item wait when it cools down and plug out Do not use abrasives and solvents. Wipe the product with soft wet cloth It is necessary to remove dust from the surface regularly Washing the item and placing it in water is forbidden! ...
- Page 14 МОДЕЛИ OptiHeat 2000MP OptiHeat 2000EWP OptiHeat 2000GTP...
-
Page 15: Техническая Спецификация
ТЕХНИЧЕСКАЯ СПЕЦИФИКАЦИЯ Характерист OptiHeat 2000MP OptiHeat 2000EWP OptiHeat 2000GTP ики Напряжение 220-240В~ 220-240В~ 220-240В~ Частота 50/60 Гц 50/60 Гц 50/60 Гц Мощность 1000/2000 Вт 1000/2000 Вт 1000/2000 Вт Степень защиты - IP24 Водонепрон ицаемость ВАЖНО Прежде, чем подключить прибор к электросети, убедитесь при визуальном... - Page 16 С ЦЕЛЬЮ ОБЕСПЕЧЕНИЯ БЕЗОПАСНОСТИ 1. Перед использованием обогревателя прочитайте все соответствующие инструкции. 2. Подключайте обогреватель только к однофазной розетке с сетевым напряжением, указанным на заводской паспортной табличке. 3. Не покидайте дом во время работы прибора. При выходе из дома убедитесь, что...
- Page 17 поскольку это повышает риск возникновения пожара, в случае если нагреватель накрыт или установлен неправильно. 24. Не оставляйте обогреватель включенным, когда выходите из дома или ложитесь спать. 25. Не разрешайте детям играть с прибором. 26. Данное устройство может использоваться детьми в возрасте от 8 лет и старше, а...
- Page 18 ОПИСАНИЕ OptiHeat 2000MP 1. Задняя панель 2. Панель управления 3. Выключатель питания 4. Регулирование температуры 5. Передняя панель 6. Ролики OptiHeat 2000EWP OptiHeat 2000GTP...
-
Page 19: Характеристики Продукта
нагрев с высокой экономией электроэнергии Сенсорное управление (OptiHeat 2000EWP и 2000GTP) Таймер Термостат Механическое управление (OptiHeat 2000MP) Светодиодный дисплей (OptiHeat 2000EWP и 2000GTP) Wi-Fi (OptiHeat 2000EWP) УСТАНОВКА Панельные конвекционные воздухонагреватели должны крепиться на стену. -
Page 20: Инструкции По Эксплуатации
ИНСТРУКЦИИ ПО ЭКСПЛУАТАЦИИ Внимание! Запрещено накрывать прибор! OptiHeat 2000MP Установите обогреватель на плоскую устойчивую поверхность Переключите ручку термостата в положение «выключено» Подключите обогреватель к розетке переменного тока. Повернув рукоятку термостата по часовой стрелке или против часовой... - Page 21 Режим Нажмите кнопку «Режим» (Mode), чтобы отрегулировать низкую или высокую температуру работы обогревателя. Температура Нажмите кнопку , чтобы выбрать нужную температуру в диапазоне от 15°- 35°C. Таймер Кнопка таймера может быть настроена на запуск или остановку прибора в нужное время с интервалом от 1 до 24 часов. Функция...
- Page 22 5. Существуют два способа подключения Приложения (режим точки доступа и режим быстрого подключения). Режим быстрого подключения является режимом по умолчанию. Пользователь может нажать кнопку в верхнем правом углу, чтобы переключить соединение в режим точки доступа. a. В режиме быстрого подключения убедитесь, что индикатор устройства мигает быстро.
- Page 23 Когда устройство находится в автономном режиме, точка на передней панели устройства будет серой. Если устройство совместно используется другими пользователями, будет отображаться двойная петля. Рис. 5 Рис. 6 Рис. 7 8. «Мой профиль» - это место, где пользователи могут управлять личной информацией.
- Page 24 OptiHeat 2000GTP Вставьте вилку в подходящую розетку переменного тока с напряжением согласно маркировке прибора. Кнопки сенсорного экрана, расположенные на устройстве, соответствуют функциям пульта дистанционного управления: 1. Дисплей 2. Кнопка температура «+» 2. Кнопка температура «-» 4. Кнопка питания 4. Кнопка режима 4.
- Page 25 Таймер Нажмите кнопку таймера « », чтобы выбрать необходимый диапазон времени - от 1 часа до 24 часов. На дисплее отобразится оставшееся время. Блокировка от детей Нажимайте кнопку «Блокировка от детей» (Child clock) в течение 3 секунд, на экране отобразится « ».
- Page 26 ОЧИСТКА Перед очисткой обогревателя подождите пока он остынет и выключите его из сети. Не используйте абразивы и растворители. Протрите прибор мягкой влажной тканью. Необходимо регулярно удалять пыль с поверхностей прибора. Запрещается мыть прибор и помещать его в воду! ...
Need help?
Do you have a question about the OptiHeat 2000MP and is the answer not in the manual?
Questions and answers