
Related Manuals for Yardworks 054-0367-0


Summary of Contents for Yardworks 054-0367-0
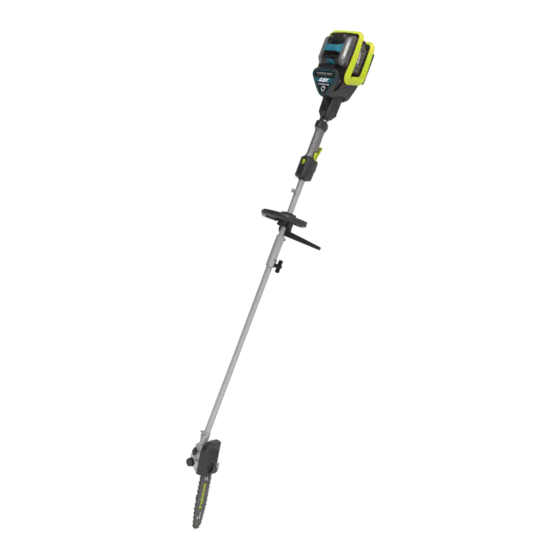
- Page 1 10” (25.4 CM) BRUSHLESS POLE SAW model number 054-0367-0 | contact us: 1.866.523.5218 3026035 IMPORTANT: Instruction Read and follow all safety rules and operating Manual instructions before using this product.
- Page 2 054-0367-0 | contact us: 1.866.523.5218...
- Page 3 054-0367-0 | contact us: 1.866.523.5218 Introduction Safety Instructions and Symbols Product Specifications Product Diagram Assembly Operation Maintenance Storage Troubleshooting Exploded View Parts List Warranty...
- Page 4 Congratulations on your purchase of your new Yardworks tool. It has been designed, engineered ® and manufactured to give you the best possible dependability and performance. Should you experience any problem you cannot easily remedy, please contact our Yardworks cus- ® tomer service line at 1.866.523.5218.
- Page 5 054-0367-0 | contact us: 1.866.523.5218 IMPORTANT SAFETY INSTRUCTIONS dry, clean, and free from oil and grease. 13) Check Damaged Parts - Before further FOR ALL APPLIANCES: use of the appliance, a guard or other 1) Avoid Dangerous Environments - Don’t part that is damaged should be carefully use appliances in damp or wet locations.
- Page 6 054-0367-0 | contact us: 1.866.523.5218 away from other metal objects, like paper POLE SAW SAFETY WARNINGS clips, coins, keys, nails, screws or other WARNING – Do not operate near electrical small metal objects, that can make a power lines. The unit has not been designed connection from one terminal to another.
- Page 7 054-0367-0 | contact us: 1.866.523.5218 cause serious injury or electric shock is not designed for use with the resulting in death. equipment. g) Always use two hands when operating Keep battery pack out of the reach of the pole saw. Hold the pole saw with both children.
- Page 8 054-0367-0 | contact us: 1.866.523.5218 Retain the original product literature • Consult the dealer or an experienced for future reference. radio/TV technician for help. u) Use only the battery pack in the application for which it was intended.
- Page 9 054-0367-0 | contact us: 1.866.523.5218 Some of the following symbols may be used on this product. Please study them and learn their meaning. Proper interpretation of these symbols will allow you to operate the product effectively and safely.
- Page 10 054-0367-0 | contact us: 1.866.523.5218 Symbol Designation/Explanation Yardworks has established a partnership with the RBRC ® Corporation to recycle any Yardworks batteries with the ® RBRC-call2recycle seal. For environmental protection, please do not discard batteries in the trash. After the battery’s life cycle is ended, please call 1-800-822-8837 for a free service that will properly dispose of batteries.
- Page 11 054-0367-0 | contact us: 1.866.523.5218 PRODUCT SPECIFICATIONS Voltage 48 V Bar length 10" (25.4 cm) Chain speed 43 ft/s (13 m/s) Oil tank capacity 4.6 oz (135 mL) Chain pitch 3/8" (0.95 cm) Battery capacity (060-1987-2) 2.0 Ah Li-ion...
- Page 12 054-0367-0 | contact us: 1.866.523.5218 Guide bar 12. Handle lock knob Chain 13. Chain cover Oil filler cap 14. Chain cover lock nut 15. Extension shaft Rotation knob 16. Chain tensioning screw Upper shaft 17. Oil tank Auxiliary handle 18.
- Page 13 054-0367-0 | contact us: 1.866.523.5218 1. ASSEMBLING THE UPPER SHAFT AND LOWER SHAFT a. Unpack all parts carefully. b. Loosen the handle lock knob by turning it counter-clockwise (see Fig. A1). Align the tab (a) on the upper shaft with the hole (b) on the lower shaft.
- Page 14 054-0367-0 | contact us: 1.866.523.5218 4. TENSIONING CHAIN AND BAR NOTE: New saw chains will stretch. Check the chain tension frequently during first use, and tighten when the chain becomes loose around the guide bar. a. Place the tool on a solid, level surface.
- Page 15 054-0367-0 | contact us: 1.866.523.5218 WARNING: • Remove the battery pack before adjusting saw chain tension. • Cutting edges on chain are sharp. Use protective gloves when handling chain. • Maintain proper chain tension always. A loose chain will increase the risk of kickback.
- Page 16 054-0367-0 | contact us: 1.866.523.5218 Important: The tool is not filled with oil. It is essential to fill with oil before use. Never operate the tool without chain oil or at an empty oil tank level, as this will result in extensive damage to the product.
- Page 17 054-0367-0 | contact us: 1.866.523.5218 BEFORE OPERATION 1. CHARGING YOUR BATTERY PACK NOTE: a) The battery in your new tool is not charged when it leaves the plant; therefore, it must be fully charged before using the first time.
- Page 18 054-0367-0 | contact us: 1.866.523.5218 CHARGING INDICATOR This charger is designed to detect some problems that can arise with battery packs. Indicator lights indicate problems (see table below). Light ON/ Flash Status Defective battery. Red on Battery Temperature Protection.
- Page 19 054-0367-0 | contact us: 1.866.523.5218 3. SWITCHING ON AND OFF To switch on, press the lock off button first, then the on/off switch (see Fig. G). To switch off, release the on/off switch. Position 1 Groove 1 Position 2 Groove 2 4.
- Page 20 054-0367-0 | contact us: 1.866.523.5218 5. CUTTING (1) Install the battery pack into the machine. (2) Use both hands to grip saw. Always use left hand to grip front handle and right hand to grip rear handle. Use a firm grip. Thumbs and fingers must wrap around saw handles.
- Page 21 054-0367-0 | contact us: 1.866.523.5218...
- Page 22 054-0367-0 | contact us: 1.866.523.5218 6. TRIMMING A TREE (PRUNING) Trimming a tree is the process of cutting limbs from a living tree. Make sure your footing is firm. Keep feet apart. Divide your weight evenly on both feet. Follow directions below to trim a tree.
- Page 23 054-0367-0 | contact us: 1.866.523.5218 1. REPLACING THE CHAIN AND GUIDE BAR a. Place the tool on a solid, level surface. b. Loosen the chain cover lock nut by turning it counter-clockwise with the wrench provided and take off the chain cover (see Fig. L1, L2).
- Page 24 054-0367-0 | contact us: 1.866.523.5218 Kink Use the wrench provided (screwdriver part) to tighten the chain to a suitable tension by turning the wrench clockwise (see Fig. L9). Fit the chain cover and tighten the chain cover by turning the chain cover lock nut clockwise until it is tight (see Fig. L10).
- Page 25 054-0367-0 | contact us: 1.866.523.5218 2. SAW MAINTENANCE Follow maintenance instructions in this manual. Proper cleaning of saw and chain and guide bar maintenance can reduce chances of kickback. Inspect and maintain saw after each use. This will increase the service life of your saw.
- Page 26 054-0367-0 | contact us: 1.866.523.5218 Replace the guide bar when the groove is worn, the guide bar is bent or cracked, or when excessive heating or burring of the rails occurs. If replacement is necessary, use only the guide bar specified for your saw in the repair parts list or on the decal located on the pole saw.
- Page 27 054-0367-0 | contact us: 1.866.523.5218 Remove the battery pack. Disassemble the pole saw by removing the bar and the chain. Store the pole saw, the battery pack and the accessories indoors in a cool, dry, clean place which is protected from the effects of weather and temperature and is out of the reach of children and animals.
- Page 28 054-0367-0 | contact us: 1.866.523.5218 The following table gives checks and actions that you can perform if your machine does not operate correctly. If these do not identify/remedy the problem, contact your service agent at 1-866-523-5218. Symptom Possible Cause...
- Page 29 054-0367-0 | contact us: 1.866.523.5218...
- Page 30 054-0367-0 | contact us: 1.866.523.5218 Spring Part Description Quantity Rear Aluminum Tube Screw Right Trim Cover Harness Ring Right Cover Screw Screw Wind Deflector Lower Handle Motor Damping Ring Spring Upper Handle Left Cover Screw Left Trim Cover...
- Page 31 054-0367-0 | contact us: 1.866.523.5218 FIVE-YEAR LIMITED WARRANTY HOW TO OBTAIN SERVICE Warranty service is available by calling For five (5) years from the date of purchase the toll-free helpline at 1.866.523.5218. within Canada, YARDWORKS CANADA The factory will not accept the return of a...
- Page 32 054-0367-0 | contact us: 1.866.523.5218 FCC Part 15 Supplier’s Declaration of Conformity Product Description: Charger Model Number: 060-1990-2 Trade Name: YARDWORKS ® This device complies with part 15 of the FCC Rules. Operation is subject to the following two conditions:...
Need help?
Do you have a question about the 054-0367-0 and is the answer not in the manual?
Questions and answers