
Subscribe to Our Youtube Channel
Related Manuals for DEPURECO RAM Series


Summary of Contents for DEPURECO RAM Series
- Page 1 R A M 2 8 0 R A M 2 8 0 MP R A M 5 0 0 R A M 1 0 0 0 R A M T 5 0 0 R A M 1 0 0 0 A V...
-
Page 2: Table Of Contents
1. INFORMATIVE SECTION Foreword........................4 Main parts ......................... 6 Optional parts......................7 Manufacturer's identification data ............... 7 Identification plate ....................7 Permitted Uses ......................7 Authorised environmental conditions ..............8 Noise level ........................ 8 Technical data ......................9 1.10 Warranty ......................... 10 2. -
Page 3: Foreword
IMPORTANT - The DEPURECO term and logo in this document refer to and are the property of DEPURECO INDUSTRIAL VACUUMS S.r.l. This document remains the exclusive property of DEPURECO S.r.l. Full or partial reproduction by any means (graphical, electronic, etc.) is prohibited without prior authorisation from the Company... - Page 4 This manual is an integral part of the vacuum cleaner and must accompany it at all times, until its demolition. In the event it is lost or damaged, you can request another copy from DEPURECO INDUSTRIAL VACUUMS S.r.l. (henceforth shortened to DEPURECO).
-
Page 5: Main Parts
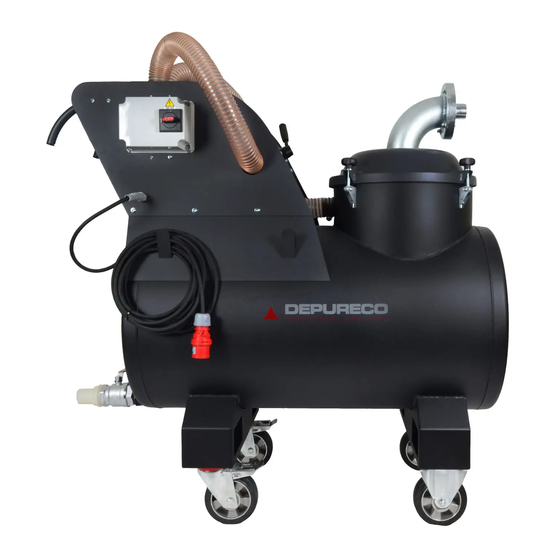
Main parts 1. Handle 2. Electrical panel 3. Cap 4. Motor head 5. Tank 6. Inlet 7. Outlet 8. Pivoting wheels 9. Fixed wheels 10. Discharge ball valve Page 6 of 38... -
Page 6: Optional Parts
Optional parts A wide range of optional accessories is available from DEPURECO depending on the intended use of the vacuum. Manufacturer's identification data DEPURECO INDUSTRIAL VACUUMS S.r.l. Corso Europa 609 - 10088 Volpiano (TO) - ITALY phone +39 011 98 59 117 - fax +39 011 98 59 326 | VAT NO. 02258610357 e-mail: depureco@depureco.com - website: www.depureco.com... -
Page 7: Authorised Environmental Conditions
Authorised environmental conditions To ensure the correct operation, the vacuum cleaner must be kept away from atmospheric agents (rain, hail, snow, fog, dust in suspension, etc.) in an area with a room temperature range between 0° and 40°C and a relative humidity no higher than 70%. The work environment must be clean and suitably lit. -
Page 8: Technical Data
1.9 Technical data U.M. RAM 280 MP Weight* Overall dimensions** 700x1450 Height 1400 Voltage I Frequency V - Hz 230 – 50/60 Power kW - HP 4,3 / 5,8 mbar Maximum vacuum m³/h Maximum air flow Noise level dB (A) Inlet diameter Liquid capacity Solid capacity... -
Page 9: Warranty
DEPURECO shall not be held liable for any injuries to persons or damage to objects caused by misuse or improper use of the vacuum. -
Page 10: Safety Section
Adequate training is crucial to this end. DEPURECO shall not be held liable for accidents or damage due to the improper use of the vacuum by untrained personnel or to failure to comply, even partially, with the occupational safety standards and intervention procedures contained in this manual. -
Page 11: Safety Recommendations
Structural damage, alterations or improper repairs can modify the protective capacity of the vacuum, thereby nullifying this certification and releasing DEPURECO from any liability. Each section lists further safety measures specific to the various functions. - Page 12 It is absolutely forbidden; For underage and non-trained people to use this vacuum cleaner. • To connect the vacuum cleaner to mains without suitable earthing. • To operate the vacuum cleaner outdoors in the presence of atmospheric precipitations. • To operate the vacuum cleaner without locking the swivelling wheel through the special brake •...
-
Page 13: Safety Plates And Symbols
Clean them using a cloth with water and soap. Do not use solvents, naphtha or petrol. Request replacements for damaged plates from DEPURECO. If a plate is located on a component that is being replaced, make sure to fit the old plate to the new component. -
Page 14: Applied Directives
Warning! The removal of safety plates from the vacuum and/or its components and packaging is strictly prohibited. DEPURECO shall not be held liable for the vacuum's safety in the event of failure to comply with this prohibition. Applied Directives The following directives apply to the vacuum cleaner described in this manual:... -
Page 15: Handling
Handling Warning! The instructions for transporting and unpacking the vacuum correctly are shown on the packaging as well. The following instructions also indicate the operations to be undertaken should the vacuum need to be re-packed or unpacked after subsequent transportation. Dimensions of packed vacuum cleaner: RAM 280 MP 75 cm... - Page 16 Cut and unwind the two packaging fixing belts remove the staples that fix the carton packaging to the pallet with the aid of a screwdriver remove the carton completely Page 17 of 38...
- Page 17 - After removing the protection wrapper, unscrew and remove, from both sides, the screws fixing the machine to the pallet. The cardboard packaging can be recycled. To protect the environment, make sure to dispose it off in specialised collection centres. Warning! Keep the pallet.
- Page 18 Find the 4 wheels and the bag containing the screws Close and lock the cap again Attention! The following operation must be carried out on a flat terrain by a forklift operator and a second person. Warning! Insert the forklift’s forks in the appropriate mountings. Attention! The forks must go completely inside the mountings.
- Page 19 Install the two fixed wheels on the opposite side of the vacuum’s handle Attention! The second person must operate outside from under the forklift Install the two pivoting wheels at the other end on the machine as shown in the picture Put the machine back on the ground Attention! Never stand under the forklift while the machine is being lowered.
- Page 20 Connect the discharge hose directly to the dedicated nozzle and fix it by using a clamp as shown in the picture Page 21 of 38...
-
Page 21: Installation
Note: the flexible hose and the relevant end-pieces and accessories are not included with the STANDARD model. Contact your dealer (or DEPURECO) for information regarding the various types of OPTIONALS that can be used on this specific model. -
Page 22: Operation Section
4. OPERATION SECTION Description of the controls Warning! The vacuum can be used solely by authorised personnel after having read these use and maintenance instructions. The user of the equipment and the maintenance technician, who carry out operations on the vacuum, must be adequately educated, informed and trained, in compliance with the occupational safety standards in force and, during the various operations, must wear personal protective equipment (PPE), such as safety footwear, gloves, protective goggles, mask, etc. -
Page 23: Operating Cycle
Operating cycle Ensure that the power cord is intact and in perfect state. Warning! Before inserting the plug, ensure that the voltage of the power supply line corresponds to the one indicated on the vacuum's identification plate. Make sure the plug is correctly inserted into the socket Make sure the hose is properly inserted and locked on the suction inlet. -
Page 24: Storage - Decommissioning
Waste disposal must take place in accordance with the laws in force in the country of use of the vacuum cleaner - for Italy Legislative Decree 152/2006 and amendments Storage – Decommissioning Remove the filter and clean it; empty the refuse collection container and store the vacuum in a place protected against weather agents with the temperature ranging between 5 and 45 °C and cover it with a nylon tarp to protect it against dust. -
Page 25: Maintenance Section
5. MAINTENANCE SECTION Warning! Special vacuum maintenance must be carried out solely by specialised technicians authorised by the DEPURECO dealer. Informative notes This section describes the checks and routine maintenance operations required to ensure proper vacuum operation. Maximum reliability and minimum maintenance costs are the result of a planned maintenance and inspection schedule carefully followed throughout the entire lifespan of the vacuum. -
Page 26: General Safety Regulations
General safety regulations Warning! All the operations described above must be carried out with the plug disconnected from the socket. Before starting any maintenance or cleaning operation, wear suitable PPE (protective clothing, goggles and/or gloves, etc.) according to the work to be done. Place a sign on the vacuum with the message: “MACHINE UNDER MAINTENANCE DO NOT START”... - Page 27 Check that the power cord and the plug are not damaged: replace them immediately if there are any signs of wear, using a cord of the same type (information c/o DEPURECO). This operation is the sole responsibility of an electrician.
-
Page 28: Replacing The Filter
Replacing the filter Warning! Wear appropriate PPE (dust mask, latex gloves, goggles, etc.). Proceed as follows to replace the filter: Switch the machine off by turning the main switch (1) to “0” Unplug the vacuum cleaner from the socket Unlock the lid (1) Remove the lid Take the filter out, wash it, or replace it if needed Page 29 of 38... - Page 29 Wash the grid basket, insert the new filter and put it in place again Reposition the lid and close it with the dedicated locking hooks EXCLUSIVELY USE FILTERS MANUFACTURED BY DEPURECO Page 30 of 38...
-
Page 30: Cleaning Or Replacing Of The Oil Proof Cartridge
5.4 Cleaning or replacing of the oil proof cartridge Proceed as follows to replace the cartridge Switch the vacuum cleaner off by turning the main switch (1) to “0” Remove the plug from the socket Unlock the vacuum’s head Lift and remove the ring holding the cartridge Page 31 of 38... - Page 31 Remove the screws and replace/clean the cartridge with a water jet Screw the cartridge back to the ring Reposition the ring inside the machine Position the vacuum’s head again and lock it with the dedicated hooks Page 32 of 38...
-
Page 32: Troubleshooting
RECOMMENDED Check for the presence of voltage in the socket Check the integrity of the socket No electric supply and the cable Contact DEPURECO’s technical assistance The vacuum cleaner will not start Red indicator light on (Maximum tank Empty the tank... -
Page 33: Scrapping
Scrapping In case of scrapping, to avoid damage to the environment, all components of the vacuum cleaner, must be disposed of responsibly, in appropriate landfills, in compliance with current legislation - for Italy Legislative Decree no. 152/2006 and subsequent amendments. (subsequent modifications and additions). - Page 34 MAINTENANCE LOG: INTERVENTION 1: DATE: TECHNICAL ASSISTANCE: TYPE OF INTERVENTION: INTERVENTION 2: DATE: TECHNICAL ASSISTANCE: TYPE OF INTERVENTION:...
- Page 35 INTERVENTION 3: DATE: TECHNICAL ASSISTANCE: TYPE OF INTERVENTION: INTERVENTION 4: DATE: TECHNICAL ASSISTANCE: TYPE OF INTERVENTION:...
- Page 38 Positioning the thermal relay and fuses - not applicable ........Troubleshooting ....................Scrapping ........................This document is exclusive property of DEPURECO S.r.l. Full or partial reproduction by any means (graphic, electronic, etc.) is prohibited without prior authorisation by the Company Management. Depureco Industrial Vacuums Sri S oci eta sogg etta a di rezi one e c oordi nam en to C OFISE spa C.F.
-
Page 39: Preface
This manual is integral part of the vacuum and must accompany it at all times, until its demolition. In the event it is lost or damaged, you can request another copy from DEPURECO S.r.l. (hereafter simply called DEPURECO). - Page 40 The topics covered in this manual are those expressly required by Machinery Directive 2006/42/EC and the technical data are taken from the technical file archived at DEPURECO. In compliance with Regulation 1907/2006/EC (REACH), DEPURECO declares that its products do not contain any Substances of Very High Concern (SVHC) included in the Candidate List.
-
Page 41: Identification Of The Main Parts
2. ON/OFF switch 3. Cover 4. Filter chamber 5.Liquid waste container 6.Moultipiece for suction tube insertion 7. Discharge hose connection 8. Swivelling wheels 9. Fixed wheels Options DEPURECO provides a wide range of optional accessories, according to the application of the vacuum. -
Page 42: Manufacturers Identification Data
The data on the vacuum identification plate must be referred to in any communication with the manufacturer or the dealer. C.so Europa, 609 Volpiano (TO) DEPURECO S.r.l 10088 - ITALY Tel. 039 011. 98. 59. 117 Fax. 039 011. 98. 59. 326... -
Page 43: Noise Level
Noise level Photometric tests carried out on these specific models have shown a sound pressure level of RAM 280 72 dB(A) RAM 500 76 dB(A) RAM 1000 Attention! For sound pressure levels above 85 dB(A), exposed workers must wear suitable personal protective equipment (PPE), such as type-approved individual hearing protection. -
Page 44: Warranty
DEPURECO shall not be held liable for any injuries to persons or damage to objects caused by misuse or improper use of the vacuum. -
Page 45: Safety Section
Adequate training is crucial to this end. DEPURECO shall not be held liable for accidents or damage due to the improper use of the vacuum by untrained personnel or to failure to comply, even partially, with the occupational safety standards and intervention procedures contained in this manual. -
Page 46: Safety Requirements
2.2 Safety requirements Attention! The indications below are important to prevent hazards that can occur while operating the vacuum. However, they cannot replace the expertise and common sense of the operators as an overall framework for accident prevention. Every section lists further safety requirements specific for the various operations. -
Page 47: Safety Plates And Symbols
• In the event that the Customer installs a tool not supplied by DEPURECO on the vacuum, is is essential to verify that the safety requirements of Machinery Directive 2006/42/EC are met, notwithstanding that DEPURECO shall not be held liable for problems caused by the use of that part. - Page 49 SCARICO ASPIRAZIONE SUCTION DISCHARGE VIDAGE ASPIRATION ENTLEERUNG ABSAUGEN DESCARGA ASPIRACION Attention! Carefully read this use and maintenance manual before using the vacuum or carrying out maintenance interventions. 00 ASPIIV41.7.
-
Page 50: Residual Risks
Residual risks The accurate risk analysis carried out by DEPURECO (archived in the technical file) has allowed eliminating the main risks related to the conditions of use of the vacuum. DEPURECO recommends complying with the instructions, procedures and recommendations in this manual and with the safety standards in force. -
Page 51: Applied Directives
Attention! It is strictly prohibited to remove the safety plates from the vacuum and/or its components and packaging. DEPURECO shall not be held liable for the vacuum's safety in the event of failure to comply with this prohibition. 2.5 Applied Directives... -
Page 53: Handling, Unpacking And Installation Section
HANDLING, UNPACKING AND INSTALLATION SECTION Handling Attention! ) The instructions for transporting and unpacking the vacuum correctly are shown also on the packaging. The instructions below also include the operations to be carried out in the event that the vacuum must be packed or unpacked again for subsequent transport. Dimensions of the packed vacuum. -
Page 54: Unpacking, Assembling The Casters And The Exhaust Pipe
3.2 Unpacking, assembling the casters and the exhaust pipe - Cut and remove the two fastening straps from the case - Using a screwdriver, remove the points that fix the cardboard case to the pallet - Completely remove the case - Upon removing the protective wrapping, loosen and remove off both sides the screws that fasten the machine to the pallet... - Page 55 The cardboard (or nylon) packaging is recyclable and should be collected separately to prevent environmental impact. Attention! Keep the pallet and the fastening screws. In the event of subsequent transport, the vacuum must be secured to the pallet using the same fastening system. - Detach and remove the cover (1).
- Page 56 Attention! The following operation must be carried out on a level surface and solely by a qualified forklift operator and a second operator. Warning! Insert the forks of the forklift into the slots (A) and (B) - see figure. Attention! The forks must fully enter and protrude at least 20 cm from the housing (B) at the end.
- Page 57 Attention! The second operator must operate outside of the forklift. - Install the two swivel casters on the opposite side as shown in the figure. Finally, lower the vacuum. Attention! Do not stand under the vacuum while it is being lowered. - Insert the exhaust pipe into the inlet port and lock it in place using a clamp.
-
Page 58: Installation
The vacuum is already equipped with a suction filter to retain the solid elements in the extracted liquid. - Insert the accessory according to the type of extraction on the opposite side of the hose. Contact your dealer (or DEPURECO) for information regarding the various types of OPTIONAL that can be used on this specific model. -
Page 59: Operation Section
OPERATION SECTION Description of the controls Attention! The vacuum can be used solely by authorised personnel after having read these use and maintenance instructions. The user of the equipment and the maintenance technician, who carry out interventions on the vacuum, must be adequately educated, informed and trained, in compliance with the occupational safety standards in force and, during the various operations, must wear personal protective equipment (PPE), such as safety footwear, gloves, protective goggles, mask, etc. -
Page 60: Operating Cycle
4.2 Operating cycle Ensure that the power cord is intact and in perfect state. Attention! Before inserting the plug, ensure that the voltage of the power supply line corresponds to that indicated on the identification plate. Ensure that the power plug is inserted correctly into the socket. Ensure that the hose is inserted properly and locked into the suction inlet. -
Page 61: Emptying The Container
War ni ng ! Before turning the vacuum on again, ensure that the pump has fully stopped. Upon completing this operation, turn the master switch (1) to "0" Use the handles (A) to move the vacuum — see figure Warning! During operation, prevent the hose from rolling up or bending 4.3 Emptying the container Attention! - Page 62 SCARICO ASPIRAZIONE DISCHARGE SUCTION VIDAGE ASPIRATION ENTLEERUNG ABSAUGEN DESCARGA ASPIRACION reach the discharge area and before starting the machine open both the inlets by means of the levers (A) — machine outlet and exhaust pipe end. Attention! Waste must be disposed of in compliance with the standards in force in the country of use —...
-
Page 63: Inserting And Locking The Refuse Collection Container - Not Applicable
Inserting and locking the refuse collection container — not applicable 4.5 Storage - decommissioning Remove the filter and clean it; empty the refuse collection container and store the vacuum in a place protected against weather agents with the temperature ranging between 5 and 45 °C and cover it with a nylon tarp to protect it against dust. -
Page 64: Maintenance Section
MAINTENANCE SECTION Attention! Special vacuum maintenance must be carried out solely by specialised technicians authorised by the DEPURECO dealer. Information notes This section describes the verifications and routine maintenance operations required to ensure proper vacuum operation. Maximum reliability and minimum maintenance costs are the result of a planned maintenance and inspection schedule carefully followed throughout the entire lifespan of the vacuum. -
Page 65: General Safety Regulations
5.2General safety regulations Attention! All the operations described must be carried out with the vacuum unplugged. Before starting any maintenance or cleaning operation, wear suitable PPE (protective clothing, goggles and/or gloves, etc.) according to the work to be done. Place a sign on the vacuum with the message: "MACHINE UNDER MAINTENANCE MACHINE II, DO NOT START"... -
Page 66: Replacing The Filter
- Ensure that the power cord and plug are not damaged: replace the power cord immediately at the slightest sign of wear with one of the same type (refer to DEPURECO for information). This operation must be carried out only by a qualified electrician. - Page 67 4. remove the cover remove the filter and replace it with a genuine spare part in the event of debris inside the filter or perforated filter, lift the filtering unit from the handles, remove the filter and clean the filter holder.
-
Page 68: Replacing The Filter Cartridge - Not Applicable
(tnt) and reassemble everything inside the compartment; then 9. hook the cover back on - follow the previous instructions. USE ONLY GENUINE DEPURECO FILTERS Replacing the filter cartridge - not applicable Positioning the thermal relay and fuses - not applicable... -
Page 69: Troubleshooting
In the event of any anomaly, read the notes in paragraph 5.1 and 5.2 of this manual before intervening. If necessary, contact the DEPURECO customer service for further information. Failure to comply with these precautions can cause series injuries to the personnel. -
Page 70: Scrapping
5.7 Scrapping To prevent damaging the environment in the event of scrapping, all the components of the vacuum must be disposed of responsibly in suitable landfills and in compliance with the standards in force - for Italy, Legislative Decree 152/2006 and subsequent amendments and additions. Before scrapping the machine, the plastic and rubber materials must be separated from the electrical material. - Page 71 Signed MAINTENANCE LOG INTERVENTION 3 Date Technical Assistance Type of Works Signed...
- Page 72 1. Identification of the main parts...
- Page 75 List of components extracted liquid tank fixed casters swivel casters extracted liquid escape valve air-water filter cleaner vacuum limiting valve suction hose inlet cover 10. control panel 11. pressure reset valve 12. pressure limiting valve 13. pressure limiting valve 14. electric motor 15.
- Page 76 2. Technical data Supply voltage 400 V Power 5.5 kW Maximum negative pressure 0.7 bar mc/h Maximum pressure 0.4 bar 400 | 50/60 Tank filling time 4 min 1000 Tank emptying time 3 min Tank capacity 1000 L 1000/220 Solid container capacity 37 L 1000/240 Noise level at 60% vacuum at 7 m...
- Page 77 3. Operation 3.1 Control panel...
- Page 78 3.2 Operating cycle Ensure that the power cord is intact and in perfect Ensure that the power cord is intact and in perfect state. Attention! Before inserting the plug, ensure that the voltage of the power supply line Before inserting the plug, ensure that the voltage of the power supply line Before inserting the plug, ensure that the voltage of the power supply line corresponds to that indicated on the equipment's identification plate.
- Page 79 3.2.1 Vacuum 1. Insert the plug and turn the cut-out switch to 0 2. turn the operation reversing lever (no. 15a in the figure) and make sure the LEVER IN VACUUM light is on 3. check the operation of the pressure limiting valve (no. 13 in the figure), pulling the red top eyelet upwards to verify the plate lifts without obstruction 4.
- Page 80 Press the CYCLE STOP button to stop vacuuming. The CYCLE IN OPERATION light remains on for a few seconds during which the pressure reset valve (no. 11 in the figure) opens to balance the pressures inside and outside the tank. The control panel can be disconnected after the light switches off.
- Page 81 4. Periodical checks Pressure reducer oil levels: for details refer to the use and maintenance manual for the specific model (PN 33 D) Cleaning the air-water filter: for details refer to the relative technical sheet.
- Page 82 Troubleshooting ......................30 Scrapping........................31 IMPORTANT - The DEPURECO term and logo in this document refer to and are the property of DEPURECO INDUSTRIAL VACUUMS S.r.l. This document remains the exclusive property of DEPURECO S.r.l. Full or partial reproduction by any means...
-
Page 83: Information Section
Foreword Dear Customer Thank you for choosing DEPURECO and a DEPURECO RAM OIL T500 series vacuum cleaner This manual has been prepared in order for you to fully appreciate the quality of this machine. Please read all sections before using the machine for the first time. - Page 84 This manual forms an integral part of the vacuum cleaner and must accompany the machine for its entire life cycle. In the event it is lost or damaged, you can request another copy from DEPURECO INDUSTRIAL VACUUMS S.r.l. (hereafter simply called DEPURECO).
-
Page 85: Main Parts
Main parts Suction nozzle solid residue container lid solid residue container liquid tank vacuum head hose wrapping hook drain pipe, including valve pump for expulsion of liquids (internal view from the hatch) vacuum cleaner handle... -
Page 86: Optional Parts
Optional parts A wide range of optional accessories is available from DEPURECO depending on the intended use of the vacuum. Manufacturer's identification data DEPURECO INDUSTRIAL VACUUMS S.r.l. Corso Europa 609 - 10088 Volpiano (TO) - ITALY tel. +39 011 98 59 117... -
Page 87: Technical Data
Warning! Workers exposed to sound pressure levels higher than 85 dB(A) must be protected by a suitable individual protection device as e.g. acoustic individual protection device type-approved. In this case, you need to supply workers training and information about risks coming from noise exposure. -
Page 88: Warranty
DEPURECO shall not be held liable for any injuries to persons or damage to objects caused by misuse or improper use of the vacuum. -
Page 89: Safety Section
Adequate training is crucial to this end. DEPURECO shall not be held liable for accidents or damage due to the improper use of the vacuum by untrained personnel or to failure to comply, even partially, with the occupational safety standards and intervention procedures contained in this manual. -
Page 90: Safety Recommendations
Safety recommendations Warning! The following information plays an important role in preventing all hazards that may occur while the vacuum cleaner is running. However, they cannot replace the expertise and common sense of operators as an overall framework for the prevention of accidents. - Page 91 • Should the Customer install a tool not supplied by DEPURECO on the vacuum, the safety requirements of Machinery Directive 2006/42/EC must be met. Nevertheless, DEPURECO shall not be held liable for problems caused by the use of such parts.
-
Page 92: Safety Plates And Symbols
Ensure that all safety messages are perfectly legible. Clean them using a cloth with water and soap. Do not use solvents, naphtha or petrol. Request replacements for damaged plates from DEPURECO. In the event that a plate is located on a piece that is replaced, ensure that a new plate is affixed to the new piece. -
Page 93: Residual Risks
Respect the limitations indicated in this manual, in section 1.5 “Authorised environmental conditions”. Risk of incorrect interpretation of the safety pictograms With reference to risk analysis and identification, DEPURECO has installed hazard labels on the vacuum, in compliance with the standards concerning graphical symbols. -
Page 94: Handling, Unpacking, And Installation Section
HANDLING, UNPACKING, AND INSTALLATION SECTION Handling Warning! The instructions for transporting and unpacking the vacuum correctly are shown on the packaging as well. The following instructions also indicate the operations to be undertaken should the vacuum need to be re-packed or unpacked after subsequent transportation. The vacuum cleaner must be lifted and handled exclusively using a forklift having suitable load bearing capacity. - Page 95 Remove the cardboard completely (where applicable) loosen and remove the fastening screws and brackets from both sides The cardboard packaging is recyclable and should be collected separately to prevent damaging the environment. Warning! Keep the pallet and the fastening brackets. In the event of subsequent transport, the vacuum must be secured to the pallet using the same fastening system.
-
Page 96: Installation
Note: the flexible pipe and the relevant end-pieces and suction accessories are not included with the STANDARD model. Contact your dealer (or DEPURECO) for information regarding the various types of OPTIONALS that can be used on this specific model. -
Page 97: Operation Section
OPERATION SECTION Description of controls Warning! The vacuum can be used solely by authorised personnel after having read these use and maintenance instructions. The user of the equipment and the maintenance technician, who carry out operations on the vacuum, must be adequately educated, informed and trained, in compliance with the occupational safety standards in force and, during the various operations, must wear personal protective equipment (PPE), such as safety footwear, gloves, protective goggles, mask, etc. -
Page 98: Operation Cycle
Operation cycle Ensure that the power cord is intact and in perfect condition. Warning! Before inserting the plug, ensure that the voltage of the power supply line corresponds to that indicated on the vacuum's identification plate. Make sure the power cord is properly inserted in the outlet and make sure the white indicator light (1) VOLTAGE PRESENCE is on. - Page 99 To proceed with vacuuming liquids, follow the steps below: make sure the drain valve at the end of the drain tube (detail no. 7, par. 1.1) is in the closed position (see image below) Place the chosen vacuum accessory on the end of the flexible hose. Turn the switch (3) LIQUID VACUUM ON/OFF to “I”, to stop the vacuum, turn the switch (1) to “O”.
- Page 100 To proceed with the expulsion of liquids, follow the steps below: turn the switch (3) to “O” as shown in the figure below, turn the handle (5) to open the drain valve to start the expulsion of liquids, tun the switch (4) LIQUID EXPULSION ON/OFF to “I”...
-
Page 101: Emptying The Solid Residue Container
Emptying the solid residue container To empty the solid residue container, make sure the machine is not in operation and proceed as indicated below: release the two hooks (6), gently raise the container lid (detail no. 2, par. 1.1) Remove the solid residue from the vacuumed liquid. For more convenient emptying, the container can be rotated 90°. -
Page 102: Storage - Decommissioning
When emptying is complete, return the container to the initial position by turning the handwheel (8) clockwise. Upon reaching the initial position, make sure the pin on the container (9) is locked under the safety hook (7) Storage - decommissioning Remove the mist filter, clean, and empty the tank of any liquid residue inside it and store the vacuum cleaner in a place out of the weather, with temperatures between 0°... -
Page 103: Maintenance Section
MAINTENANCE SECTION Warning! Special vacuum maintenance must be carried out solely by specialised technicians authorised by the DEPURECO dealer. Informative notes This section describes the checks and routine maintenance operations required to ensure proper vacuum operation. Maximum reliability and minimum maintenance costs are the result of a planned maintenance and inspection schedule carefully followed throughout the entire lifespan of the vacuum. -
Page 104: General Safety Regulations
General safety regulations Warning! All the operations described above must be carried out with the plug disconnected from the socket. Before starting any maintenance or cleaning operation, wear suitable PPE (protective clothing, goggles and/or gloves, etc.) according to the work to be done. Place a sign on the vacuum with the message: “MACHINE UNDER MAINTENANCE DO NOT START”... - Page 105 Check that the power cord and the plug are not damaged: replace them immediately if there are any signs of wear, using a cord of the same type (information c/o DEPURECO). This operation is the sole responsibility of an electrician.
-
Page 106: Cleaning The Mist Filter
Cleaning the mist filter Warning! Wear appropriate PPE (dust mask, latex gloves, goggles, etc.). To replace the mist filter, proceed as follows: switch off the machine disconnect the vacuum cleaner from the power supply disconnect the pump plug from the outlet on the electrical panel Release the closure hooks (A) on the vacuum head to release it from the hatch (to loosen the hooks, turn the handwheel clockwise (A1)) From the hatch, lift the vacuum head (B) and position it in a safe place to avoid damaging the pump. -
Page 107: Replacing The Mist Filter
Unscrew the mist filter (D) from the ring (C). Clean the filter with a jet of water with sufficient pressure to remove any residues inside the filter. To reassemble the filter, operate in reverse order: screw the mist filter (C) on the support ring and reposition the latter inside the hatch position the head of the vacuum above the hatch, making sure that it is positioned as previously and that the notches on the closure hooks are aligned with the proper closure hooks tighten the closure hooks... -
Page 108: Tank Emptying And Cleaning
Warning! Make sure the tap is screwed on and tightened properly, if not there could be leaks during normal use ONLY USE ORIGINAL DEPURECO FILTERS... -
Page 109: Troubleshooting
- Magneto-thermic switch power cable The vacuum cleaner will tripped not start - Reset the magneto-thermal switch - Contact the DEPURECO technical assistance - Follow filter cleaning procedure. If this - Mist filter solution is not effective, replace it. Irregular suction - Clogged suction tube - Check suction pipe and clean it. -
Page 110: Scrapping
Scrapping At the end of the life cycle, to avoid damages to environment, each component of the vacuum cleaner must be disposed of responsibly, in adequate dumps, according to current laws - in Italy, Legislative Decree 152/2006, as amended. Before scrapping the machine, the plastic and rubber materials must be separated from the electrical material. - Page 111 To make a warranty claim, photocopy this form and fill it in all parts, preferably in block capitals, and send via fax to the manufacturer at the following number 0 1 1 . 9 8 5 9 3 2 6 or via email to DEPURECO@DEPURECO.com VACUUM / COMPONENTS Model Serial number Date of delivery: Company name:………………………………………………………………………..
- Page 112 MAINTENANCE LOG Date INTERVENTION 1 Technical Assistance Type of intervention Signature INTERVENTION 2 Date Technical Assistance Type of intervention Signature MAINTENANCE LOG...
- Page 113 INTERVENTION 3 Date Technical Assistance Type of intervention Signature...
Need help?
Do you have a question about the RAM Series and is the answer not in the manual?
Questions and answers