Advertisement
Quick Links
(4). Install thermal solution and AX93A07 I/O board as indicated in image
below.
Thermal Solution
[ [ [ [
AX93A07
or _ _ __ : : : :
- Use [ for PICO313
- Use _ for PICO313+AX93A07
PICO313:
[
4pcs, 793803ZZ600E - 5H*8L*M3 Hex female copper stand-off, true color
\
2pcs, 79380363600E - 5H*8L*6L*M3 Hex male-female copper stand-off, true color
]
2pcs, 79395363200E - 5H*9.5L*6L*M3 Hex male-female copper stand-off, nickel-plated
AX93A07:
^ 1pcs, 72932670100e - AX93A07 bracket
_ 2pcs, 793703ZZ600E - 5H*7L*M3 Hex female copper stand-off, true color
'
2pcs, 75111630400E - M3*4L Pan head phillips machine nickel-plated screw (RC)
(5). Firmly insert the DC power adapter into CN5 on AX93A07.
(6). Power on the system by inserting power plug.
4
9418H313000E
©
Copyright 2017 Axiomtek Co., Ltd.
Version A1 May 2017
Printed in Taiwan
PICO313 Quick Installation Guide
Checklist
Pico-ITX Board x1
Product Information DVD x1
Quick Installation Guide x1
AX93A07 I/O Board x1
USB Cable x1
Note: Please contact your local vendors if any damaged or missing items. DO
NOT apply power to the board if there is any damaged component.
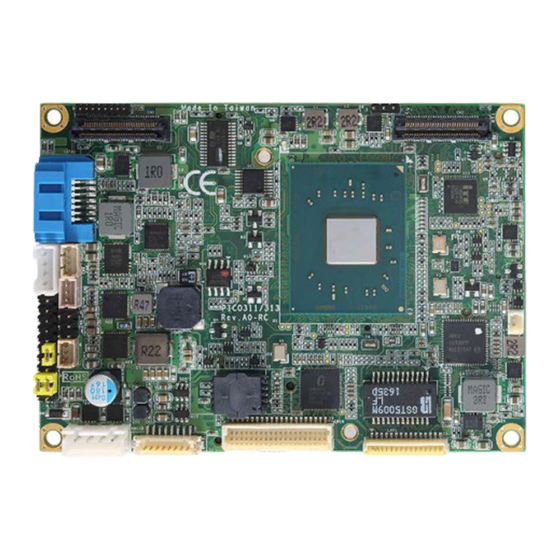
Board Layout
CN1
SATA1
CN4
CN5
CN6
CN8
CN7
JP2
CN9
JP4
JP3
CN10
CN11
CN12
Top View
9418H313000E
©
Copyright 2017 Axiomtek Co., Ltd.
Version A1 May 2017
Printed in Taiwan
SATA Cable x1
SATA Power Cable x1
Heatspreader x1
Heatsink x1
CN2
U1
BAT1
LAN1
1
Advertisement

Subscribe to Our Youtube Channel
Related Manuals for AXIOMTEK PICO313


Summary of Contents for AXIOMTEK PICO313
- Page 1 Board Layout [ [ [ [ AX93A07 or _ _ __ : : : : - Use [ for PICO313 - Use _ for PICO313+AX93A07 PICO313: 4pcs, 793803ZZ600E - 5H*8L*M3 Hex female copper stand-off, true color 2pcs, 79380363600E - 5H*8L*6L*M3 Hex male-female copper stand-off, true color SATA1 2pcs, 79395363200E - 5H*9.5L*6L*M3 Hex male-female copper stand-off, nickel-plated...
- Page 2 Half-size PCI-Express Mini Card Connector Bottom View SSDIMM1 DDR3L SO-DIMM Connector Note: Please refer to the PICO313 product information DVD for the complete user’s manual, drivers and utilities. User’s manual and related Quick Start documents are in Acrobat PDF format.
Need help?
Do you have a question about the PICO313 and is the answer not in the manual?
Questions and answers