TSC TDM-20 User Manual
Moblie barcode printers
Hide thumbs
Also See for TDM-20:
- User manual (70 pages) ,
- Service manual (20 pages) ,
- Programming manual (434 pages)

Subscribe to Our Youtube Channel
Related Manuals for TSC TDM-20


Summary of Contents for TSC TDM-20
- Page 1 ;’RFTGTT5RT12 TDM-20/30 Direct Thermal Moblie Barcode Printers Series Lists: User Manual TDM-20 / TDM-30...
- Page 2 All other trademarks are the property of their respective owners. Information in this document is subject to change without notice and does not represent a commitment on the part of TSC Auto ID Technology Co. No part of this manual may be reproduced or transmitted in any form or by any means, for any purpose other than the purchaser’s personal use, without the...
-
Page 3: Table Of Contents
Table of Contents 1. Introduction ........................................1 1.1 Product Specification ....................................2 1.2 Printer Optional Features .....................................3 1.3 General Specifications ....................................5 1.4 Print Specifications ......................................6 1.5 Media Specifications ....................................7 2. Operation Overview ......................................8 2.1 Unpacking and Inspection ....................................8 2.2 Printer Overview ......................................9 2.2.1 Front View ......................................9 2.2.2 Interior View ...................................... - Page 4 4.7 Charge by 4-bay Printer Charger Station (Optional) ........................... 33 5. TSC Console ........................................35 5.1 Start TSC Console ..................................... 35 5.2 Set WiFi and Add to TSC Console Interface .............................. 37 5.3 Initialize the Printer WiFi Setting ................................40 5.4 TPH Care ........................................41...
- Page 5 5.6 Setting Post-Print Action .................................... 43 6. TroubleShooting ......................................44 7. Maintenance ........................................46 8. Angency Compliance and Approvals ................................48 9. Revise History ......................................... 58...
-
Page 6: Introduction
TDM-20, TDM-30 printers are designed for a rough life, inside the IP54-rated environmental case to resist dust and water and with its durable design prepared to take up to 2.5 meters fall and keep printing. -
Page 7: Product Specification
1.1 Product Specification The printer offers the following standard features Features Description TDM20 TDM30 Direct thermal printing Black mark reflective sensor Head open sensor 3 operation buttons (On/off, feed/pause, and cover-open buttons) LED version: LED version: 5 LEDs: 1 for printer status; 3 for Battery capacity; 1 for wireless 5 LEDs: 1 for printer status;... -
Page 8: Printer Optional Features
1.2 Printer Optional Features TDM-20Series: The printer offers the following optional features. Features Description User options Factory options 802.11 a/b/g/n Wi-Fi and Bluetooth V4.2, NFC tag, and USB 2.0 high-speed interface ○ MFi Bluetooth V5.0 with NFC tag and USB 2.0 high-speed interface ○... - Page 9 TDM-30 Series: Features Description User options Factory options ○ 802.11 a/b/g/n Wi-Fi with Bluetooth V4.2, NFC tag, and USB 2.0 interface ○ MFi Bluetooth V5.0 with NFC tag and USB 2.0 interface ○ Vehicle mount kit ○ Printer ready for vehicle docking cradle ○...
-
Page 10: General Specifications
1.3 General Specifications General Specifications TDM-20 TDM-30 Physical dimensions 79 mm (W) x 36.5 mm (H) x 116 mm (D) 105 mm (W) x 49.5 mm (H) x 116 mm (D) Enclosure Plastic Plastic Weight (w/ battery) 0.215 kg (0.47 lbs) 0.375 kg (0.83 lbs) -
Page 11: Print Specifications
IP54 w/ protective case Drop 1.8 m (5.9 ft) w/o IP54-rated environmental case Drop 2.5 m (8.2 ft) w/ IP54-rated environmental case 1.4 Print Specifications Print Specifications TDM-20 TDM-30 Print head resolution 203 dots/inch (8 dots/mm) Direct thermal Printing method Dot size 0.125 x 0.125 mm(1 mm = 8 dots) -
Page 12: Media Specifications
1.5 Media Specifications Media Specifications TDM-20 TDM-30 Max. O.D.: 30 mm (1.18”) Max. O.D.: 40 mm (1.57”) Media roll capacity Reflective sensor model: Receipt paper, black mark receipt paper (mark in printing side) & Continuous, black mark, partial label with gap (liner is... -
Page 13: Operation Overview
2. Operation Overview 2.1 Unpacking and Inspection This printer has been specially packaged to withstand damage during shipping. Please carefully inspect the packaging and printer upon receiving the bar code printer. Please retain the packaging materials in case you need to reship the printer. Unpacking the printer, the following items are included in the carton. -
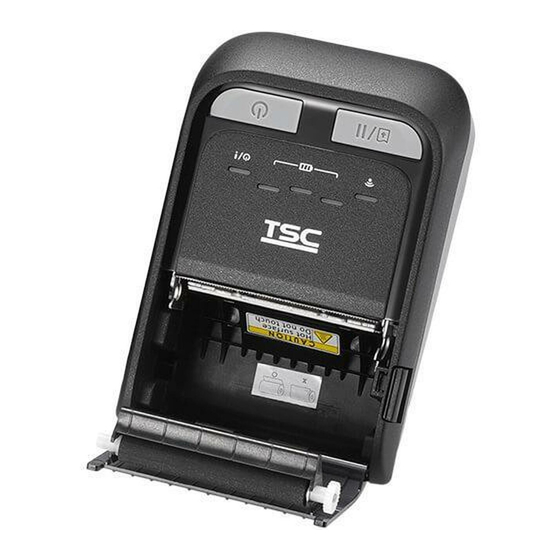
Page 14: Printer Overview
2.2 Printer Overview 2.2.1 Front View TDM-30(LCD) TDM-20 TDM-30 Feed/stop button Feed/stop button Feed/stop button Power on/off button Power on/off button Power on/off button LED indicators LED indicators LED indicators & LCD screen Media cover Media cover Media cover Media view window... -
Page 15: Interior View
2.2.2 Interior View TDM-20 TDM-30 Platen roller Platen roller Tear edge Tear edge Print head Print head Black mark sensor Black mark sensor... -
Page 16: Rear View
2.2.3 Rear View TDM-30 TDM-20 Li-ion Battery Li-ion Battery Battery open clasp Battery open clasp Interface cover Interface cover Power jack Power jack USB interface USB interface... -
Page 17: Operator Control
2.3 Operator Control 2.3.1 Led Indication and Keys TDM-20 Wireless status LED indicator Printer status LED indicator Feed/Pause button Power on/off button Battery charge level LED indicators Keys Function 1. Press and hold for 2-3 seconds to turn on the printer. - Page 18 Status Indication Printer is ready Green (blinking) Printer is paused Sleep mode/ entered the sleep mode after stop working over 2 minutes (The interval can be Printer status LED indicator Green (blinking every two seconds) changed by revising the command, refer to TSPL/TSPL2 programming manual on website).
- Page 19 TDM-30(LED) Wireless status LED indicator Printer status LED indicator Feed/Pause button Power on/off button Battery charge level LED indicators Keys Function 3. Press and hold for 2-3 seconds to turn on the printer. 4. Press and hold for 2-3 seconds to turn off the printer. 3.
- Page 20 Sleep mode/ entered the sleep mode after stop working over 2 minutes (The interval can be Printer status LED indicator Green (blinking every two seconds) changed by revising the command, refer to TSPL/TSPL2 programming manual on TSC website). Red (solid) Media cover is open Red (blinking)
- Page 21 TDM-30(LCD) LCD screen (indicates battery status/media type/firmware Printer status/Wireless version/error messages) status LED indicator Power on/off button Feed/Pause button Keys Function LCD monitor 1. Press and hold for 2-3 seconds to turn on the Battery & Bluetooth icon printer. Media type 2.
-
Page 22: Led Indication And Keys
2.3.2 Led Indication and Keys TDM-20: Charging the battery when the printer turns on. Charging Fully charged then turn off the mode printer automatically. Power saving mode Charging cycle LED version Charging level: 0~30% 1. Charging the battery when the printer turns on. - Page 23 Note: Printer status LED blinks amber light when charging the battery. Push power on/off button when charging the battery, the LED lights will shows the charging status. After the battery was fully charged and stopped print job for a while, the printer will ...
- Page 24 TDM-30: Charging the battery when the printer turns on. Charging Fully charged then turn off mode the printer automatically. Power saving mode Charging cycle LED version LCD version Charging level: Charging level: 1 block blinking 0~30% 0~25% Charging level: 2 blocks Charging level: 1.
- Page 25 Push power on/off button when charging the battery, the LED lights/ LCD monitor will shows the charging status. After the battery was fully charged and stopped print job for a while, the printer will automatically turn-off. Check the smart battery charging capacity on TSC Console.User can use TSC Console to check battery level and battery life.
-
Page 26: Power-On Utilities
2.3.3 Power-on Utilities Power-on Utilities provides the basic functions and can be activated by below procedures: Turn off the power > Hold the Feed button ( ) > Open the power > Release the button depending on the the color of the LED. Sequences of the settings: LED Colors (solid) -
Page 27: Setup
3. Setup TDM-20 TDM-30 operate in the same way, this manual uses TDM-20 as an example. 3.1 Install the Battery Insert battery to the left side of battery slot on the rear of the printer. Push the battery down and pull the battery clasp to lock the battery. -
Page 28: Charge The Battery
3.2 Charge the Battery 3.2.1 Charge the Battery It takes 1.5 to 2 hours to fully charge the battery before the first time usage. The lifetime of the battery is 300 times for charge/discharge cycles. Open the interface cover and plug the power cord into the power jack. -
Page 29: Charge By 4-Bay Battery Charger Station (Optional)
3.2.2 Charge by 4-bay Battery Charger Station (Optional) Plug the power cord to the power jack on the charger station. Insert the printer along the slot to the charger station as pictured. Note: Please refer to section 3.1 for battery installation procedure. -
Page 30: Charge The Battery Communicate
3.3 Charge the Battery Communicate 3.3.1 Connecting with the Communication Cable USB to USB Cable (Optional) Open the interface cover and connect the printer to the computer with USB cable. 3.3.2 Connecting with Bluetooth (Optional) Turn on the printer and make sure the Bluetooth Default device opened. -
Page 31: Loading The Media
3.4 Loading the Media Open the printer media cover by pressing the media cover release button. Place the media roll at the correct side, and pull out enough paper over the tear edge. Press the media cover on both sides to close it and make sure the media cover have closed correctly. -
Page 32: Accessories(Use Tdm-20 As Sample)
4. Accessories(Use TDM-20 as sample) 4.1 Install the Belt Clip Turn the battery to rear side and lock the belt clip on the hole at the top of the printer. Press the ball on the belt clip to the hole as pictured. -
Page 33: Install The Media Spacer Kit (Optional)
4.2 Install the Media spacer kit (Optional) Open the printer media cover by pressing the media cover release button. Insert the media spacers to both sides of slots then complete the installation. Slot NOTE: The media spacer kit could easily change the media fix width ranged from 1”, 1.5”, to 2”... -
Page 34: Install The Ip54-Rated Environmental Case With Shoulder Strap (Optional)
4.3 Install the IP54-rated environmental case with shoulder strap (Optional) Open the zip along the arrow direction indicated on case cover. Place the printer in the case. Note: The printing side must face the outside cover as indicated. Zip up the case cover. The outside cover should be opened and fixed while printing. -
Page 35: Install Shoulder Strap Kit (Optional)
4.4 Install Shoulder strap kit (Optional) Turn the printer to rear side, remove the battery on the rear of the printer and lock the shoulder strap kit on the hole above the battery as indicated. Reinstall the battery, and the printer can be hung on the shoulder strap. -
Page 36: Install Vehicle Holder Adapter For Ram Mount (Optional)
4.5 Install Vehicle holder adapter for RAM mount (Optional) Turn the printer to the rear side. Install the vehicle holder Note: adapter align with the Please choose the copper pillars and fix with printer with copper two screws as indicated. pillars as indicated. -
Page 37: Charge By 1-Bay Printer Charger Station (Optional)
4.6 Charge by 1-bay Printer Charger Station (Optional) Turn the printer to rear side, remove the battery on the rear of the printer and lock the shoulder strap kit on the hole above the battery as indicated. Push the printer properly to the charger station. Reinstall the battery, and the printer can be hung on the shoulder strap. -
Page 38: Charge By 4-Bay Printer Charger Station (Optional)
4.7 Charge by 4-bay Printer Charger Station (Optional) Turn the printer to rear side, remove the battery on the rear of the printer and lock the shoulder strap kit on the hole above the battery as indicated. Push the printer properly to the charger station. Reinstall the battery, and the printer can be hung on the shoulder strap. - Page 39 Plug the power cord into power outlet. Plug the power cord into power outlet. Turn on the power switch on the charger station, it will flash the blue light and start charging. Note: When the battery is completely charged, the amber of LED indicator will be off and shows fully charged green LED.
-
Page 40: Tsc Console
5. TSC Console TSC Console is a management tool combining the Printer Management, Diagnostic Tool, CommTool and Printer Webpage settings, which enables you to adjust printer’s settings/status; change printers’ settings; download graphics, deploy fonts, graphics, label templates or upgrade the firmware to the group of printers, and send additional commands to printers at the same time ※... - Page 41 Select the current interface of the printer. The printer will be added to TSC Console’s interface. Select the printer and set the settings. For more information, please refer to TSC Console User Manual.
-
Page 42: Set Wifi And Add To Tsc Console Interface
5.2 Set WiFi and Add to TSC Console Interface Use USB or COM Port to set up the interface. (refer to chp.5.1) Double click to enter the printer configuration page. Click Get to receive printer’s information. Click Wi-Fi to the wi-fi setting page. - Page 43 For WPA-Personal Fill-in the SSID. Select the Encryption option to WPA-Personal. III. Fill-in the Key. Select DHCP to ON. (For OFF option, please fill-in the IP Address, Subnet Mask and Gateway) After setting, click the Set button. Note: Before setting, the entered field will be shown in yellow for reminding.
- Page 44 After clicking Set button, it'll pop-up the window tip as below shown. IP address will be shown in the “IP address” field. Remove cable between the computer and the printer. Go to main page, click Add Printer to add the printer via Network.
-
Page 45: Initialize The Printer Wifi Setting
5.3 Initialize the Printer WiFi Setting Return to the main page of TSC Console. Click Functions to expand the page. Click Wi-Fi Default to initialize the printer Wi-Fi module setting to factory default setting. -
Page 46: Tph Care
5.4 TPH Care TPH Care provides users to check the condition of the print head and be able to set the dot failure threshold for indicating errors when the threshold is triggered. This option is used to set the This option is used to enable treshhold for unhealthy TPH dot (ON)/ disable (OFF) the TPH number. -
Page 47: Printer Function
5.5 Printer Function Printer Function could be found in Printer Configuration. “Printer Function” will be shown on the left side of the window. Functions Description Calibrate Sensor Detect media types and the size of the label RTC Setup Synchronize printer with Real Time Clock on PC Factory Default Initialize the printer to default settings Reset Printer... -
Page 48: Setting Post-Print Action
When the printer is equipped with other opton kits, ex: cutter, peeler, rewinder, please select the mode after finishing the calibration. Follow below procedure to set the post action for the printing: Refer Chp 5.1 to Connect the printer with TSC Console > Double click the printer >... -
Page 49: Troubleshooting
( FLASH / DRAM ) FLASH. * Check the available memory space for DRAM or FLASH via TSC Console. * Make sure the right/ left side of media cover is fully latched. * Media cover is not fully latched. * Clean the print head. - Page 50 Missing printing on the left or right * Wrong label size setup. * Set the correct label size. side of label * The print head is dirty. * Clean the print head. Gray line on the blank label * The platen roller is dirty. * Clean the platen roller.
-
Page 51: Maintenance
7. Maintenance This session presents the clean tools and methods to maintain the printer. For Cleaning Depending on the media used, the printer may accumulate residues (media dust, adhesives, etc.) as a by-product of normal printing. To maintain the best printing quality, you should remove these residues by cleaning the printer periodically. Regularly clean the print head and supply sensors once change a new media to keep the printer at the optimized performance and extend printer life. - Page 52 Cleaning Tools Cotton swab Lint-free cloth Brush with soft non-metallic bristles Vacuum cleaner 75% Ethanol (for disinfecting) 99% Isopropyl alcohol (for printhead and platen roller cleaning) Genuine printhead cleaning pen Mild detergent (without chlorine) Cleaning Process: Printer Part Method...
-
Page 53: Angency Compliance And Approvals
8. Angency Compliance and Approvals 2014/30/EU(EMC), 2014/35/EU(LVD), 2011/65/EU(RoHS 2.0) EN 55032 Class B EN 55024 EN61000-3-2:2014 EN61000-3-3:2013 EN 60950-1 FCC part 15B, Class B This equipment has been tested and found to comply with the limits for a Class B digital device, pursuant to part 15 of the FCC Rules. - Page 54 10 C.F.R. Section 430.23(aa) (Appendix Y to Subpart B of part 430) TP TC 004/2011 TP TC 020/2011 LP0002 Important safety instructions: Read all of these instructions and keep them for later use. Follow all warnings and instructions on the product. Disconnect the power plug from the AC outlet before cleaning or if fault happened.
- Page 55 3. 在清潔前或發生故障時,拔除電源插頭與交流電源插座的連接。 不要使用液體或噴霧清潔劑。建議使用濕布清潔。 4. 電源插座應安裝在設備附近及方便使用處。 5. 本機器必須防止潮濕。 6. 確保安裝設備時的穩定性,翻倒或跌落可能會導致設備損壞。 7. 確保按照製造商提供的標籤上標明之正確的額定功率和電源類型進行設定。 8. 請參考使用手冊以確認環境溫度的最大值。 WARNING: Hazardous moving parts, keep fingers and other body parts away. CAUTION: (For equipment with RTC (CR2032) battery or rechargeable battery pack) Risk of explosion if battery is replaced by an incorrect type. Dispose of used batteries according to the Instructions as below.
- Page 56 警告: (對於帶有 RTC(CR2032)電池或可充電電池組的設備) 如果更換不正確的電池類型,會有爆炸的危險。 請按照以下說明處理廢電池: 1. 請勿將電池投入火中。 2. 請勿使觸點短路。 3. 請勿拆卸電池。 4. 請勿將電池丟入都市廢棄物。 5. 垃圾桶畫叉圖案表示電池不應放置在都市廢棄物中。 Caution: The printhead may be hot and could cause severe burns. Allow the printhead to cool. CAUTION: Any changes or modifications not expressly approved by the grantee of this device could void the user's authority to operate the equipment. CE Statement: This equipment complies with EU radiation exposure limits set forth for an uncontrolled environment.
- Page 57 RF exposure warning (For Bluetooth) The equipment complies with FCC RF exposure limits set forth for an uncontrolled environment. The equipment must not be co-located or operating in conjunction with any other antenna or transmitter. Canada, Industry Canada (IC) Notices This Class B digital apparatus complies with Canadian ICES-003 and RSS-210.
- Page 58 NCC 警語: 經型式認證合格之低功率射頻電機,非經許可,公司、商號或使用者均不得擅自變更頻率、加大功率或變更原設計之特性及功能。(即低功率電波 輻射性電機管理辦法第十二條) 低功率射頻電機之使用不得影響飛航安全及干擾合法通信;經發現有干擾現象時,應立即停用,並改善至無干擾時方得繼續使用。 前項合法通信,指依電信法規定作業之無線電通信。低功率射頻電機須忍受合法通信或工業、科學及醫療用電波輻射性電機設備之干擾。(即低功 率電波輻射性電機管理辦法第十四條) 警告: 本電池如果更換不正確會有爆炸的危險,請依製造商說明書處理用過之電池。NBTC SDoC...
- Page 59 MFi for Bluetooth Use of the Made for Apple badge means that an accessory has been designed to connect specifically to the Apple product(s) identified in the badge, and has been certified by the developer to meet Apple performance standards. Apple is not responsible for the operation of this device or its compliance with safety and regulatory standards.
- Page 60 Except for US, JP Model Made for iPhone XS Max, iPhone XS, iPhone XR, iPhone X, iPhone 8, iPhone 8 Plus, iPhone 7, iPhone 7 Plus, iPhone SE, iPhone 6s, iPhone 6s Plus, iPhone 6, iPhone 6 Plus, iPhone 5s, iPad Pro 12.9-inch (2nd generation), iPad Pro 10.5-inch, iPad (6th generation), iPad (5th generation), iPad Pro 9.7-inch, iPad Pro 12.9-inch (1st generation), iPad Air 2, iPad mini 4, iPad mini 3, iPad Air, iPad mini 2, iPod touch (6th generation)
- Page 61 限用物質及其化學符號 六價鉻 多溴聯苯 多溴二苯醚 Restricted substances and its chemical symbols 單元Unit 鉛Lead 汞Mercury 鎘Cadmium Hexavalent Polybrominated Polybrominated (Pb) (Hg) (Cd) chromium biphenyls diphenyl ethers (PBB) (PBDE) 內外塑膠件 ○ ○ ○ ○ ○ ○ 內外鐵件 ○ ○ ○ ○ ○ 滾輪 ○...
- Page 62 電源供應器 ○ ○ ○ ○ ○ ○ 印字頭 ○ ○ ○ ○ ○ 馬達 ○ ○ ○ ○ ○ 液晶顯示器 ○ ○ ○ ○ ○ 插座 ○ ○ ○ ○ ○ 線材 ○ ○ ○ ○ ○ 備考 1.〝超出 0.1 wt %〞及〝超出 0.01 wt %〞係指限用物質之百分比含量超出百分比含量基準值。 Note 1:“Exceeding 0.1 wt %”...
-
Page 63: Revise History
9. Revise History Date Content Editor...
Need help?
Do you have a question about the TDM-20 and is the answer not in the manual?
Questions and answers