Alcatel-Lucent Enterprise OXO CONNECT ALE-500 Enterprise DeskPhone User Manual
Hide thumbs
Also See for OXO CONNECT ALE-500 Enterprise DeskPhone:
- User manual (114 pages) ,
- User manual (113 pages)

Related Manuals for Alcatel-Lucent Enterprise OXO CONNECT ALE-500 Enterprise DeskPhone


Summary of Contents for Alcatel-Lucent Enterprise OXO CONNECT ALE-500 Enterprise DeskPhone
- Page 1 OXO CONNECT ALE-500 Enterprise DeskPhone ALE-400 Enterprise DeskPhone ALE-300 Enterprise DeskPhone User Manual 8AL91434ENAAed01 W2140 8AL91434ENAAed01 1 /102...
- Page 2 User Manual Introduction Thank you for choosing an Alcatel-Lucent Enterprise desk phone. This document describes the services offered by the following desk phones connected to an OXO Connect or OXO Connect Evolution system. • ALE-500 Enterprise DeskPhone (ALE-500). • ALE-400 Enterprise DeskPhone (ALE-400).
- Page 3 User Manual The labels and icons displayed depend on the type and the skin of the set. The label is not displayed if the corresponding feature is not configured on your telephone system. Depending on the size of the display, some labels may be truncated. All labels are displayed in color and are italicized.
-
Page 4: Table Of Contents
User Manual Getting to know your telephone ALE-500 Enterprise DeskPhone 1.1.1 Phone description 1.1.2 Virtual keyboard / Virtual add-on module 1.1.3 Ordering options and supported accessories ALE-400 Enterprise DeskPhone 1.2.1 Phone description 1.2.2 Ordering options and supported accessories ALE-300 Enterprise DeskPhone 1.3.1 Phone description 1.3.2... - Page 5 User Manual Making calls by name (company directory) 2.9.1 Calling a contact using the unified directory 2.9.2 Calling a contact using the internal directory (predictive search) 2.10 Make calls via your programmed call keys (Perso page/F1 and F2 keys/Add-on module) 2.11 Filtering calls using the voice mailbox 2.11.1 Activating call screening...
- Page 6 User Manual 2.45 Leaving a text message for internal callers 2.45.1 Sending predefined message 2.45.2 Sending a new message 2.46 consulting text messages 2.47 Send a voice message copy 2.48 Sending a recorded message to a number or a distribution list 2.49 Message notification 2.49.1 Change the time slot...
- Page 7 User Manual Adjusting the brightness of the desk phone 4.7.1 Auto-adjusting of the brightness 4.7.2 Adjust the brightness when the phone is not in use 4.7.3 Adjust the brightness when the phone is in use 4.7.4 Adjust the dimmed brightness when the phone is not in use 4.7.5 Set the delay before the brightness is dimmed when the phone is not in use (screensaver) Selecting the welcome page...
- Page 8 User Manual Magnetic alphabetic keyboard: ALE-100 keyboard (USB) 5.4.1 Description 5.4.2 Unboxing 5.4.3 Installation 5.4.4 How to use the keyboard ALE-140 Customization kit 5.5.1 Description 5.5.2 Unboxing 5.5.3 Remove or install the customization kit ALE-120 Key Expansion Module 5.6.1 Description 5.6.2 Unboxing 5.6.3...
-
Page 9: Getting To Know Your Telephone
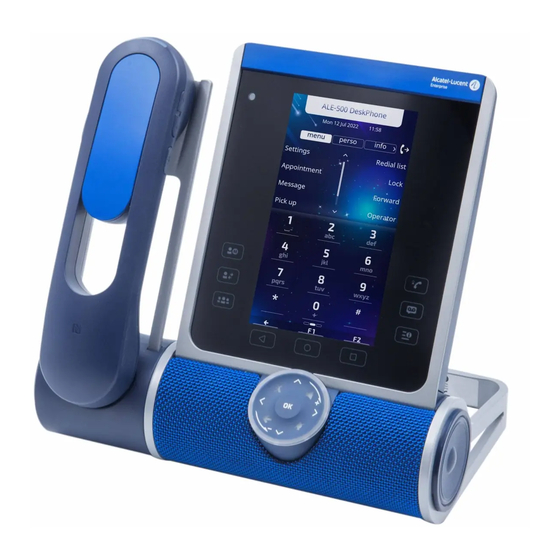
User Manual 1 Getting to know your telephone ALE-500 Enterprise DeskPhone This phone is part of the Enterprise and IP phone ranges.With its 5.5 inch color touch display and an intuitive navigation Smart Pad, the ALE-500 Enterprise DeskPhone (ALE-500) delivers a great user experience and increased convenience with an outstanding super wideband audio quality (3D Symphonic HD) in hands-free mode with a 3D audio. -
Page 10: Virtual Keyboard / Virtual Add-On Module
User Manual 1.1.2 Virtual keyboard / Virtual add-on module In addition to default homepage, the screen of the ALE-500 allows to display a virtual add-on, a numeric keyboard and an alphabetic keyboard. The appearance depends on the selected skin. Browse between different screens by swiping left or right: 1.1.3 Ordering options and supported accessories There are three commercial variants of the ALE-500:... -
Page 11: Enterprise Deskphone
User Manual ALE-400 Enterprise DeskPhone This phone is part of the Enterprise and IP phone ranges. With its 4.3 inch color touch display and an intuitive navigation Smart Pad, the ALE-400 Enterprise DeskPhone (ALE-400) delivers a great user experience and increased convenience with an outstanding super wideband audio quality (3D Symphonic HD) in hands-free mode with a 3D audio. -
Page 12: Ordering Options And Supported Accessories
User Manual 1.2.2 Ordering options and supported accessories There are two commercial variants of the ALE-400: • The desk phone with cordless handset (ALE-400, ALE-160, ALE-108). • The desk phone with corded handset (ALE-400, ALE-150). Some options can complete your order such as the addition of the keyboard (ALE-100), the wireless module (ALE-108), an expansion module (ALE-120) or a Bluetooth®... -
Page 13: Enterprise Deskphone
User Manual ALE-300 Enterprise DeskPhone This phone is part of the Enterprise and IP phone ranges. With its 3.5 inch color display that comes with ten dedicated function keys and an intuitive navigation Smart Pad, the ALE-300 Enterprise DeskPhone (ALE-300) delivers a great user experience and increased convenience with an outstanding wideband audio quality or super wide band using the ALE-150 SWB Corded Handset. -
Page 14: Ordering Options And Supported Accessories
User Manual 1.3.2 Ordering options and supported accessories The ALE-300 Enterprise DeskPhone is available in one version: the desk phone with corded handset. Some options can complete your order such as the addition of the keyboard (ALE-100), the wireless module (ALE-108) and an expansion module (ALE-120). Removable keys (ALE-400, ALE-300) Depending on the configuration of the system, three keys can have different features. -
Page 15: To Install New Keys
User Manual 1.4.1 To install new keys The extra keys are provided hanging on a support so that they do not get lost. The new key is easily detached. • On the desk phone, take the key to replace between thumb and forefinger and pull gently to remove it. -
Page 16: Unboxing
User Manual Unboxing Your phone is modular. Several options are possible depending on your specific requirements. Options delivered in the box depend on the model of your desk phone. The following table lists all options regarding the model of your desk phone. You can order a compatible accessory to make your desk phone evolve. -
Page 17: Smart Pad
User Manual Smart Pad 1.7.1 Description Hands-free/Loudspeaker key Pressing this key answers an incoming call in hands-free mode (when activated, the key is lit blue). When a call is in progress, pressing this key switches from hands-free mode to headset or handset mode. A long press activates the loudspeaker when a call is in progress via the handset or headset. -
Page 18: Smart Pad Gesture
User Manual 1.7.2 Smart Pad gesture Short press Long press Rotate The light ring is not touch sensitive. Please place your finger in the hollow of the Smart Pad for any actions. 1.7.3 The Smart Pad contains a large number of notifications indicated by the color of the leds. The ring around the Smart Pad and the keys can light up depending on the event. - Page 19 User Manual 1.7.3.3 LED management Legend: Switch off Strongly lit in blue Blinking in blue Dimly lit leds indicate the available actions. Smart Pad ring In idle state, awake, Interphony activated Incoming call (ringing) In conversation with handset or headset In conversation in hands- free mode Muted with handset or...
-
Page 20: Change The Theme (Skin) Of Your Phone
User Manual 1.7.3.5 Other use cases Idle state Boot During boot phase, boot steps are represented by lit led on the Smart Pad ring: finished steps are fully lit up in blue, current booting step is blinking in blue and next steps will be off. Update During software update, the Smart Pad ring rotates clockwise in purple until the update is finished. -
Page 21: Welcome Screens
User Manual Welcome screens Example of the ALE-400 home page 1.9.1 Homepage description You can access all of your phone's features from these screens. The default display has three pages that you can access by selecting tabs at the top of the screen. Depending on your phone, touch the tab at the top of the screen (touch screen) or use the left or righr navigation keys to select it. -
Page 22: Main Screen And Navigation Keys
User Manual 1.9.3 Main screen and navigation keys Customization area: The company/logo of your enterprise can be added in this area (ALE-500 / ALE-400). Top bar (date, time, status icons). Desk phone dynamic status (optional, depending on system configuration). Display the page by selecting the corresponding tab. Forward icon. -
Page 23: Call Management Screen
User Manual 1.9.4 Call management screen Customization area: The company/logo of your enterprise can be added in this area (ALE-500 / ALE-400). Tabs: incoming call icon, call in progress, call on hold, … notification (popup) of incoming call softkeys: actions available depending on the call status (when presentation screen is not displayed) Left-right navigator: Each tab corresponds to a call, the status of which is symbolized by its icon (in... -
Page 24: User Local Menu
User Manual 1.10 User local menu : open the user local menu. The User Local menu can also be accessed from the system MENU: Reach the 'Menu' page Settings Phone Local Menu The user local menu depends on the type of the set. →... - Page 25 User Manual Bluetooth Use this menu to configure the Bluetooth® device (optional). This menu is displayed only if the desk phone is equipped with: ALE-108 Wireless Module: • Enable Enable or disable Bluetooth® function (check or uncheck the box). • Devices Display all paired Bluetooth®...
-
Page 26: Status Icons/ Call Icons
User Manual 1.11 Status icons/ Call icons Icons giving information about some specific configurations of the phone or about call status are displayed in the top bar of the screen. Status icons Depending on the size of the display, all status icons may not be displayed simultaneously. Which icons are displayed depend on their priority. -
Page 27: Permanent Features Keys
User Manual 1.12 Permanent features keys This chapter displays all permanent features keys available on your desk phone. The keys depend on the model of your desk phone. They are located around the screen and on the Smart Pad. • Hang up key (lit in red) to end a call or to go back to the homepage during programming. -
Page 28: Alphanumeric Keyboard (Ale-400, Ale-300)
User Manual 1.13 Alphanumeric keyboard (ALE-400, ALE-300) Your phone is equipped with alphanumeric keyboard. You can switch between numeric keyboard to dial number, and alphabetic keyboard to enter text by pressing the alphanumeric key. When you are in a text zone, you can switch to the alphabetic keyboard by selecting this key. -
Page 29: Connectors
10/100/1000 Mbps Ethernet connectors to the enterprise network (LAN - RJ45). Use this port to connect the desk phone to the enterprise network. . Use only Alcatel-Lucent Enterprise compatible handset (ALE-150 Wired handset connector (RJ11) SWB Corded Handset). Universal Serial Bus (USB-C) connector USB connectors (Universal Serial Bus) –... -
Page 30: Using Your Telephone
User Manual 2 Using your telephone Identify the terminal you are on The number of your telephone is displayed on the 'Info' page. Messaging portal The messaging portal allows you to access and manage features such as the call log, instant messaging and voice messages. -
Page 31: Deleting
User Manual • Press the softkey associated with the type of event you want to acknowledge. If you press the key associated with the 'all' option, all new events are acknowledged. You can also acknowledge all events if you press the softkey associated with the check icon in the top right corner of the screen. -
Page 32: Delete All Missed Calls
User Manual 2.3.3 Delete all missed calls • Press the associated softkey. • Press the associated softkey. • Press to confirm. All missed calls are deleted. 2.3.4 Consulting all calls • Select the 'All' tab. All calls are displayed with an icon giving information on the type of call. Answered outgoing calls. -
Page 33: Receiving A Call
User Manual • Hands-free Dial the destination number. • Programmed line key. • Dial by name (enter the first letters of the contact's name on the alphapad and press OK to start the search). • Redialing from the call log. •... -
Page 34: Switching Between Audio Modes
User Manual Switching between audio modes During conversation, you can switch between different audio modes (handset, loudspeaker, hands-free or headset, if connected) by pressing the loudspeaker/hands-free key until the desired audio mode is displayed: . This feature depends on connected devices and the default device selected in the phone configuration. -
Page 35: Activating The Loudspeaker During A Conversation (Handset Lifted) - Group Listening Feature
User Manual Activating the loudspeaker during a conversation (handset lifted) - Group listening feature Activate or deactivate the loudspeaker when you are in conversation using the handset or the headset. • Activate loudspeaker (long press) The key is blinking blue ( •... -
Page 36: Calling A Contact Using The Internal Directory (Predictive Search)
User Manual Call your contact using the company phone number • Press the softkey associated with the company phone number. Call your contact using another phone number (via contact card) • Press the softkey associated with the contact name: The contact card opens and displays information about the contact: last name and first name, several phone numbers (Office, mobile, home), email address, instant message address and the company name. -
Page 37: Filtering Calls Using The Voice Mailbox
User Manual 2.11 Filtering calls using the voice mailbox This service lets you filter incoming calls to your voice mailbox. When your caller leaves his message you can choose to communicate with him. This feature depends on the system configuration. If necessary, contact your administrator. -
Page 38: Receiving Interphony Calls
User Manual 2.14 Receiving interphony calls You can answer a call without lifting the handset. When you receive a call, you are automatically connected in hands-free mode. The identity of the caller is displayed on the screen. This feature depends on the system configuration. If necessary, contact your administrator. To activate •... -
Page 39: From The Bluetooth® Handset (Bluetooth® Wireless Handset)
User Manual 2.16.2 From the Bluetooth® handset (Bluetooth® wireless handset) • Press the handset mute key (short press) When muted, the key is lit in blue and the Smart Pad in red. • Press the handset mute key (short press) Enable microphone The mute button is dimly lit in blue again and the Smart Pad is lit in blue. -
Page 40: Sending An Instant Message To A Contact
User Manual Delete all messages • Press the associated softkey. • Press the associated softkey: Voice msg • 2.19 Sending an instant message to a contact You can only send an instant message to a colleague connected to the same telephone system (generally, a colleague in your enterprise). -
Page 41: Status Of The Instant Messages
User Manual • Write the instant message to send. • Send the instant message. 2.19.3 Status of the instant messages Once the instant message has been sent, the message is stored in the 'Sent' tab of the instant message feature in the messaging portal. The status of the message is as follows: •... -
Page 42: Answering With An Instant Message
User Manual Acknowledge new instant messages Once a new instant message is read, it is automatically acknowledged. However, you can acknowledge all new instant messages without reading them. • Press the associated softkey. • Press the associated softkey: New IM •... -
Page 43: Answering A Voice Message
User Manual 2.21.2 Answering a voice message • Access the messaging portal. • Select the voice message feature (depending on your phone, use touchscreen or the associated softkey). • Enter your password if required. • Select one of the following tabs: new voice messages or all voice messages. Use left and right navigation key or press directly on the tab if your phone is equipped with a touch screen. -
Page 44: Placing An External Call On Hold (Parking)
User Manual Recover the call on hold Use one of the following: • Select the call on hold icon from the conversation screen • • Hang up, your phone is ringing, then answer the call. • Press the Back/Exit key to display the Perso page Select the call on hold. This key depends on the system configuration and countries as United States. -
Page 45: Answering A Second Call During A Conversation
User Manual 2.26 Answering a second call during a conversation • During a conversation, another person is trying to call you. The name or number of the caller is displayed for a few seconds. • Select the incoming call icon. •... -
Page 46: Transfer A Call To A Voice Mail
User Manual You are in communication with a first caller. A second caller is on hold. • You want to connect the first caller with the second. • Use one of the following: Transfer • The two callers are connected. Depend on system configuration for specific countries as United States. -
Page 47: Meet Me' Conference
User Manual 2.31 'Meet me' conference The 'Meet me' function is used to set up a conference with a maximum of 6 persons: the 'master ' of the conference (who has the rights for initiating the conference) and the participants (maximum of 5) who meet for the conference. -
Page 48: Intrusion Into An Internal Conversation (Barge-In)
User Manual 2.32 Intrusion into an internal conversation (barge-in) Your contact's line is busy. If the number is not 'protected' and if authorised, you can intrude into the call: • ¤Intrusion • Same key to exit (×Intrusion). 2.32.1 Protection against intrusion •... -
Page 49: Personal Assistant: Reaching You With One Number Only
User Manual 2.37 Personal assistant: reaching you with one number only As well as leaving a message in the voice mailbox, the personal assistant directs the caller to an internal number, an outside number, a mobile or the switchboard. • reach the 'Menu' page. -
Page 50: Forwarding All Group Calls
User Manual 2.41 Forwarding all group calls You can forward all your group calls to another internal number: • Group calls forwarding programmed key. The programmed key has to be configured by the system. • Enter the number of the phone you want to forward calls. •... -
Page 51: Sending A New Message
User Manual The 27 standard messages are shown below: Call me back Meeting on ___ (*) Call me back tomorrow Meeting on ___ at _:_ (*) Call me back at _:_ (*) Out for a while Call back _____ (*) Absent for the rest of the day Call the attendant Absent, back at _:_ (*) -
Page 52: Sending A Recorded Message To A Number Or A Distribution List
User Manual When sending a copy of the message, you can also record a comment to join to the copy. • Record • Start recording the comment. • Stop • 2.48 Sending a recorded message to a number or a distribution list •... -
Page 53: Answering The General Bell
User Manual 2.51 Answering the general bell When the operator is absent, outside calls to the operator are indicated by a general bell. To answer: • Reach the 'Menu' page. • Pickup Generalbell 2.52 Manager/Assistant filtering System configuration allows 'Manager/Assistant' groups to be formed, so that the manager's calls can be directed to one or more assistants. -
Page 54: Hunting Groups
User Manual 2.55 Hunting groups 2.55.1 Hunting group call Certain numbers can form a hunting group and can be called by dialing the group number. • Lift the handset. • Number of group to be called. 2.55.2 Temporary exit from your hunting group/Return into your group •... -
Page 55: Acd: Agent Set/ Supervisor Station
User Manual 2.60 ACD: Agent set/ Supervisor station 2.60.1 Agent set A call center solution allows optimum distribution of calls to agents according to their availability and skills. 2.60.2 Open an agent session (login) – Agent set • Select the ACD application. •... -
Page 56: Changing The Operating Status Of The Set - Agent Set
User Manual 2.60.5 Changing the operating status of the set – Agent set 2.60.5.1 Changing using codes (all sets) The operating status change codes are defined when the system is configured. Contact the system administrator to obtain these codes. • Enter the feature code to activate. -
Page 57: Do More With Your Desk Phone
Enterprise also offers remote desk phones deployment solutions: Alcatel-Lucent Enterprise Easy Deployment Server (EDS). EDS offers a cloud server allowing easy deployment of devices in remote worker situation for Alcatel-Lucent Enterprise (ALE) systems and third-party SIP servers. For more information, contact your installer or administrator. -
Page 58: First Connection As Remote Working
User Manual 3.1.2 First connection as remote working When you connect your desk phone for the first time remotely, you are prompted to set a PIN code. The PIN code is requested when you enter in the VPN configuration (submenus) or when you boot your desk phone (depending on the VPN configuration). -
Page 59: Change The Configuration
User Manual Select this icon to return to the main menu. If you leave the PIN code request menu when the phone is starting, the phone will start without VPN activated. If an error occurs when your phone is running in remote mode, a popup is displayed with an error message. -
Page 60: Reconnect Your Desk Phone In Your Business Place
User Manual 3.1.6 Reconnect your desk phone in your business place Your phone is already configured for remote working. • Connect your desk phone to the network (and plug in the power jack if you are using an external power adapter). •... -
Page 61: Beacon: Using Your Desk Phone For Geo-Localization In The Enterprise
User Manual Beacon: using your desk phone for geo-localization in the enterprise Your desk phone can behave as a beacon, by periodically emitting data, using BTLE (Bluetooth® Low Energy) technology (it has a built-in beacon). A beacon is a small Bluetooth® radio transmitter. it repeatedly transmits a single signal that other devices can use. -
Page 62: Programming Your Telephone
User Manual 4 Programming your telephone Initializing your voice mailbox • Light flashes. • • Enter your personal code then record your name according to voice guide instructions. Your personal code is used to access your voice mailbox and to lock your telephone. Your password has 6 digits. -
Page 63: Adjusting The Audio Functions
User Manual Adjusting the audio functions • Reach the 'Menu' page. • Settings Phone Ringing • Enter your password (if required) and apply. 4.4.1 Choose the tune The compatible desk phone offers a choice of key ringtones including 16 new Super Wide Band ringtones. •... -
Page 64: Adjust Ringer Volume While A Call Arrives
User Manual 4.4.6 Adjust ringer volume while a call arrives • Your telephone rings. • Adjusting the ringer volume. Audio ambiences Your desk phone provides 4 audio ambiences for a more personalized and enjoyable use. Depending on the selected ambience, the bass or treble will be more present, the range of frequencies used will be greater or less. -
Page 65: Adjust The Brightness When The Phone Is In Use
User Manual 4.7.3 Adjust the brightness when the phone is in use • Display Brightness • Increase or decrease the brightness. • • 4.7.4 Adjust the dimmed brightness when the phone is not in use • Display Advanced Low brightness •... -
Page 66: Programming Direct Call Keys (Perso Page/F1 And F2 Keys/Add-On Module)
User Manual 4.10 Programming direct call keys (Perso page/F1 and F2 keys/Add-on module) : If your set is not equipped with a magnetic keyboard, use the alphanumeric keyboard to enter letters. Use the alphanumeric keyboard key to switch between the numeric and alphabetic keyboard. When in alphabetic mode, the LED corresponding to the key remains lit up. -
Page 67: Customize The Color And The Style Of Programmable Softkeys
User Manual 4.11 Customize the color and the style of programmable softkeys You can customize the color and style of the softkeys of the perso page and the add-on modules by inserting a prefix in front of the label of the softkey. When you program a softkey, add the prefix to the name of the softkey to customize it. -
Page 68: Programming An Appointment Reminder
User Manual 4.14 Programming an appointment reminder You can set the time of a temporary reminder (one within 24 hours) or a permanent reminder (every day at the same time). • Reach the 'Menu' page. • Appointment • Enter time of appointment. •... -
Page 69: Manage Connected Devices
User Manual Use one of the following: • Bluetooth Search devices • Reach the 'Menu' page. Settings Phone Bluetooth Add device Searching for Bluetooth® equipment. Wait for the detected equipment type and address to be displayed • Select the relevant equipment. •... -
Page 70: Default Device
User Manual 4.17.2 Default device If you have connected the same type of accessory onto different connectors (for example, one headset to the USB connector and one Bluetooth® headset), the list of used connectors is displayed for each type of accessory. You can select your preferred accessory to be used as the default accessory. The most visible icon is the default device. -
Page 71: Activating/Deactivating 'Forced Headset' Mode
User Manual 4.21 Activating/Deactivating 'Forced headset' mode Forced headset mode must be activated as soon as a headset is installed instead of the handset. • Reach the 'Menu' page. • Settings Phone ForcedHead • ON/OFF Activating/deactivating forced headset. 4.22 Contacting your administrator (Technical support) If necessary you may need to contact your administrator. -
Page 72: Legal Notice
User Manual 4.22.6 Legal notice Display regulatory information about your desk phone. Use one of the following: • Legal. • Select the settings icon displayed at the bottom left of the screen during the boot (after a few seconds) Legal. 4.22.7 Access to administrator configuration Your administrator can access to the phone configuration. -
Page 73: Send Your Desk Phone Or Your Add-On Module To Support
User Manual 4.22.9 Send your desk phone or your add-on module to support Please remove customization kit before sending back your desk phone or your add-on module to hardware support as hardware support will send back a generic phone. Please refer to the accessories section to see how to remove the customization kit. -
Page 74: Accessories
User Manual 5 Accessories The ALE-supported accessories are intended to work smoothly on most/all of our clients (hardphones, softphones). The list of accessories presented in this document is not contractually binding and may be modified without prior warning. List of accessories For more details about references, consult chapter: Ordering information. -
Page 75: Wb Cordless Handset
User Manual ALE-160 WB Cordless Handset To use the Bluetooth® handset, your desk phone must be equipped with ALE-108 Wireless Module. The Bluetooth® settings menu is displayed only if the module is installed. The Bluetooth® feature must be enabled. 5.2.1 Description Power button / Line key Switch the device on/off: press and hold to switch the device on/off. -
Page 76: Unboxing
User Manual 5.2.2 Unboxing • ALE-160 WB Cordless Handset. • Battery pack placed on the handset. • Safety and regulatory instructions. 5.2.3 The LEDs are placed on the top of the handset and over the microphone. Blue, red and purple colors are used to inform you about the status of the handset. -
Page 77: Enable Bluetooth
User Manual To replace the battery, with the handset turned off: Press, then slide the piece towards the bottom of the device a few millimeters with your thumbs. Remove the piece by lifting it. Be careful not to break the clips. 3, 4, 5, Disconnect the old battery and replace it with the new one by joining the 2 connectors. -
Page 78: Information About The Connected Handset And The Battery Level
User Manual 5.2.6.1 Easy pairing Your device is designed to easy pair with the desk phone. 1. Put the handset in detectable mode: a. The device is not paired: switch on the device. The device is directly in pairing mode. b. -
Page 79: Activate/Deactivate The Beep Touch Instead Of The Voice Prompts
User Manual 5.2.8.1 Define voice prompts language • The handset is connected. • Bluetooth Devices • Select the relevant device: “ALE-160 BT Handset”. • Language • Select the language of your choice • Next language: press simultaneously on Mute and Volume + keys. Previous language: press simultaneously on Mute and Volume - keys. -
Page 80: Swb Corded Handset
User Manual ALE-150 SWB Corded Handset 5.3.1 Description The ALE-150 SWB Corded Handset is a super wide band comfort wired handset. 5.3.2 Unboxing • ALE-150 SWB Corded Handset. • RJ11 cable. • Safety and regulatory instructions. 5.3.3 Install a comfort wired handset Plug-in the wired handset to the appropriate connector - connector number in the picture: 4. -
Page 81: Magnetic Alphabetic Keyboard: Ale-100 Keyboard (Usb)
User Manual Magnetic alphabetic keyboard: ALE-100 keyboard (USB) 5.4.1 Description The keyboard depends on your country and languages. The magnetic keyboard is automatically fixed on the base of the set. It is connected to the corresponding connector behind the phone. Country variants: •... -
Page 82: How To Use The Keyboard
User Manual 5.4.4 How to use the keyboard Use the keyboard to enter text while configuring the phone. Access directly the dial by name feature by entering the name of your contact on the keyboard. Below is a list of the function keys that allow you to access all the symbols. Caps lock: to write text in capital letters. -
Page 83: Customization Kit
User Manual ALE-140 Customization kit Please remove customization kit before sending back your desk phone or your add-on module to hardware support as hardware support will send back a generic phone. 5.5.1 Description The ALE-140 customization kit lets you change the color of your desk phone. A default kit is installed on your phone and you can purchase the other kits separately. - Page 84 User Manual 8AL91434ENAAed01 84 /102...
- Page 85 User Manual 5.5.3.1 Remove the customization kit This piece is clipped to the four Press, then slide the corners. We recommend starting Slide your fingernail along piece towards the bottom from the back of the desk phone. the piece to detach it from of the device a few Carefully insert a thin, non-sharp the phone.
-
Page 86: Key Expansion Module
User Manual ALE-120 Key Expansion Module 5.6.1 Description The ALE-120 Key Expansion Module allows you to add 24 programmable keys with led to your desk phone. For the greatest comfort of use, it is equipped with 2 screens and a Smart Pad to navigate between pages. -
Page 87: Installation
User Manual 5.6.4 Installation The module can be installed on the right or left side of the desk phone if you are not using the handset. With the handset connected, it has to be installed on the right side. 5.6.4.1 Install the add-on to the desk phone •... - Page 88 User Manual 5.6.4.2 Install more than one add-on module It is possible to connect up to 3 similar add-on modules to a desk phone. For examples (depending on the model of your desk phone): Depending on the phone model, the number of add-on modules and the power supply, it may be necessary to connect an additional power supply (contact your administrator for more information): Number of add-on...
- Page 89 User Manual • The first add-on is connected to the desk phone. • Fix the add-on to the other add-on by using the provided foot clip. o Remove the cover on the foot of the desk phone or the installed add-on module, on the side where you want to attach the new add-on module.
-
Page 90: Smart Pad
User Manual 5.6.5 Smart Pad Up-down navigator: used to scroll through the content of a page. Left-right navigator: in idle state, use this key to move from one page to another. Home key • Short press: Go back to the home page. •... -
Page 91: Wall Mounting Kit
User Manual ALE-110 Wall Mounting Kit 5.7.1 Wall mount installation 8AL91434ENAAed01 91 /102... - Page 92 User Manual First remove the keyboard and add-on if installed. Use the recommended screws. Depending on your country (United States), use a standard plate (not provided with the kit). Lift the phone foot. Put the support on the back side of the desk phone: 1.
-
Page 93: Wireless Module
User Manual ALE-108 Wireless Module 5.8.1 Description The ALE-108 Wireless Module allows to add wireless features such as Bluetooth® and Wi-Fi for wireless LAN connection in future software version. This device offers a Bluetooth® and WLAN (Wi-Fi) radio interface. This module is required: •... -
Page 94: Third Parties Headset Certified In Developer And Solution Partner Program (Dspp)
The mission of the DSPP is to support a broad ecosystem of developers and partners throughout the desk phone lifecycle. In this context, certification tests are performed between partner applications or devices and Alcatel-Lucent Enterprise's platforms. It certifies proper inter-working with partner applications or devices. -
Page 95: Technical Specifications
User Manual 6 Technical specifications ALE-500 ALE-500 ALE-400 ALE-300 without handset With handset and With handset and With handset cable cable and cable Width 163 mm 228 mm 228 mm 228 mm Depth on a table 156 mm 162 mm 162 mm 162 mm Height... -
Page 96: Ordering Information
User Manual 7 Ordering information This list is not exhaustive and may change at any moment. ALE-300 IP DeskPhone w Corded Handset 3ML27310AA ALE-400 IP DeskPhone w Corded Handset 3ML27410AA ALE-400 IP DeskPhone w Cordless Handset 3ML27420AA ALE-500 IP DeskPhone w/o Handset 3ML27500AA ALE-500 IP DeskPhone w Cordless Handset 3ML27510AA... -
Page 97: Guarantee And Clauses
Always listen at moderate levels. Cleaning and disinfecting Refer to document: “How to clean and disinfect Alcatel-Lucent Enterprise terminals”. Wear gloves when cleaning products. Do not use harsh chemicals such as bleach, peroxide, acetone, ethyl acid, methyl chloride, ammonia, or multi-purpose cleaners to clean plastic, metal, rubber, or screen surfaces. -
Page 98: Regulatory Statements
User Manual Power supplies ALE-300, ALE-400, ALE-500: these products can be supplied by Power over Ethernet (POE) compliant with IEEE 802.3af class 1 minimum for ALE-300 and class 2 minimum for ALE-400/ALE-500, or by an USB Type C External Power Supply (EPS) with rating 5V DC, 3A minimum. ALE-120: this product is supplied by ALE-300/400/500 Deskphone through USB-A port or by an USB Type C External Power Supply (EPS) with rating 5V DC, 3A minimum. - Page 99 User Manual Canada Equipments with RF part comply with Industry Canada's license-exempt RSSs. Operation is subject to the following two conditions: (1) this device may not cause harmful interference, and (2) this device must accept any interference received, including interference that may cause undesired operation. These products meet the applicable Innovation, Science and Economic Development Canada technical specifications.
- Page 100 User Manual Regulatory information about ALE-108 Europe: this device contains BTWDB01 RF module that is compliant with Radio Equipment Directive (RED) 2014/53/EU. UK: this equipment is compliant with UK regulations. US: this device complies with part 15 of the FCC Rules. Operation is subject to the following two conditions: (1) this device may not cause harmful interference, and (2) this device must accept any interference received, including interference that may cause undesired operation.
-
Page 101: Quick Guide
Alcatel-Lucent Enterprise ALE-500 / ALE-400 / ALE-300 Enterprise DeskPhone - Quick guide OXO Connect Quick guide Mute and interphony key ● Mute key: during a call, press this key to stop your contact from hearing you. When activated, the key is lit in blue and the Smart Pad ring in red. - Page 102 Alcatel-Lucent Enterprise ALE-500 / ALE-400 / ALE-300 Enterprise DeskPhone - Quick guide OXO Connect Call Modify the programmed key Dial the number directly or dial the number after pressing a Settings Phone Key program Menu line key (an off-hook key phone or Bluetooth® handset, Press the programmed key to be modified.
Need help?
Do you have a question about the OXO CONNECT ALE-500 Enterprise DeskPhone and is the answer not in the manual?
Questions and answers