
Related Manuals for Alcatel-Lucent Enterprise OpenTouch ALE-300


Summary of Contents for Alcatel-Lucent Enterprise OpenTouch ALE-300
- Page 1 OpenTouch® Suite for MLE ALE-300 Enterprise DeskPhone SIP User manual 8AL91446ENAAed01 w2248...
- Page 2 User manual Introduction Thank you for choosing an Alcatel-Lucent Enterprise desk phone. This document describes the services offered by the ALE-300 Enterprise DeskPhone in connection with an OmniPCX Enterprise system in SIP mode (R100.1 MD1 and upper). The ALE-300 Enterprise DeskPhone is the next generation of business phones with innovative and sleek industrial design built for every workstyle and workplace with vertical capabilities in the Enterprise environment.
-
Page 3: Table Of Contents
User manual Getting started How to read this guide Unboxing Install Hold, Transfer and Conference keys Login Getting to know your telephone ALE-300 Enterprise DeskPhone 2.1.1 Phone description Smart Pad 2.2.1 Description 2.2.2 Smart Pad gesture 2.2.3 Permanent features keys Alphanumeric keyboard Description of the homepage 2.5.1... - Page 4 User manual During audio call Mute, so that your contact cannot hear you 3.6.1 From the set 3.6.2 From the headset Switching between audio modes Activating the loudspeaker during a conversation (handset lifted) - Group listening feature 35 Release the second call and retrieve the call on hold 3.10 Put a call on hold/retrieve a call on hold 3.11...
- Page 5 User manual Magnetic alphabetic keyboard: ALE-100 keyboard (USB) 5.3.1 Description 5.3.2 Unboxing 5.3.3 Installation 5.3.4 How to use the keyboard ALE-140 Customization kit 5.4.1 Description 5.4.2 Unboxing 5.4.3 Remove or install the customization kit ALE-110 Wall Mounting Kit 5.5.1 Prerequisites 5.5.2 Wall mount installation Third parties headset certified in Developer and Solution Partner Program (DSPP)
-
Page 6: Getting Started
User manual 1 Getting started 1.1 How to read this guide The labels and icons displayed depend on the type and the skin of the set. The label is not displayed if the corresponding feature is not configured on your telephone system. All labels are displayed in color and are italicized. -
Page 7: Install Hold, Transfer And Conference Keys
User manual 1.3 Install Hold, Transfer and Conference keys If not already done, you have to install Hold, Transfer and Conference keys provided with your desk phone instead of the F1, F2 and 'abc' keys. To install new keys: The extra keys are provided hanging on a support so that they do not get lost. -
Page 8: Getting To Know Your Telephone
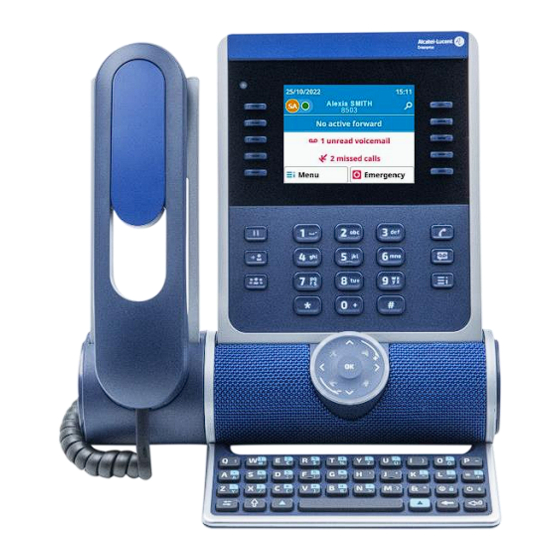
User manual 2 Getting to know your telephone 2.1 ALE-300 Enterprise DeskPhone This phone is part of the Enterprise and IP phone ranges. With its 3.5 inch color display that comes with ten dedicated function keys and an intuitive navigation Smart Pad, the ALE-300 Enterprise DeskPhone (ALE-300) delivers a great user experience. -
Page 9: Smart Pad
User manual 2.2 Smart Pad 2.2.1 Description Hands-free/Loudspeaker key Pressing this key answers an incoming call in hands-free mode (when activated, the key is lit blue). When a call is in progress, pressing this key switches between the supported audio mode: hands-free, headset, handset or group listening (loudspeaker). In idle state, press this key to take the line before dialing a number. -
Page 10: Smart Pad Gesture
User manual 2.2.2 Smart Pad gesture Short press Long press Rotate The light ring is not touch sensitive. Please place your finger in the hollow of the Smart Pad for any actions. 2.2.3 LED The Smart Pad contains a large number of notifications indicated by the color of the leds. The ring around the Smart Pad and the keys can light up depending on the event. - Page 11 User manual 2.2.3.3 LED management Legend: Dimly lit in Strongly lit in blue Blinking in blue blue Smart Pad ring In idle state, awake, Switched off Interphony activated Incoming call (ringing) In conversation with handset or headset In conversation in hands- free mode Muted with handset or headset...
- Page 12 User manual 2.2.3.5 Other use cases Idle state Boot During boot phase, the Smart Pad ring rotates clockwise in blue until the boot is finished. Update During software update, the Smart Pad ring rotates clockwise in purple until the update is finished. 8AL91446ENAAed01 12 /65...
-
Page 13: Permanent Features Keys
User manual 2.3 Permanent features keys This chapter displays all permanent features keys available on your desk phone. The keys depend on the model of your desk phone. They are located around the screen and on the Smart Pad. • Take the call with the headset if connected, or in hands-free mode. - Page 14 User manual • Hold: the call is placed on hold. • Transfer: transfer the call to another number. • Conference: establish a three-party conference call. The following keys are located on the Smart Pad (for more information see section: Smart Pad) •...
-
Page 15: Alphanumeric Keyboard
User manual 2.4 Alphanumeric keyboard An alphanumeric keyboard is built into your desk phone, using its own keys. It is not necessary to install a physical keyboard to input text. The number pad keys have letters that you can display by successive presses. The number is the first character in the series. -
Page 16: Description Of The Homepage
User manual 2.5 Description of the homepage The homepage is the default page displayed on your phone. The default homepage displays information about your desk phone (phone numer, forward, missed calls), but you can choose to display another page in the settings of the phone (call log, contacts or programmable keys). The phone status is displayed in a red banner when your desk phone is forwarded to your mailbox or another contact. -
Page 17: Define The Default Homepage
User manual 2.5.1 Define the default homepage Settings Access the phone local menu. User Use left-right navigation keys to display user settings (displayed by default). Phone Homepage Select the homepage: • Default • Contacts • Call Log • Programmable Keys Save and go back to the homepage. -
Page 18: User Local Menu
User manual 2.7 User local menu → Open the user local menu. Call Routing Open call routing to manage the status of your desk phone (forward to a number, forward to your voicemail, do not disturb, …). My telephony status (the status is displayed for your information and is only visible on your application). -
Page 19: Information Area
User manual Settings • Define the appearance. • Define the language. • Define the ringtone. • Define the ringtone volume. • Select your preferred accessory. • Software information (version, run mode). • Hardware information (MAC, CPU). • Network configuration (DM, DNS, Ethernet, IP parameters, LDAP). Search •... -
Page 20: Connectors
10/100/1000 Mbps Ethernet connectors to the enterprise network (LAN - RJ45). Use this port to connect the desk phone to the enterprise network. Wired handset connector (RJ11). Use only Alcatel-Lucent Enterprise compatible handset (ALE- 150 SWB Corded Handset). Universal Serial Bus (USB-C) connector USB connectors (Universal Serial Bus) –... -
Page 21: Compatible Accessories
User manual 2.10 Compatible accessories The following accessories are compatible with your desk phone and can be ordered separately: • ALE-100 Keyboard • ALE-110 Wall Mounting Kit • ALE-140 Factory Customization Kit • ALE-140 Azur Customization Kit • ALE-140 Ruby Customization Kit •... -
Page 22: Contacts
User manual 2.11 Contacts Open the user local menu: Contacts. Display your personal directory: all saved contacts are displayed alphabetically. Available actions: Open the contact card by pressing the function key to the right or left of the contact's name/number. Use Smart Pad to scroll through the page and select a contact (highlighted). -
Page 23: Create A New Contact
User manual 2.11.2 Create a new contact Open the user local menu: Contacts. • Open contextual menu. • contact: select the add new contact icon. • Add information about your contact. Fill in the mandatory fields circled in red such as name or first name, and a phone number. -
Page 24: Delete A Contact
User manual 2.11.5 Delete a contact Open the user local menu: Contacts. • Select the contact to delete. • : open contextual menu. • Delete • Select the contact(s) to be deleted by checking the corresponding box. • Delete the selected contact(s). 8AL91446ENAAed01 24 /65... -
Page 25: Call Log
User manual 2.12 Call log Open the user local menu: Call logs. Display your entire call history sorted by date. • (All) : missed calls. • (Missed) : unacknowledged missed calls. • : unanswered outgoing calls. • : answered incoming calls. •... -
Page 26: Using Your Telephone
User manual 3 Using your telephone 3.1 Search by name feature The search is performed through your local and corporate directories. Enter letters to start your search. The search is performed for the first name, last name or number. The result lists contacts whose attributes start with the string or number entered. Use one of the following: •... -
Page 27: Using Dialpad
User manual 3.2.1 Using Dialpad Use one of the following: • Pick up the handset and dial the number on the dialpad. • Dial directly the number on the Dialpad. Available actions: Pick up the handset if you have not already done it and press the call key to make the call with the handset. -
Page 28: Using Call Log
User manual 3.2.3 Using Call log Open the user local menu Contacts. Call the contact by pressing the function key to the right of the contact's name/number. In the case of a known contact, the number used is the one displayed under the name. Open the contact card by pressing the function key to the left of the contact's name/number. -
Page 29: Receive An Incoming Call
User manual 3.3 Receive an incoming call 3.3.1 Incoming call screen When you receive an incoming call, information about the caller is displayed on the screen. Available actions: Pick up the handset to answer the audio call with the handset. Answer the incoming audio call using the preferred device. -
Page 30: Divert The Incoming Call To Your Voicemail
User manual 3.3.4 Divert the incoming call to your voicemail When you receive an incoming call, you can decline it and transfer it to your voicemail (if voicemail is available). Divert the incoming call to your voicemail. 3.3.5 Ignore the call Stop ringing. -
Page 31: Forward All Incoming Calls To Your Voicemail Immediately
User manual 3.4.3 Forward all incoming calls to your voicemail immediately Activate the feature by checking the bullet Status: • Voicemail. • Condition: Immediate forward. • Validate and return to the call routing settings. • Go back to the homepage. 3.4.4 Forward all incoming calls to another number immediately Activate the feature by checking the bullet Status:... -
Page 32: Do Not Disturb
User manual 3.4.7 Do not disturb Activate the feature by checking the bullet Status: • 'Do not disturb' option. If your desk phone is already forward, the background will be in red. 3.4.8 Cancelling all forwards Deactivate all forward by checking the bullet Status: •... -
Page 33: During Audio Call
User manual 3.5 During audio call Information about your contact, such as number, name, company and job title, is displayed in the conversation screen. The elapsed time is displayed above the same area. You are in conversation with one You are in conversation with one You are in conference with two contact and the second is on contact. -
Page 34: Mute, So That Your Contact Cannot Hear You
User manual 3.6 Mute, so that your contact cannot hear you You can hear your contact but he/she cannot hear you: 3.6.1 From the set • During a conversation. • Disable microphone When muted, the key is lit in blue and the Smart Pad is lit in red. •... -
Page 35: Activating The Loudspeaker During A Conversation (Handset Lifted) - Group Listening Feature
User manual 3.8 Activating the loudspeaker during a conversation (handset lifted) - Group listening feature Activate or deactivate the loudspeaker when you are in conversation using the handset or the headset (the microphone used remains the same). • Press successively until the device with the microphone to use is selected: The following icon is displayed on the screen of the device: •... -
Page 36: Transfer A Call
User manual 3.11 Transfer a call From the conversation screen: Make a second call. Use one of the following: • Blind transfer: select the transfer icon before the second contact answers. • Select the transfer icon in the conversation screen with the two contacts (two calls or conference). -
Page 37: Receive A Second Call
User manual 3.14 Receive a second call When you receive an incoming call, information about the caller is displayed on the screen and you hear a small beep. Available actions: Answer the incoming audio call in handsfree mode. Silent ringing when receiving an incoming call. -
Page 38: Conference
User manual 3.16 Conference You are in conversation with two contacts. Press the conference key. Switching between audio modes. Activate loudspeaker. When activated, the key is lit blue. Deactivate loudspeaker. Mute the audio. When activated, the key is lit in blue and the Smart Pad ring in red. -
Page 39: Programmable Keys
User manual 3.18 Programmable keys Open the user local menu: Prog keys. Your application provides a virtual add-on module with 3 pages and 8 programmable keys by page. You can program a key by entering a number or a service prefix. Available actions: Use to move from one page to another or to move the cursor in a text box. - Page 40 User manual Use one of the following: • : select direct call number: o To create a direct call key: enter the number of your contact. o To define a service associated with the key: enter the service prefix followed by the number.
-
Page 41: Modify A Programmable Key
User manual Phone number format supported: • Short number for an internal contact. • Contact number without country code for a contact in the same country. • International number (digits only): 00 Country RegionCode Number (for example: 0033390123456). 3.18.1.3 Create a 'Do Not Disturb' key You can make your terminal temporarily unavailable for all calls. -
Page 42: Programming Your Telephone
User manual 4 Programming your telephone 4.1 Initializing your voice mailbox When you access the first time to your voicemail, you have to define your personal code. • Press the message key flashing in red. • Enter your personal code then record your name according to voice guide instructions. Your personal code is used to access your voice mailbox and to lock your telephone. -
Page 43: Activate/Deactivate Meeting Mode (Progressive Ringing)
User manual 4.2.3 Activate/deactivate meeting mode (progressive ringing) • Settings • Use left-right navigation keys to display user settings (displayed by default): User. • Audio Ringing tones • Progressive ringing: activate or deactivate the progressive ringing (Yes/No). • Validate. • Go back to the homepage. -
Page 44: Adjusting The Brightness Of The Desk Phone
User manual 4.4 Adjusting the brightness of the desk phone Adjust the brightness of the display, the LEDs, the keys (add-on) and the logo light on the back shell. 4.4.1 Auto-adjusting of the brightness The phone can automatically adjust the display brightness, LED and busy light logo on the back shell depending on the lighting conditions to improve user experience and achieve power savings (ambient light sensor). -
Page 45: Adjust The Dimmed Brightness When The Phone Is Not In Use
User manual 4.4.3 Adjust the dimmed brightness when the phone is not in use • Settings • Use left-right navigation keys to display user settings (displayed by default): User. • Phone Brightness • Low level brightness • Increase or decrease the dimmed brighness (percentage of brightness). •... -
Page 46: Contacting Your Administrator (Technical Support)
User manual 4.7 Contacting your administrator (Technical support) If necessary you may need to contact your administrator. Before contacting your administrator, make sure you have information such as your phone's codes and software version to hand. 4.7.1 Date code / Technical code The codes are located on the foot of the phone. -
Page 47: Network Status
User manual 4.7.5 Network status • Settings • Use left-right navigation keys to display user settings: Advanced. • Status Network IP status Ethernet status SIP Server status (SIP server connection status) • Go back to the previous page (short press) or to the homepage (long press). 4.7.6 Network configuration Before changing network configuration, contact your administrator. -
Page 48: Copy Logs On Usb Drive
User manual 4.7.9 Copy logs on USB drive You can use an USB-C key. The key has to be formated in FAT32 mode. • Insert the USB key in the corresponding USB-C slot. • Settings • Use left-right navigation keys to display user settings: Advanced. -
Page 49: Accessories
User manual 5 Accessories 5.1 List of accessories For more details about references, consult chapter: Ordering information. 5.1.1 USB accessories • AH 21 M II Premium headset monaural USB-C USB-A • AH 22 M II Premium headset binaural USB-C USB-A •... -
Page 50: Ale-150 Swb Corded Handset
User manual 5.2 ALE-150 SWB Corded Handset 5.2.1 Description The ALE-150 SWB Corded Handset is a super wide band comfort wired handset. 5.2.2 Unboxing • ALE-150 SWB Corded Handset. • RJ11 cable. • Safety and regulatory instructions. 5.2.3 Install a comfort wired handset 1. -
Page 51: Magnetic Alphabetic Keyboard: Ale-100 Keyboard (Usb)
User manual 5.3 Magnetic alphabetic keyboard: ALE-100 keyboard (USB) 5.3.1 Description The keyboard depends on your country and languages. The magnetic keyboard is automatically fixed on the base of the set. It is connected to the corresponding connector behind the phone. Country variants: •... -
Page 52: How To Use The Keyboard
User manual 5.3.4 How to use the keyboard Use the keyboard to enter text while configuring the phone. Access directly the dial by name feature by entering the name of your contact on the keyboard. Below is a list of the function keys that allow you to access all the symbols. Caps lock: to write text in capital letters. - Page 53 User manual For the other languages, the international keyboard is in QWERTY mode. In this case, use the alt key to display characters from the QWERTZ keyboard: • : 'z' is displayed. • : 'y' is displayed. • : 'ß' is displayed. •...
-
Page 54: Ale-140 Customization Kit
User manual 5.4 ALE-140 Customization kit Please remove customization kit before sending back your desk phone or your add-on module to hardware support as hardware support will send back a generic phone. 5.4.1 Description The ALE-140 customization kit lets you change the color of your desk phone. A default kit is installed on your phone and you can purchase the other kits separately. - Page 55 User manual 8AL91446ENAAed01 55 /65...
- Page 56 User manual 5.4.3.1 Remove the customization kit This piece is clipped to the four Press, then slide the corners. We recommend starting Slide your fingernail along piece towards the bottom from the back of the desk phone. the piece to detach it from of the device a few Carefully insert a thin, non-sharp the phone.
-
Page 57: Ale-110 Wall Mounting Kit
User manual 5.5 ALE-110 Wall Mounting Kit 5.5.1 Prerequisites To connect the desk phone to the dedicated LAN port when the wall mounting kit is installed, you have to switch the two LAN ports. By default, the LAN port 1 is used to connect the desk phone. - Page 58 User manual First remove the keyboard and add-on if installed. Use the recommended screws. Depending on your country (United States), use a standard plate (not provided with the kit). Lift the phone foot. Put the support on the back side of the desk phone: 1.
-
Page 59: Third Parties Headset Certified In Developer And Solution Partner Program (Dspp)
The mission of the DSPP is to support a broad ecosystem of developers and partners throughout the desk phone lifecycle. In this context, certification tests are performed between partner applications or devices and Alcatel-Lucent Enterprise's platforms. It certifies proper inter-working with partner applications or devices. -
Page 60: Ordering Information
User manual 6 Ordering information This list is not exhaustive and may change at any moment. ALE-300 IP DeskPhone w Corded Handset 3ML27310AA ALE-100 Keyboard AZERTY 3ML37100FR ALE-100 Keyboard QWERTY - QWERTZ 3ML37100DW ALE-110 Wall Mounting Kit 3ML27110AA ALE-140 Factory Customization Kit 3ML27140AB ALE-140 Azur Customization Kit 3ML27140AC... -
Page 61: Guarantee And Clauses
Always listen at moderate levels. Cleaning and disinfecting Refer to document: “How to clean and disinfect Alcatel-Lucent Enterprise terminals”. Wear gloves when cleaning products. Do not use harsh chemicals such as bleach, peroxide, acetone, ethyl acid, methyl chloride, ammonia, or multi-purpose cleaners to clean plastic, metal, rubber, or screen surfaces. -
Page 62: Regulatory Statements
User manual Regulatory Statements Declaration of Conformity may be obtained from: ALE International 32 avenue Kléber – 92700 Colombes, France - ALE.welcomecenter@al-enterprise.com. Regulatory information about ALE-300, ALE-400 ALE-500, additional certification regulatory marks are stored in the phone. Use one of the following: •... - Page 63 User manual www.al-enterprise.com The Alcatel-Lucent name and logo are trademarks of Nokia used under license by ALE. To view other trademarks used by affiliated companies of ALE Holding, visit: www.al-enterprise.com/en/legal/trademarks-copyright. All other trademarks are the property of their respective owners. The information presented is subject to change without notice. Neither ALE Holding nor any of its affiliates assumes any responsibility for inaccuracies contained herein.
-
Page 64: Quick Guide
Alcatel-Lucent Enterprise ALE-300 SIP - Quick guide OpenTouch® Suite for MLE Quick gui de User local menu Call Routing Open call routing to manage the status of your desk phone (forward to a number, forward to your voicemail, do not disturb, …). - Page 65 Alcatel-Lucent Enterprise ALE-300 SIP - Quick guide OpenTouch® Suite for MLE Smart Pad Call icons Answer the incoming audio call using the preferred device. The preferred device is defined in the settings of the desk phone and can be the loudspeaker (hands-free), the USB headset or a USB conference module.
Need help?
Do you have a question about the OpenTouch ALE-300 and is the answer not in the manual?
Questions and answers