Table of Contents
Advertisement
Quick Links
Advertisement
Table of Contents

Related Manuals for Raise3D E2CF


Summary of Contents for Raise3D E2CF
- Page 1 E2CF 3D Printer User Manual * Please review this entire manual before operating the printer. This is a class A product. In a domestic environment this product may cause radio interference in which case the user may be required to take adequate measures.
- Page 3 The contents of this User Manual maybe updated overtime. For the latest version, scan the QR code or visit the link below.
- Page 4 E2CF 3D Printer / User Manual CONTENTS...
-
Page 5: General Information
E2CF 3D Printer / User Manual Safety Read the following information to ensure safe usage of the appliance. General information This section focuses on general information about the instruction manual. Any failure and losses caused by ignoring the following mentioned items, and cautions mentioned in the operation and installation instruction are not covered by our warranty and any liability. -
Page 6: Safe Installation
E2CF 3D Printer / User Manual Safety Safe installation Take note of the safety instructions when installing the printer. WARNING ‒ Risk of electric shock! Improper installation is dangerous. Connect and operate the printer according to the specifications on the rating plate. - Page 7 E2CF 3D Printer / User Manual Safety WARNING ‒ Risk of injury! Careful when lifting the machine. The weight of the machine may cause injury when lifted. Do not lift the machine on your own. WARNING ‒ Risk of suffocation! Keep packaging material away from children.
- Page 8 E2CF 3D Printer / User Manual Safety An ingress of moisture can cause an electric shock. Never expose the machine to intense heat or humidity. Do not use steam cleaners or sprays to clean the machine. WARNING ‒ Risk of harm to health! If a child locks themselves in the machine, their life is at risk.
- Page 9 E2CF 3D Printer / User Manual Safety When operating or printing at high temperatures, the print bed becomes hot. Do not touch the print bed when it is hot. Please operate with the heat-resistant gloves in the attachments box. Keep children away from the print bed when it is hot.
-
Page 10: Fcc Statement
E2CF 3D Printer / User Manual FCC Statement This equipment has been tested and found to comply with the limits for a Class A digital device, pursuant to part 15 of the FCC Rules. These limits are designed to provide reasonable protection against harmful interfer- ence when the equipment is operated in a commercial environment. -
Page 11: Technical Specifications
E2CF 3D Printer / User Manual Technical Specifications E2CF Printer Single Extruder Print Dual Extruder Print Build Volume (W×D×H) 330×240×240 mm 295×240×240 mm Machine Size 607×596×465 mm (W×D×H) Power Supply Input 100-240 V AC, 50/60Hz 230 V @ 2A Electrical... -
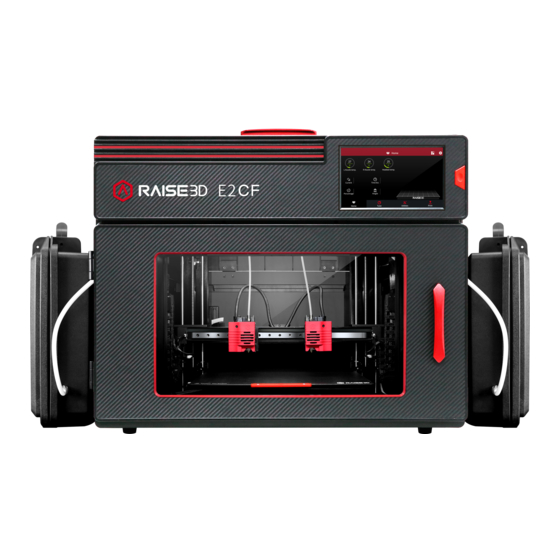
Page 12: List Of Parts
E2CF 3D Printer / User Manual List of Parts 1. Front Parts E. Touch Screen F. Power Saving Button A. Air Filter Box B. Extruder G. Dry Box H. Flexible Plate C. Hot End D. Platform Tray A. Air Filter Box Contains the air filter, which can filter out part of the harmful gas produced in the printing process. - Page 13 E2CF 3D Printer / User Manual List of Parts 2. Back Parts A. Electric Control F. Filament Exit System G. Filament Run-out B. Camera Sensor C. LED Light Bar H. Switching Power Supply I. Air Filter Fan J. Ethernet Port E.
- Page 14 E2CF 3D Printer / User Manual List of Parts 3. Other Parts A. Z-axis Endstop Limit Switch B. Left Extruder B. Right Extruder C. X-axis Guide Rail C. X-axis Guide Rail D. X-axis Left Motor D. X-axis Right Motor E. Z-axis Left Motor E.
-
Page 15: Safety Marks
E2CF 3D Printer / User Manual Safety Marks Hot Surface: The hot surface sign indicates the presence of devices with high temperatures. Always use extra care when working around heated components. Wait half an hour after switching off the printer before handling parts to prevent burned fingers. -
Page 16: Installation
No flammable materials are allowed around the installation location. Filament and Electrical Precautions It is strongly recommended to use Raise3D official filaments and/or default settings for better performance. The Raise3D printer is designed with strong compatibility with filaments. However, please be very careful when using unverified filaments and settings. - Page 17 Safety Marks Electromagnetic Compatibility - EMC Simplified EU Declaration of Conformity Raise3D declares that this device is in compliance with the essential requirements and other relevant provisions of Directive 2014/53/EU. Full text of the EU declaration of conformity is available at https://www.raise3d.com.
- Page 18 E2CF 3D Printer / User Manual Hardware Installation and First Print Raise3D Supplies and Accessories Power Cable Hex Wrenches Filament Tweezers (×5) (×2) Heat Resistant Gloves Spatula Filament USB Storage Guide Tube (×2) Quick Connectors Fuse Glue 0.3 mm Feeler Gauge...
-
Page 19: Environmental Requirements
Noise (Acoustics) : <50dB(A) during printing. NOTE: E2CF printers may generate vibrations which depend mainly on the geometry of parts being printed and material characteristics. This shall be taken into account if placing the printer near vibration sensitive equipment. During transportation in low temperatures, the printer may frost or freeze. - Page 20 Turn on the power and the printer will enter the boot process. Your Raise3D printer will take about 60 seconds to boot. When the touch screen displays the "Welcome" window, the printer is ready. Then...
- Page 21 E2CF 3D Printer / User Manual ideaMaker Installation The slicing software, ideaMaker, is available on the USB storage device www.raise3d.com included with your printer. Additional downloads and versions are available online at: Download ideaMaker https://www.raise3d.com/download/ WINDOWS Install ideaMaker, and click "Next".
- Page 22 E2CF 3D Printer / User Manual ideaMaker Installation Follow the instructions provided by the guide, and click "Install". After the installa- tion is finished, click "Next" to go to the next step. Click "Finish" and ideaMaker is installed.
- Page 23 E2CF 3D Printer / User Manual ideaMaker Installation MAC OS X Open the Disk Image for the ideaMaker installer. This is located in the USB storage device included with your printer. Alternatively, you can download the latest version from www.raise3d.com/pages/download#down-im.
- Page 24 When launching ideaMaker for the first time, you will need to select your printer model from the drop-down list, then press "Next". Select the diameter of your filament. Press "Finish" to finalize the initial settings. NOTE: ALL E2CF printers use 1.75 mm filaments.
- Page 25 E2CF 3D Printer / User Manual...
- Page 26 E2CF 3D Printer / User Manual Using ideaMaker Select your type of Platform Addition and Support in the "Edit" window. Click "Save and Close" to return to the previous menu. Click "Slice" to generate your file. Save the sliced files (.gcode and .data) by exporting them on the USB storage device.
- Page 27 E2CF 3D Printer / User Manual Annealing Annealing is a very important post-processing procedure for PA12 CF. Through annealing, FFF process induced inner-stress of PA12 CF can be released. Annealing accelerates the post-crystallization process and improve stiffness and dimensional stability for end-use.
-
Page 28: Wlan Connection
E2CF 3D Printer / User Manual WLAN Connection You can connect to a network by selecting the SSID and inputting the password. When the Wi-Fi module is manufactured, 2.4G is set at HT20, 5GHz is set at HT40. NOTE: The Wi-Fi's frequency is fixed before being manufactured. -
Page 29: Maintenance
E2CF 3D Printer / User Manual Maintenance The printers are pre-leveled at the factory, but we recommend verifying that the leveling has not ① changed during shipping. How to level up the X-axis: ② As shown in figure 1, click "Mainte- nance"... - Page 30 E2CF 3D Printer / User Manual Maintenance Check the distance between the nozzle and the printing platform. After pushing the left extruder to the center position on the platform, loosen the nozzle screw.
- Page 31 E2CF 3D Printer / User Manual Maintenance Take out the gauge from the Accessory Kit and insert it between the nozzle and the platform. Adjust the nozzle so that the distance between the nozzle and the printing platform exactly matches the thickness of the gauge (about 0.3...
- Page 32 E2CF 3D Printer / User Manual Maintenance Insert the USB storage device into the USB slot on the side of the touch USB Storage screen. Select the "Print" tab, and choose "USB Storage". Select the file and ① check the printing parameters and settings.
-
Page 33: User Interface
E2CF 3D Printer / User Manual User Interface Status Menu, Set button Extruder and Pause, Restore button heating plate Stop button temperature Current model name Visual display of the Total print time current mode Current print status Print height Taskbar... - Page 34 Experiencing Difficulties/Contact Information If you run into any issues during this guided setup, please contact our expert techni- cians by opening a ticket online at support.raise3d.com.
- Page 36 US Office 43 Tesla, Irvine, CA 92618, USA Netherlands Office Stationsplein 45 Unit A4.004 3013AK Rotterdam, the Netherlands China office 4th Floor B5, 1688 North Guoquan Raod, Yangpu istrict, Shanghai 200438 400 6367 888 (For the Mainland of China only)
Need help?
Do you have a question about the E2CF and is the answer not in the manual?
Questions and answers