
Subscribe to Our Youtube Channel
Related Manuals for Southern Enterprises Wallingford BT7838A0TX


Summary of Contents for Southern Enterprises Wallingford BT7838A0TX
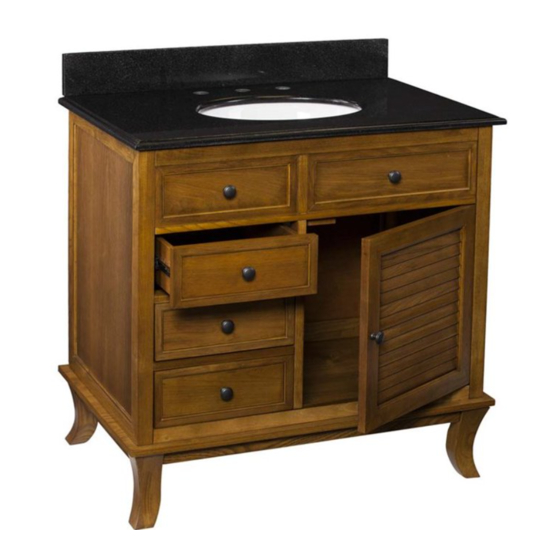
- Page 1 BT7838A0TX BT7838B0TX Wallingford Vanity Sink For assistance with assembly, contact: Southern Enterprises Inc. Assembly Instructions Customer Service 1-800-633-5096 service@seidal.com www.seifurniturestore.com...
- Page 2 Wallingford Vanity Sink Parts List Please check packaging for all parts and hardware before discarding. Unpack and lay parts on clean, padded surface like carpet or a blanket. Check that you have all parts indicated. Call customer service if any hardware is missing.
- Page 3 Quantity Quantity of 2 of 6 Bolt (Ø1/4”*1/2”) Metal Plate Quantity Quantity of 1 of 1 Top Panel Back splash Quantity Quantity of 1 of 1 Left Side Panel Right Side Panel Quantity Quantity of 1 of 1 Bottom Panel Middle Divide Panel Quantity Quantity...
- Page 4 Quantity Quantity of 1 of 3 Wood Stopper Drawer Front Quantity Quantity of 3 of 3 Left Drawer Side Right Drawer Side Quantity Quantity of 3 of 3 Drawer Back Drawer Bottom Care and Cleaning Instructions: Before using, wipe with a clean, dry cloth. Call SEI customer service at 1-800-633-5096 for Avoid rubbing or scratching the surface with rough or assistance, questions, or Parts.
- Page 5 Wallingford Vanity Sink Assembly Instructions Note: Align cam bolts by hand before using screwdriver. Insert Cam Locks (C) into corresponding holes on Front Upper Bar (7). Do not overtighten cam bolts. Stop when they feel secure. Insert Cam Bolts (A) into corresponding holes on Middle Divide Panel (6).
- Page 6 Insert Cam Locks (C) into corresponding holes on Front Upper Bar (7), Front Lower Bar (8), Back Upper Bar (9), and Back Lower Bar (10). Insert Cam Bolts (A) and Wood Dowels (B) into corresponding holes on Left Side Panel (3) and Right Side Panel (4).
- Page 7 Attach Legs (14) to Bottom Panel (5) with Bolts (E) and Washers (F/G). Tighten Bolts (E) with Phillips screwdriver (not included). Figure 5 Attach Back Panel (12) to pre-assembled unit from Figure 5 with Screws (O). Tighten Screws (O) with Phillips screwdriver (not included).
- Page 8 Attach the Knobs (H) to the Front Upper Bar using Bolts (I). Tighten Bolts (I) with Phillips screwdriver (not included). Figure 7 Attach the Hinges (L) to the Doors (13) using Screws (M). Tighten Screws (M) with Phillips screwdriver (not included). Figure 8...
- Page 9 Attach the Door Panel (13) to the assembled unit using Screws (M). To achieve uniform clearance around the door, you may need to adjust the door by tightening or Tighten Screws (M) with Phillips loosening the two screws on the hinge. screwdriver (not included).
- Page 10 Insert the assembled drawers from Figure 10 into the assembled body. Figure 11 Loosen the drawer slides as neede d to adjust the drawer height. Figure 12...
- Page 11 Attach the Top Panel (1) to the assembled unit. Figure 13 Attach Back Splash (2) to Top Panel (1). Insert Bolts (R) with Washers (F/G) through holes on Metal Plate (Q) and the assembled unit.、 Attach Metal Plate (Q) to Back Splash (2) and assembled unit and tighten Bolts (R) with Phillips screwdriver (not included).
- Page 12 Note: If the table is not level, you can modify the height by turning the attached levelers by hand. Figure 15 Now your Wallingford Vanity Sink is ready for use. Note: Install not included piping items: faucet, drain, and supply lines to vanity sink according to the instructions supplied with those items.
-
Page 13: Parts Replacement Form
90 days of your receipt, we are under no obligation to provide parts or replacement merchandise. Please contact Southern Enterprises at 800-633-5096 or in Dallas 972-869-0111/ 9am – 4pm Mon-Fri Central time if you have product issues or email us at service@seidal.com. Please ask for customer service representative for issues involving damages or replacement parts.
Need help?
Do you have a question about the Wallingford BT7838A0TX and is the answer not in the manual?
Questions and answers