Advertisement
Package Contents
Base
Bottom plate
Note: There are two ways to attach this monitor arm to your desktop: Clamp and Bolt-thru assembly. Determine if you need
to attach it around the back side of your desk (follow Step 1.1) or through a hole from .4'' to 3.15'' in diameter (follow Step 1.2).
fig. 1
min thickness
*
fig. 4
© UPLIFT Desk • 1-800-349-3839 • info@upliftdesk.com • www.upliftdesk.com
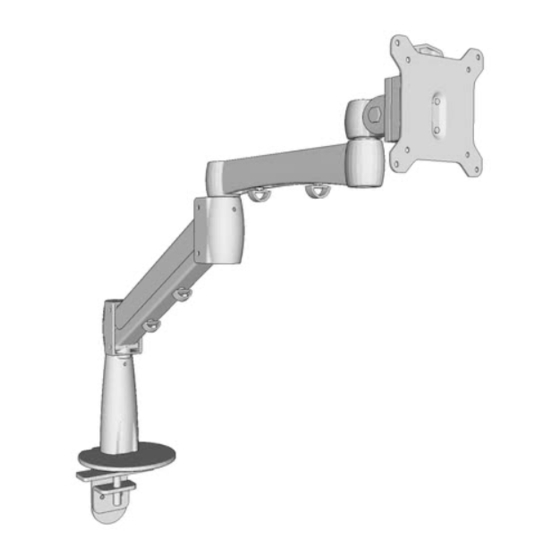
Monitor joint
Extension arm
Gas arm
fig. 2
fig. 3
max thickness
.75''
3.5''
*
®
Range Single Monitor Arm
MON020
VESA mount
13mm Flat wrench
Allen wrenches
(set of five: 2mm, 3mm,
4mm, 6mm, 6.5mm)
Step 1.1 - Clamp
Rest the Bottom plate onto the Base's bolt. Fit the Base around
the back of the desk and tighten the Bolt & Bottom plate into
place using the 6.5 mm Allen wrench.
Note:
If the Clamp does not fit on your desk, increase or decrease the
span of the clamp by removing the Bottom clamp and Bolt, and
repositioning them. First, unscrew the two screws holding the
Bottom clamp with the 4mm Allen wrench (see fig. 1).
For thin desks (.75'' minimum), reassemble the clamp as shown in
Figure 2. For thick desks (3.75'' maximum), reassemble the clamp
as shown in Figure 3.
Once the Clamp has been set and fits your desktop, continue on
to Step 2 below.
Step 1.2 - Bolt-thru
To mount your monitor arm through a hole in your desktop (min .4'',
max 3.15'' in diameter), first loosen the big screw inside the clamp
with the 6mm Allen wrench. Note: screw may be tight. Once re-
moved, separate the clamp assembly from the Base.
Place the Base onto the Bolt-thru top as shown. The Base's small
peg should fit into the small hole of the Bolt-thru top. Rotate until
the large hole lines up with the notch at the front of the base.
Place assembly completely over the hole facing the front of desk.
Select a Long bolt: the 50mm Bolt fits desks .6'' to 1.38'' thick, and
the 70mm Bolt fits desks 1.38'' to 2.13'' thick. Insert the Long bolt
thru the Bottom plate. Note: Bottom Plate must be wide enough
to straddle the hole's diameter. Thread the bolt into the Base as-
sembly by hand and tighten using the 6.5mm Allen wrench.
Step 2
Insert the Gas arm into the Base. Note: The stopping-pin under
the Gas arm restricts rotation to 180°. If you want a full 360°
rotation, remove this pin with the 2mm Allen wrench. (see fig. 4)
*
Insert the Extension arm into the Gas arm, and finish by insert-
ing the Monitor joint into the Extension Arm.
*Once the arm is assembled, you may need to tighten the set
screws (marked with "
different components from separating apart or drifting on their
own. Use the 3mm Allen wrench provided. Make sure not to
overtighten the set screws.
Parts for Bolt-thru assembly
Monitor screw
(qty 4)
Wire clips
(qty 4)
*
") located at each joint to prevent the
Bolt-thru top
Long bolts
(two sizes included:
50mm & 70mm)
AI-MON020-1.1
Advertisement
Table of Contents

Subscribe to Our Youtube Channel
Related Manuals for Uplift Desk MON020


Summary of Contents for Uplift Desk MON020
- Page 1 ”) located at each joint to prevent the different components from separating apart or drifting on their own. Use the 3mm Allen wrench provided. Make sure not to overtighten the set screws. fig. 4 © UPLIFT Desk • 1-800-349-3839 • info@upliftdesk.com • www.upliftdesk.com AI-MON020-1.1...
- Page 2 Copyright Notice: This guide is a component of the UPLIFT Desk Single monitor arm. This guide is a part of the scope of delivery, even if the item is resold.
Need help?
Do you have a question about the MON020 and is the answer not in the manual?
Questions and answers