Table of Contents
Advertisement
Quick Links
Advertisement
Table of Contents

Related Manuals for X-Tronic 4010-PRO-X


Summary of Contents for X-Tronic 4010-PRO-X
-
Page 3: Table Of Contents
PLEASE READ THESE INSTRUCTIONS BEFORE USING YOUR NEW X-TRONIC MODEL #4010-PRO-X SOLDERING STATION TABLE OF CONTENTS Product Specifications............2 Package Contents .............2 Safety Precautions ............3 Unit Diagram ..............4 Initial Set-up ...............4 User Interface..............5 Operating Instructions ............6 Features................6 Celsius / Fahrenheit Conversion ........6 Mute/Unmute Function ............6... -
Page 4: Product Specifications
PRODUCT SPECIFICATIONS Model XTR-4010-PRO-X Dimensions 6.75 x 6.5 x 4.75 in / 17.1 x 16.5 x 12 cm Weight 4.0 lbs / 1.8 kg Working Environment 32°F ~ 104°F / 0°C ~ 40°C Storing Environment -4°F ~ 176°F / -20°C ~ 80°C... -
Page 5: Safety Precautions
SAFETY PRECAUTIONS 1. Always use a grounded outlet for the unit. 2. Always turn the power off and unplug the unit when not in use. 3. Never use the soldering iron near any flammable substance, material, or gas. 4. Never touch the metallic components of the soldering iron while the unit is on. -
Page 6: Unit Diagram
INITIAL SET - UP 1. Open the package and check that all parts are present and are not damaged. If anything is missing or damaged, please contact X-Tronic immediately for assistance (see back cover for contact information). 2. Remove everything from the packaging. -
Page 7: User Interface
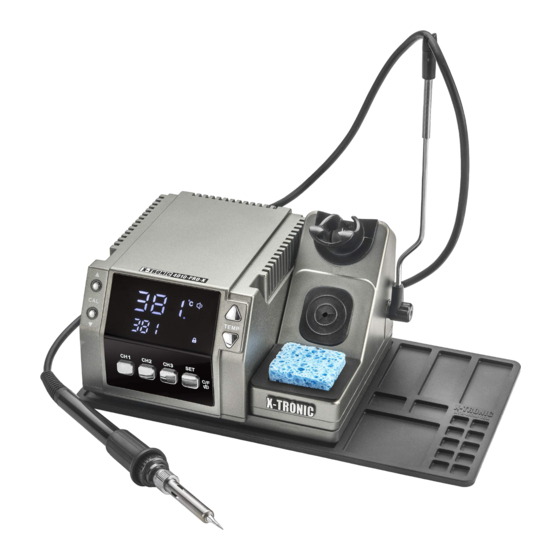
USER INTERFACE FRONT 1. Celsius / Fahrenheit Indicator 2. Actual Temperature of the Soldering Iron Heating Element 3. Calibration Buttons 4. Set Temperature 5. 3 Preset Memory Channels 6. Function Setting Button 7. Currently Selected Preset Channel 8. Lock / Unlock Indicator 9. -
Page 8: Operating Instructions
OPERATING INSTRUCTIONS 1. Place the soldering iron in the holder. 2. Turn the unit on with the power switch on the back of the unit. 3. Set the desired temperature using the TEMP UP and DOWN buttons on the right side of the unit or by pressing one of the Preset Memory Channels. -
Page 9: Lock/Unlock Mode
CALIBRATION FUNCTION When is it time to Calibrate your Soldering Station? All X-Tronic Soldering Stations come with a high quality ceramic heating element in the soldering iron that is calibrated to within ±3.6°F/2.0°C of the temperature that is shown on the LED Display. -
Page 10: Sleep Function
IMPORTANT - PLEASE READ Infrared (IR) Thermometers should NOT be used to measure the temperature of the soldering tip as they often provide inaccurate readings. All IR Thermometers are different and the capability depends on the Distance to Spot (D:S) ratio of the model being used. -
Page 11: Maintenance
MAINTENANCE SOLDERING TIP CARE 1. For first use, allow the tip to rise to a stable temperature. Clean the tip on the damp sponge and tin the tip (apply a small amount of fresh solder to the tip). 2. The soldering iron should be run in the 330°C ~ 360°C range for regular use, which is the normal temperature range for most soldering applications. -
Page 12: Replacing The Heating Element
4. Slide the metallic tube off of the soldering iron and tip. 5. Slide the tip off of the heating element. 6. Repeat in the reverse order for installation. Do not over-tighten the nut on the soldering iron. REPLACING THE HEATING ELEMENT 1. -
Page 13: Replacing The Fuse
REPLACING THE FUSE Fuse Clip Fuse Compartment Extra Fuse Compartment Fuse 1. Unplug the power cord from the outlet. 2. Remove the fuse compartment by pressing a flat head screwdriver into the divot just inside the power socket under the fuse compartment. -
Page 14: Warranty
(b) any product shipped outside of the United States, the District of Columbia or Canada, or (c) anyone who may have purchased it from someone other than X-Tronic International Inc.. Proof of purchase is required for in- warranty service. We recommend you promptly register this product on our website (www.XTronicUSA.com) to facilitate verification of the date of the original... - Page 15 WHAT DOES THIS WARRANTY NOT COVER? This limited warranty during the Warranty Period does not cover any damage due to: (a) improper use; (b) failure to follow the product instructions or to perform any preventive maintenance; (c) modifications; (d) unauthorized repair; (e) normal wear and tear that comes with household use;...
-
Page 16: Contact Information
Compliments please call or email us. Toll Free: 844-861-4762 Info@XTronicUSA.com Our Business Hours are: Monday - Thursday: 8am - 4pm CST Friday: 8am - Noon CST If you would like to shop for other X-Tronic International Products Please visit our website www.XTronicUSA.com...
Need help?
Do you have a question about the 4010-PRO-X and is the answer not in the manual?
Questions and answers