Table of Contents
Advertisement
Quick Links
Advertisement
Table of Contents

Subscribe to Our Youtube Channel
Related Manuals for X-Tronic 8020-XTS


Summary of Contents for X-Tronic 8020-XTS
-
Page 3: Table Of Contents
TABLE OF CONTENTS Introduction Package Contents ..........2 Product Features ...........3 Product Specifications ...........3 Getting Started Product Set-Up ............4 User Interface ............5 Operating Instrutions ..........6 Function Set-Up .............9 Safety Precautions ..........17 Maintenance Soldering Tip Care ..........17 Install/Remove Soldering Tip .......18 Replacing Heating Elements .........18 Warranty ..............20 Contact Information ..........22 - 1 -... -
Page 4: Package Contents
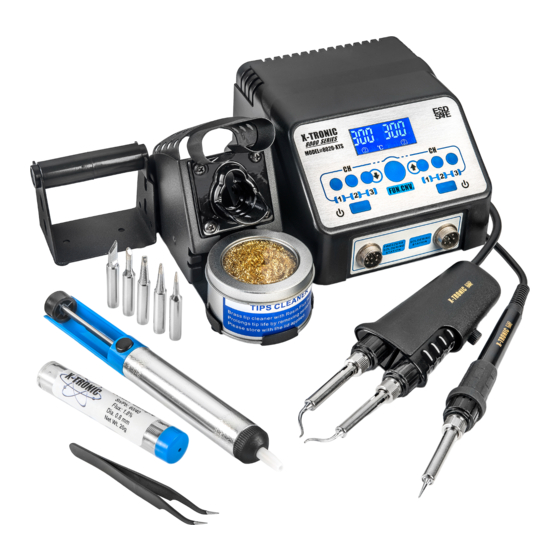
Package Contents 1 – X-Tronic #8020-XTS Main Unit 1 – X-Tronic Soldering Iron 1 – X-Tronic Hot Tweezer 1 - Soldering Iron and Hot Tweezer Holder 1 - Brass Tip Cleaner w/ Flux 5 – Soldering Iron Tips (Assorted Sizes and styles) -
Page 5: Product Features
Product Specifications Model #8020-XTS Dimensions 5.9 x 5.4 x 3.7 in / 15.0 x 13.6 x 9.3 cm Weight 6.0 lbs / 2.72 kg Working Environment 32°F ~ 104°F / 0°C ~ 40°C Storing Environment -4°F ~ 176°F / -20°C ~ 80°C Temperature Range 212°F ~ 896°F / 100°C ~ 480°C... -
Page 6: Product Set-Up
Product Set-up 1. Unpack all of the contents of the X-Tronic #8020-XTS unit. 2. Inspect the unit and accessories for any damage. If damage is detected, please contact X-Tronic immediately. 3. Attach the soldering iron to the unit using the soldering iron connection. -
Page 7: User Interface
User Interface Hot Tweezer Temperature Display Hot Tweezer CH #3 Memory Preset Hot Tweezer CH #1 Memory Preset Hot Tweezer CH #2 Memory Preset Hot Tweezer Power Button Soldering Iron Temperature Display Function Key Soldering Iron CH #1 Memory Preset Soldering Iron CH #3 Memory Preset Soldering Iron CH #2 Memory Preset Soldering Iron Power Button... -
Page 8: Operating Instrutions
Operating Instructions - 6 -... - Page 9 Operating Instructions Cont. - 7 -...
- Page 10 Operating Instructions Cont. - 8 -...
-
Page 11: Function Set-Up
Operating Instructions Cont. - 9 -... - Page 12 Operating Instructions Cont. - 10 -...
- Page 13 Operating Instructions Cont. - 11 -...
- Page 14 Operating Instructions Cont. - 12 -...
- Page 15 Operating Instructions Cont. - 13 -...
- Page 16 Operating Instructions Cont. - 14 -...
- Page 17 Operating Instructions Cont. - 15 -...
- Page 18 Operating Instructions Cont. - 16 -...
-
Page 19: Safety Precautions
Safety Precautions 1. Never use the soldering iron near any flammable substance, material, or gas. 2. Never touch the metallic components of the soldering iron while they are in use. The items may be extremely hot and will cause serious burns instantly. Allow the unit to properly cool to room temperature before attempting to touch them. -
Page 20: Install/Remove Soldering Tip
Install/Remove Soldering Iron Tip 1. Turn off the power to the unit and unplug from the power source. 2. Allow the soldering iron and tip to reach room temperature. 3. Loosen the nut at base of the metallic shaft of the soldering iron. 4. - Page 21 17. Replace the outer metallic shaft of the soldering iron. 18. Replace the metallic nut and tighten. Hot Tweezers 1. Turn off the unit and unplug it from the power source. 2. Allow the unit to reach room temperature before proceeding. 3.
-
Page 22: Warranty
(b) any product shipped outside of the United States, the District of Columbia or Canada, or (c) anyone who may have purchased it from someone other than X-Tronic International Inc.. Proof of purchase is required for in- warranty service. We recommend you promptly register this product on our website (www.XTronicUSA.com) to facilitate verification of the date of the original... - Page 23 WHAT DOES THIS WARRANTY NOT COVER? This limited warranty during the Warranty Period does not cover any damage due to: (a) improper use; (b) failure to follow the product instructions or to perform any preventive maintenance; (c) modifications; (d) unauthorized repair; (e) normal wear and tear that comes with household use;...
-
Page 24: Contact Information
Compliments please call or email us. Toll Free: 844-861-4762 Info@XTronicUSA.com Our Business Hours are: Monday - Thursday: 8am - 4pm CST Friday: 8am - Noon CST If you would like to shop for other X-Tronic International Products Please visit our website www.XTronicUSA.com...
Need help?
Do you have a question about the 8020-XTS and is the answer not in the manual?
Questions and answers