Panduit Atlona AT-UHD-CLSO-601 User Manual
4k/uhd 6 input multi-format switcher with mirrored hdmi and hdbaset outputs, poe, and auto-switching
Hide thumbs
Also See for Atlona AT-UHD-CLSO-601:
- Manual (34 pages) ,
- Application programming interface (33 pages)
Table of Contents
Advertisement
Quick Links
Advertisement
Table of Contents

Related Manuals for Panduit Atlona AT-UHD-CLSO-601


Summary of Contents for Panduit Atlona AT-UHD-CLSO-601
- Page 1 4K/UHD 6 Input Multi-Format Switcher with Mirrored HDMI and HDBaseT Outputs, PoE, and Auto-Switching AT-UHD-CLSO-601 User Manual Please check http://www.atlona. com/AT-UHD-CLSO-601 for the most recent firmware update or manual Toll free: 1-877-536-3976 atlona.com Local: 1-408-962-0515...
-
Page 2: Table Of Contents
Table of Contents 1. Introduction ..................3 2. Package Contents ..................3 3. Features ..................3 4. Wall/Rack mounts ..................3 5. Panel Descriptions a. Front Panel ..................4 b. Back Panel ..................4 6. Category cable ..................5 7. Analog Multi-Format Inputs .................. -
Page 3: Introduction
Introduction Easy to integrate, the CLSO-601 was designed for conference and classrooms with inputs near the switcher. Displays can be up to 328 feet from the switcher with HDBaseT outputs. Local (100 meters) HDMI and multifunction analog inputs work with any source. Combined with great features such as: 4K up/down scaling, microphone ducking, and audio control, this is the core component of your AV presentation system. -
Page 4: Panel Descriptions
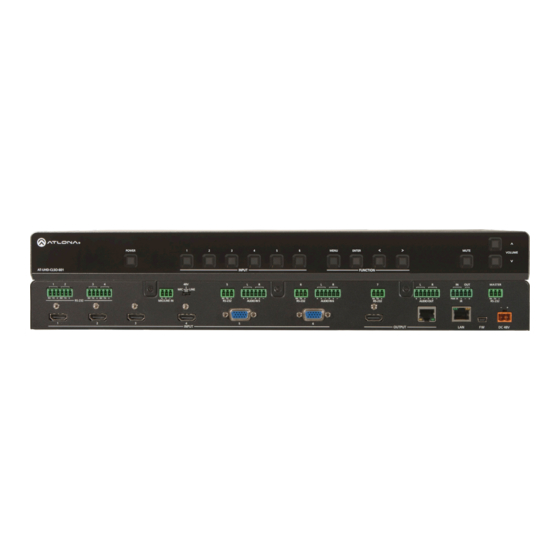
Panel Description Front Panel POWER MENU ENTER < > MUTE VOLUME AT-UHD-CLSO-601 INPUT FUNCTION MASTER LINE RX TX RX TX RX TX RX TX RX TX RX TX PWRIR RX TX RS-232 MIC/LINE IN RS-232 AUDIO IN 5 RS-232 AUDIO IN 6 RS-232 AUDIO OUT RS-232... -
Page 5: Category Cable
Category Cable For the category cables used in the installation of these products, please be sure to use a 568B termination as pictured below: 1. White - Orange 2. Orange 3. White - Green 4. Blue 5. White - Blue 6. - Page 6 Analog Multi-Function Inputs The CLSO-601 multi-function analog inputs can be used with most analog video signal (Input 5 and 6) formats including VGA , RGBHV , component , S-Video, or composite (with DDC) (without DDC) (YUV) video. Balanced analog audio can be input and embedded using the provided captive screw connectors.
- Page 7 The captive screw connectors have Counter Clockwise a contact bar that is adjusted to Clockwise compress the wire against the top Turn the screws clockwise to Turn the screws counter raise the contact bar to the clockwise to lower the contact plate.
-
Page 8: Microphone
Microphone Connection MIC (Dynamic MIC) MIC/LINE IN LINE Connect dynamic or self-powered microphones in this mode. Balanced MIC/LINE IN LINE Use this setting for phantom powered microphones. Supplies 48 volts. Balanced MIC/LINE IN MIC/LINE IN LINE Connect wireless microphone receivers (or other with line level outputs using this setting. - Page 9 On Screen Display (OSD) Input Input 1 HDMI 1 Input 2 HDMI 2 Input 3 HDMI 3 Input 4 HDMI 4 Input 5 VGA 1 Component 1 Composite 1 S-Video 1 Input 6 VGA 2 Component 2 Composite 2 S-Video 2 Audio Volume Master...
- Page 10 Setup Language English Spanish French German OSD Settings Transparency Position Horizontal Vertical Menu Timer 10 sec 30 sec 60 sec Info Banner Output Format Pass Through 480i@60 (NTSC) 480p@60 720p@60 1080i@60 1080p@60 576i@50 (PAL) 576p@50 720p@50 1080i@50 1080p@50 1080p@24 Native 3840x2160p@24 3840x2160p@25 3840x2160p@30...
- Page 11 Note: After selecting a new language, close the menu and reopen it for the change to take effect. Status System Info Software Revision x.x.xx (e.g. 1.0.01) OSD Revision x.x.x (e.g. 1.0.0) FPGA Revision x.x.x (e.g. 1.0.0) On-Time (h-m) x:xx (e.g. 1:15) Video Info Input xxxx (e.g.
- Page 12 TCP/IP For convenience, the CLSO-601 comes with DHCP on. This enables the switcher to be connected to a network without concern for overlapping IP addresses with other devices on the network. If your network does not support DHCP, this feature may be turned off and the IP address set using RS- 232 commands or the WebGUI.
- Page 13 The home screen tab will display the general system information. If an HDMI port is the current input, audio will display . If an analog port is selected then no audio information will (see image above) be displayed. (see below) Toll free: 1-877-536-3976 atlona.com Local: 1-408-962-0515...
- Page 14 The network set up page will allow the IP information to be changed. When a change is made the screen will grey and the ability to save or cancel will display at the bottom (see below) Note: When DHCP is on, the IP address cannot be configured. Turn DHCP off to enable IP configuration. Note: For a stable connection when using a control system, it is best to set up a static IP.
- Page 15 The settings page is used to set front panel and video options. Select the source from the first menu. If VGA is selected, more video options will display. (see top of page 16) System Settings Power - Turn the switcher on and off Panel Lock - Locks/unlocks the front panel buttons, or just the menu when Lock Menu is selected Auto Switch - Turns auto switching between HDMI inputs on/off VGA auto switch - Turns VGA auto switching on/off...
- Page 16 Video Settings Set the output video settings: Scale - Sets video output aspect ratio - Full, overscan, letter box, pan and scan, or follow input Full - Sources always fill the screen, regardless of source aspect ratio Overscan - Image is slightly zoomed in so that broadcast data at edges is masked LetterBox - Used to create 16:9 aspect ratio on 4:3 aspect ratio TVs Pan and Scan - Used to create 4:3 aspect ratio on 16:9 aspect ratio TVs Follow Input - Aspect ratio on TV matches source aspect ratio...
- Page 17 Reset Settings - Will reset the parameters to default settings on the current page only. Factory Default - Select to reset CLSO back to factory settings. Note: This will reset the switcher to factory default, including: resolutions, audio settings, HDCP settings, etc. The config page will allow the admin password to be changed, users to be added, and the RS-232 ports to be configured (CLSO-601 system port and the RS-232 I/O ports can be adjusted individually)
- Page 18 The EDID page enables the input preferred timing to be selected and HDCP compliance reporting to be set. This function is controllable through RS-232 as well. Note: CLSO-601 protects HDCP encoded content and will not pass HDCP content to a non-HDCP compliant device. Note: Some devices flag all content as protected when connected to an HDCP compliant display.
- Page 19 Microphone ducking uses the audio level from the microphone to decrease the program level so the speaker may be heard. Note: Proper set up is critical for satisfactory operation. If program levels are too high they can trigger the ducking process.
- Page 20 The Control Page includes settings which enable display controls by the switcher. It provides a way to program button functions, turn auto switching on/off, and determine the type of control commands sent out. (TCP/IP or RS-232) Button Control Selection Power - Set which device the power button controls None: Power button will turn the UHD-CLSO-601 on and off RS-232: Power button will send power on/off command over HDBaseT using RS-232 to compatible receivers and displays...
- Page 21 System Settings Display Auto Power On - When enabled, the unit will send a programmed command to the display to turn on after detecting an A/V signal Display Auto Power Off - When enabled, the unit will send a command to the display to turn off after not detecting an A/V signal Power Button Lock - Locks the front panel power button while Auto Power On/Off are enabled.
- Page 22 IP Mode Non-login: Does not require a username and password when using TCP/IP to control the display Login: Requires a username and password to control the display through TCP/IP IP Address & Port - Set to match the display’s static IP Username &...
- Page 23 The firmware page provides an area to update the switcher, Valens, audio, FPGA, and OSD firmwares. • Select the browse button for the type of firmware to be updated - Firmware Update - MCU/Main firmware - Valens Update - Valens firmware - Audio Update - DSP firmware - FPGA Update - FPGA firmware - OSD Update - OSD firmware...
-
Page 24: On Screen Display
Remote Source Selection HDMI1 - Input 1 Power HDMI2 - Input 2 On - turns CLSO-601 on HDMI3 - Input 3 Off - sets CLSO-601 into standby HDMI4 - Input 4 VGA1 - Input 5 VGA2 - Input 6 SV1 - Input 5 (S-Video 1) SV2 - Input 6 (S-Video 2) -
Page 25: Rs-232
RS-232 Connection Wire color will RS-232 RS-232 pin out will be determined by the RS- differ by cable 232 cable and will connect as Rx , Tx manufacturer. (receiver) , and (transmitter) (ground) (See picture 1) RX TX RS-232 is often connected through a DB 9-pin to captive screw connector. -
Page 26: Commands
Commands The command codes are case sensitive, do not change capitalization, spacing, or lettering. Command Feedback Description PWON PWON Power ON PWOFF PWOFF Stand-by PWSTA PWON/PWOFF Get system power status RS232zoneX[Y] RS232zoneX[Y] RS232zoneX[Y], X: 1-8. [Y] is the command string sent to the display device or source through the RS-232 port RS232paraX[Y] RS232paraX[Y]... - Page 27 Command Feedback Description EQB+ EQB(xx) Turns EQ bass up one level EQB- EQB(xx) Turns EQ bass down one level EQB(xx) EQB(xx) Turns EQ bass to the specific level xx: (xx: -10 to 12) EQT+ EQT(xx) Turns EQ treble up one level EQT- EQT(xx) Turns EQ treble down one level...
- Page 28 Command Feedback Description Input X Y Input X Y Input [interface]* [index]*. Select input source video. e.g. Input HDMI 2 e.g. Select input to HDMI 2 video => Input HDMI 2 HDCPSetX Y HDCPSetX Y Sets HDCP mode of the HDMI ports e.g.
-
Page 29: Baud Rate
IP Commands Command Feedback Description IPCFG IP Addr : x.x.x.x Displays IP address configure Netmask : x.x.x.x Gateway : x.x.x.x IP Port IPQuit IPQuit Telnet Logout IPAddUser [X] [Y] IPAddUser [X] [Y] IPAddUser [name] [password]. Add user of telnet. If only command write “IPAddUser”, it will display all user list. =>... -
Page 30: Control Diagram
Control Diagram Video HDBaseT Control MUTE OFF POWER MENU ENTER < > MUTE VOLUME Laptop Media Player AT-UHD-CLSO-601 INPUT FUNCTION MASTER LINE RX TX RX TX RX TX RX TX RX TX RX TX PWRIR RX TX RS-232 MIC/LINE IN RS-232 AUDIO IN 5 RS-232... -
Page 31: Connection Diagram
Connection Diagram Video HDBaseT Audio Control Media Player Set-top box MUTE OFF POWER MENU ENTER < > MUTE Laptop VOLUME Blu-ray Player Control System AT-UHD-CLSO-601 INPUT FUNCTION MASTER LINE RX TX RX TX RX TX RX TX RX TX RX TX PWRIR RX TX RS-232... -
Page 32: Specifications
Specifications Video Resolutions 4096x2160@24/30Hz, 3840x2160@24/25/30Hz, 1080p@23.98/24/25/29.97/30/50/59.94/60, 1080i@50/59.94/60Hz, 720p@25/29.97/30/50/59.94/60Hz, 576p, 576i, 480p, 480i 2560x1440, 2048x1152, 2048x1080, 1920x1200, 1680x1050, 1600x1200, 1600x900, 1440x1050, 1440x900, 1366x768, 1360x768, 1280x1024, 1280x960, 1280x800, 1280x768, 1024x768, 800x600, 640x480 4096x2160@24/30Hz, 3840x2160@24/25/30Hz, 1080p@24/25/30/50/60Hz, 1080i@50/60Hz, 720p@50/60Hz, 576p, 576i, 480p, 480i 2048x1152, 2048x1080, 1920x1200, 1600x1200, 1600x900, 1440x1050, 1440x900, 1366x768, 1360x768, 1280x1024, 1280x960, 1280x800, 1280x768, 1024x768, 800x600, 640x480 Composite/S-Video... -
Page 33: Safety
Safety Information Safeguards Do not modify the wall plug. Doing so will To reduce the risk of electric shock, do not void the warranty and safety features. expose this product to rain or moisture This equipment should be installed near If the wall plug does not fit into your local the socket outlet and the device should power socket, hire an electrician to replace... - Page 34 Atlona, Inc. (“Atlona”) Limited Product Warranty Policy Coverage Atlona warrants its products will substantially perform to their published specifications and will be free from defects in materials and workmanship under normal use, conditions and service. Under its Limited Product Warranty, Atlona, at its sole discretion, will either: A) repair or facilitate the repair of defective products within a reasonable period of time, restore products to their proper operating condition and return defective products free of any charge for necessary parts, labor and shipping B) replace and return, free of charge, any defective products with direct replacement or with similar products deemed...
-
Page 35: Registration
Disclaimers This Limited Product Warranty does not imply that the electronic components contained within Atlona’s products will not become obsolete nor does it imply Atlona products or their electronic components will remain compatible with any other current product, technology or any future products or technologies in which Atlona’s products may be used in conjunction with.
Need help?
Do you have a question about the Atlona AT-UHD-CLSO-601 and is the answer not in the manual?
Questions and answers