Advertisement
Quick Links
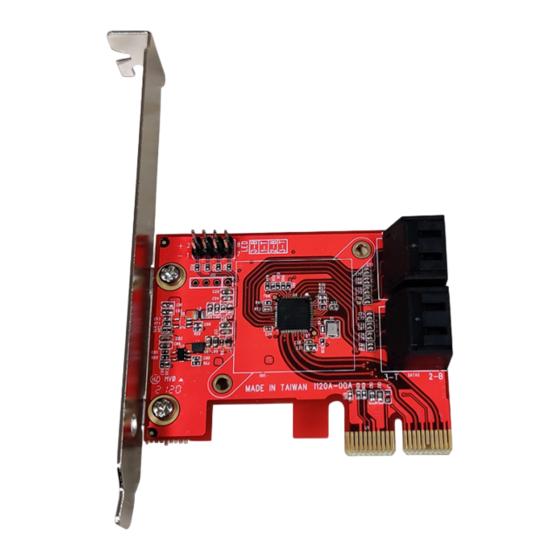
4 Port SATA 6Gbps PCIe Controller Card
Product Diagram (4P6G-PCIE-SATA-CARD)
Front View
Port
• Connect SATA Stoage Devices to the PCIe SATA
1
SATA Ports x 4
Card using a SATA Cable
• Connect the PCIe SATA Card to the PCIe Slot in
2
PCIe x4 Connector
the Computer
Product Information
For the latest product information, technical specifications, manuals, and Declarations
of Conformance, please visit:
www.StarTech.com/4P6G-PCIE-SATA-CARD
Package Contents
• PCIe SATA Card x 1
• Full-Profile Bracket (Installed) x 1
• Low-Profile Bracket x 1
• Quick-Start Guide x 1
Requirements
• Computer with an available PCIe slot (x4/8/16)
• Phillips Head Screwdriver
• SATA Cables
To view manuals, FAQs, videos, drivers, downloads, technical drawings, and more, visit www.startech.com/support.
1
2
*Product may vary from images
Function
Hardware Installation
Warning: PCIe Cards can be damaged by static electricity. Make sure that the
Installer is properly grounded before they open the Computer Case or touch the
PCIe SATA Card. The Installer should wear an Anti-Static Strap when installing any
computer component. If an Anti-Static Strap is not available, discharge any built-up
static electricity by touching a large Grounded Metal Surface for several seconds.
Only handle the PCIe SATA Card by its edges and do not touch the gold connectors.
Installing the Low-Profile Bracket
By default the Full-Profile Bracket is attached to the PCIe SATA Card. Depending on
the system configuration it may be necessary to remove the Full-Profile Bracket to
replace with the Low-Profile Bracket (included).
1. Remove the 2x Phillips Head Screws securing the Full-Profile Bracket, using a
Phillips Head Screwdriver.
2. Remove the Full-Profile Bracket and replace with the Low-Profile Bracket
(included).
3. Install the 2x Phillips Head Screws removed in step 1 and tighten, using a Phillips
Head Screwdriver.
Installing the Card
1. Turn off the Computer and any Peripheral Devices that are connected
(e.g. printers, external hard drives, etc.).
2. Unplug the Power Cable from the rear of the Computer and disconnect any
Peripheral Devices that are connected.
3. Remove the Cover from the Computer Case.
Note: Consult the documentation that came with the Computer for details about
how to do this safely.
4. Locate an open PCIe Slot (x4/8/16) and remove the corresponding Metal Cover
Plate from the rear of the Computer Case. In most instances, the Metal Cover Plate
is attached to the rear of the Computer Case with a single Phillips Head Screw.
Save this Phillips Head Screw for the next step.
5. Gently insert the PCIe SATA Card into the open PCIe Slot (x4/8/16) and fasten the
Bracket to the rear of the Computer Case, using the Phillips Head Screw from
step 4.
6. Connect a maximum of 4 SATA Storage Devices to the SATA Ports of the PCIe
SATA Card using SATA Cables.
7. Replace the Cover from the Computer that was removed in step 3.
8. Reconnect all of the Peripheral Devices that were disconnected in step 2.
9. Reconnect the Power Cable to the rear of the Computer.
Quick-Start Guide
Manual Revision: October 7, 2021
Advertisement

Subscribe to Our Youtube Channel
Related Manuals for StarTech.com 4P6G-PCIE-SATA-CARD


Summary of Contents for StarTech.com 4P6G-PCIE-SATA-CARD
- Page 1 8. Reconnect all of the Peripheral Devices that were disconnected in step 2. • Phillips Head Screwdriver 9. Reconnect the Power Cable to the rear of the Computer. • SATA Cables To view manuals, FAQs, videos, drivers, downloads, technical drawings, and more, visit www.startech.com/support. Manual Revision: October 7, 2021...
- Page 2 43125 Northampton JP: startech.com/jp and do not represent an endorsement of a product or service by StarTech.com, or an endorsement of the product(s) to which U.S.A. NN4 7BW this manual applies by the third-party company in question. StarTech.com hereby acknowledges that all trademarks, registered...
Need help?
Do you have a question about the 4P6G-PCIE-SATA-CARD and is the answer not in the manual?
Questions and answers