Table of Contents
Advertisement
Quick Links
Advertisement
Table of Contents

Subscribe to Our Youtube Channel
Related Manuals for AEG CCB6740ACM


Summary of Contents for AEG CCB6740ACM
- Page 1 CCB6740ACB User Manual Cooker CCB6740ACM USER MANUAL...
-
Page 2: Table Of Contents
14. ENERGY EFFICIENCY..................... 30 FOR PERFECT RESULTS Thank you for choosing this AEG product. We have created it to give you impeccable performance for many years, with innovative technologies that help make life simpler features you might not find on ordinary appliances. Please spend a few minutes reading to get the very best from it. - Page 3 ENGLISH manufacturer is not responsible for any injuries or damages that are the result of incorrect installation or usage. Always keep the instructions in a safe and accessible location for future reference. 1.1 Children and vulnerable people safety WARNING! Risk of suffocation, injury or permanent disability.
- Page 4 This appliance is not intended to be used on a ships, • boats or vessels. Do not install the appliance behind a decorative door • in order to avoid overheating. Do not install the appliance on a platform. •...
-
Page 5: Safety Instructions
ENGLISH Ensure that the appliance is switched off before • replacing the lamp to avoid the possibility of electric shock. If the mains power supply cable is damaged, it must • be replaced by the manufacturer, its Authorised Service Centre or similarly qualified persons to avoid an electrical hazard. - Page 6 • Make sure that the parameters on the • Be careful when you open the rating plate are compatible with the appliance door while the appliance is electrical ratings of the mains power in operation. Hot air can release.
- Page 7 ENGLISH • Be careful not to let objects or and can cause corrosion. To decrease cookware fall on the appliance. The the condensation operate the surface can be damaged. appliance for 10 minutes before • Do not activate the cooking zones cooking.
-
Page 8: Product Description
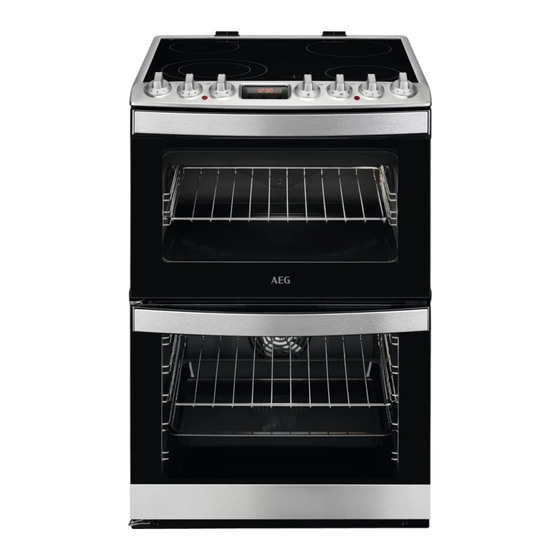
3. PRODUCT DESCRIPTION 3.1 General overview Control panel and hob Air vents for the cooling fan Heating element Lamp Shelf support, removable Cavity embossment Shelf positions 3.2 Cooking surface layout Cooking zone 1200 W Steam outlet - number and position... -
Page 9: Before First Use
ENGLISH Temperature indicator / symbol for the top oven 3.4 Accessories • Trivet For roasting and grilling. • Wire shelf Use the trivet only with For cookware, cake tins, roasts. the Grill- / roasting pan. • Grill- / Roasting pan To bake and roast or as pan to collect fat. -
Page 10: Hob - Hints And Tips
5.1 Heat setting To activate the outer ring: turn the knob clockwise through a light resistance . Then turn the knob Symbols Function counterclockwise to the correct heat setting. Off position To deactivate the outer ring: turn the Double zone knob to the off position. -
Page 11: Hob - Care And Cleaning
ENGLISH Heat setting Use to: Time Hints (min) 1 - 2 Solidify: fluffy omelettes, 10 - 40 Cook with a lid on. baked eggs. 2 - 3 Simmer rice and milkbased 25 - 50 Add at least twice as much liq- dishes, heat up ready-cooked uid as rice, mix milk dishes meals. -
Page 12: Oven - Daily Use
8. OVEN - DAILY USE WARNING! Refer to Safety chapters. 8.1 Top oven functions Symbol Oven function Application Off position The oven is off. Oven Lamp To turn on the lamp without a cooking function. 100 - 250 Conventional Cook- To bake and roast food on one shelf position. - Page 13 ENGLISH 8.3 Activating and 3. Turn the knob for the function: Steam deactivating the top / main Bake 4. Turn the knob for the temperature to oven select a temperature. 5. Put food in the appliance and close It depends on the model if the oven door.
-
Page 14: Oven - Clock Functions
2. Put the deep pan into the oven on the necessary shelf position. • All accessories have small You can use the trivet to grill flat dishes indentations at the top of in large quantities and to toast. the right and left side to increase safety. - Page 15 ENGLISH 9.2 Buttons Button Function Description MINUS To set the time. CLOCK To set a clock function. PLUS To set the time. 9.3 Clock functions table Clock function Application TIME OF DAY To set, change or check the time of day. DURATION To set how long the appliance operates.
-
Page 16: Oven - Hints And Tips
5. Press to set the time for 2. Press to set the necessary END. time. The Minute Minder starts automatically 6. Press to confirm. after 5 seconds. Appliance turns on automatically later 3. When the set time ends, an acoustic on, works for the set DURATION time signal sounds. - Page 17 ENGLISH 10.4 Tips on baking Baking results Possible cause Remedy The bottom of the cake The shelf position is incor- Put the cake on a lower shelf. is not browned suffi- rect. ciently. The cake sinks and be- The oven temperature is The next time you bake, set a comes soggy, lumpy or too high.
- Page 18 Food Temperature (°C) Time (min) Shelf posi- tion Cakes: Meringues 90 - 100 150 - 180 Cakes: Flapjack 160 - 170 25 - 30 Cakes: Shortbread 130 - 150 45 - 60 Cakes: Apple Pie 170 - 180 50 - 60...
- Page 19 ENGLISH 10.6 Thermaflow® Baking - Main Oven Shelf positions are not critical but ensure that the oven accessories are evenly spaced when more than one is used. Food Temperature (°C) Time (min) Shelf posi- tion Biscuits 180 - 190 10 - 20 1 –...
- Page 20 10.7 Moist Fan Baking Food Temperature (°C) Time (min) Shelf posi- tion Lasagne 190 - 210 60 - 80 Cannelloni 180 - 200 70 - 85 Potato gratin 190 - 210 70 - 85 Pasta gratin 190 - 210...
- Page 21 ENGLISH Food regeneration Food Temperature Water in Preheating Time (min) Shelf (°C) the cavity time (min) posi- emboss- tion ment (ml) White bread 15 - 25 Bread rolls 10 - 20 Homemade piz- 15 - 25 Focaccia 15 - 25 Vegetables 15 - 25 Rice...
- Page 22 10.10 Thermaflow® - Main Oven Roasting Food Temperature (°C) Time (min) Beef / Beef boned 170 - 190 20 - 35 minutes per 0.5 kg (1 lb) and 20 - 30 mi- nutes over Mutton / Lamb 170 - 190 20 - 35 minutes per 0.5 kg (1 lb) and 25 - 35 mi-...
- Page 23 ENGLISH Food Time (min) Shelf position Fillets - Plaice / Cod 4 - 6 Kebabs 12 - 18 2 - 3 Kidneys - Lamb / Pig 6 - 10 2 - 3 Sausages 20 - 30 Steaks: Rare 4 - 6 Steaks: Medium 6 - 8 Steaks: Well Done...
-
Page 24: Oven - Care And Cleaning
Top oven Food Function Temper- Time (min) Accesso- Shelf ature ries position (°C) Small cakes (20 small Conventional 20 - 30 Tray cakes per tray) Cooking Apple pie, 2 tins (ø Conventional 20 - 35 Grid 20 cm) on the grid,... - Page 25 ENGLISH 11.5 Removing the shelf WARNING! supports Keep children away when you clean the oven at a high To clean the oven, remove the shelf temperature. The oven supports. surface becomes very hot and there is a risk of burns. 1.
- Page 26 2. Hold the door trim on the top edge 2. Pull up the trim. of the door at the two sides and push 3. Remove the glass panels. inwards to release the clip seal. To replace the glass panels, do the same steps in reverse.
-
Page 27: Troubleshooting
ENGLISH 12. TROUBLESHOOTING WARNING! Refer to Safety chapters. 12.1 What to do if... Problem Possible cause Remedy You cannot activate the ap- The appliance is not connec- Check if the appliance is cor- pliance. ted to an electrical supply or rectly connected to the elec- it is connected incorrectly. -
Page 28: Installation
Problem Possible cause Remedy The water comes out of the There is to much water in the Deactivate the oven and cavity embossment. cavity embossment. make sure that the appliance is cold. Wipe the water with a cloth or sponge. Add the correct amount of water to the cavity embossment. - Page 29 ENGLISH 13.3 Levelling of the appliance 13.5 Covering terminal board • The recommended cross-section area Use small feet on the bottom of is six square millimetres (6 mm²). appliance to set the appliance top • When you refit the mains terminal surface level with other surfaces.
-
Page 30: Energy Efficiency
14. ENERGY EFFICIENCY 14.1 Product information for hob according to EU 66/2014 Model identification CCB6740ACB CCB6740ACM Type of hob Hob inside Freestanding Cooker Number of cooking zones Heating technology Radiant Heater Diameter of circular cooking Left front 14.0 cm / 21.0 cm zones (Ø) - Page 31 Type of oven Oven inside Freestanding Cooker CCB6740ACB 59.2 kg Mass CCB6740ACM 59.0 kg EN 60350-1 - Household electric cooking temperature to minimum 3 - 10 minutes appliances - Part 1: Ranges, ovens, steam before the end of the cooking time,...
- Page 32 www.aeg.com/shop...
Need help?
Do you have a question about the CCB6740ACM and is the answer not in the manual?
Questions and answers