
Related Manuals for Taga Harmony HTA-1000B


Summary of Contents for Taga Harmony HTA-1000B
- Page 1 HTA-1000B HIGH-FIDELITY HYBRID INTEGRATED AMPLIFIER Instruction Manual Edition 03-2020...
- Page 2 You can connect a range of digital devices via optical or coaxial inputs and a built- in premium high-resolution 24bit / 192kHz DAC will always provide the best sound performance. The HTA-1000B is also an ideal companion for mobile devices – stream music from smartphones, tablets or computers compatible with Bluetooth ®...
-
Page 3: Table Of Contents
Contents Safety Instructions Remote controller Front and Rear Panel Hooking up speaker cables Hooking up the amplifier Operation Bluetooth Connection ® Additional Information Specifications... -
Page 4: Safety Instructions
Safety Instructions IMPORTANT READ THIS SECTION CAREFULLY BEFORE PROCEEDING! WARNING: TO REDUCE THE RISK OF FIRE OR ELECTRIC SHOCK, DO NOT EXPOSE THIS PRODUCT TO RAIN OR MOISTURE. DO NOT REMOVE COVER (OR BACK). NO USER-SERVICEABLE PARTS INSIDE. REFER SERVICING TO QUALIFIED SERVICE PERSONNEL. The triangle containing a lightning symbol is intended to alert the user to the presence of uninsulated dangerous voltages within the product’s enclosure that may be of sufficient magnitude to constitute a risk of electric shock to persons. - Page 5 Safety Instructions 1. Read Instructions - All the safety and operating instructions 13. Overloading - Do not overload wall outlets, extension cords or should be read before the product is operated. integral convenience receptacles as this can result in a risk of fire 2.
-
Page 6: Remote Controller
Remote Controller • Always use AAA batteries and do not use the rechargeable batteries. • Do not mix new batteries with old batteries or different kinds of batte- ries. • If the batteries run out, remove the old batteries and replace them with new ones within several minutes. -
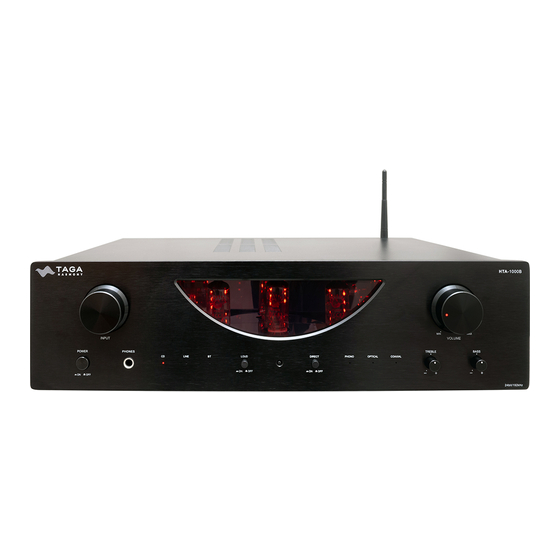
Page 7: Front And Rear Panel
Remote Controller CD Input Selector Button Line Input Selector Button Bluetooth Input Selector Button ® Phono MM Input Selector Button Optical Input Selector Button Coaxial Input Selector Button Mute Button Volume Buttons (▲/ ▼) Dimmer Button Front and Rear Panel Front Panel: Input Selector Power Switch (ON and OFF) -
Page 8: Hooking Up Speaker Cables
Front and Rear Panel Rear Panel: 15. Phono Ground Screw 16. Analog Stereo RCA Inputs CD / LINE / PHONO (MM) 17. Digital Inputs OPTICAL / COAXIAL 18. Preamplifier Stereo RCA Output 19. Speaker Right Channel Output (Speaker Connectors) 20. Speaker Left Channel Output (Speaker Connectors) 21. - Page 9 Hooking Up Speaker Cables Connecting speaker cables Speaker cables have 2 conductors. Each conductors should be connected to a separate speaker connector - mind the polarity while connecting. For each conductor: 1. Remove approximately 10 mm (3/8”) of insulation from the end of the conductor. Twist the bare wires firmly together.
-
Page 10: Hooking Up The Amplifier
Hooking up the Amplifier Right speaker Left speaker Smartphone, tablet, etc. CD player etc. FM/AM tuner, etc. Turntable (MM) Interconnect RCA Interconnect RCA Phono Ground cable Speaker cables Interconnect RCA Optical cable Coaxial cable External power amplifier, Video game console etc. DVD / Blu-ray Player etc. -
Page 11: Operation
Hooking up the Amplifier connect it to one of digital inputs: OPTICAL or COAXIAL. Use a digital optical cable for the OPTICAL input and a digital coaxial cable for the COAXIAL input (the cables are not supplied with this product). Preamplifier Output (PRE OUT) : this amplifier is equipped with a preamplifier output. - Page 12 Operation Headphones connection: When headphones (not supplied with this product) are plugged to the headphone input (Phones) the transmission of sound to the speakers and PRE OUT is switched off. The speakers and PRE OUT are again active after you disconnect the headphones. The volume of the headphones is regulated by the Volume Regulator (front panel and remote controller).
-
Page 13: Bluetooth ® Connection
Bluetooth devices. ® • After a short time “HTA-1000B” will appear on the screen of your audio source. • Select “Pair” on your audio source to connect with the amplifier. After connection is successful the Bluetooth Input Led Indicator will be illuminated ®... -
Page 14: Additional Information
Additional Information Break-In Your TAGA Harmony amplifier sounds great immediately after it is taken out of the carton but as all hybrid amplifiers, this amplifier requires a “break-in” period to reach its full sonic capabilities. -
Page 15: Specifications
Additional Information The warranty time for vacuum tubes is shorter than for other compo- nents of this device - for more details check your warranty terms or contact a local dealer. The vacuum tubes are installed inside the device and should be replaced only by qualified service personnel. - Page 16 We strongly advise to contact a professional installer or dealer in order to install TAGA Harmony products. We recommend using high quality TAGA Harmony cables and other installation accessories. Kit Content: Amplifier Remote Controller Bluetooth Antenna ® Power Cable Instruction Manual Your product is marked with the symbol as showed on the left.
Need help?
Do you have a question about the HTA-1000B and is the answer not in the manual?
Questions and answers