Table of Contents
Advertisement
Available languages
Available languages
Quick Links
DELTA-SPORT HANDELSKONTOR GMBH
Wragekamp 6
DE-22397 Hamburg
GERMANY
10/2017
Delta-Sport-Nr.: TB-4474
IAN 292884
BARRA DE TRACCIÓN
BARRA ENTROPORTA
BARRA DE TRACCIÓN
BARRA ENTROPORTA
Manual de instrucciones
Istruzioni d'uso
BARRA PARA PORTA
CHIN-UP BAR
Manual de instruções
Instructions for use
TÜRRECK
Bedienungsanleitung
IAN 292884
Antes de leer, abra la página con las ilustraciones y familiarícese seguidamente con todas las funciones
del aparato.
Prima di leggere ribaltare la pagina con le immagini e familiarizzare poi con tutte le funzioni
dell´apparecchio.
Antes de ler, vire o lado com as imagens para fora e familiarize-se com todas as funções do aparelho.
Before reading, fold out the illustration page and get to know all of the functions of your unit.
Klappen Sie vor dem Lesen die Seite mit den Abbildungen aus und machen Sie sich anschließend mit
allen Funktionen des Artikels vertraut.
ES
Instrucciones de manejo y seguridad
IT/MT
Istruzioni d´uso e di sicurezza
PT
Manual de instruções e indicações de segurança
GB/MT
Instructions and Safety Notice
DE/AT/CH
Bedienungs- und Sicherheitshinweise
Página
10
Pagina
18
Página
26
Page
33
Seite
40
Advertisement
Table of Contents

Subscribe to Our Youtube Channel
Related Manuals for Crivit 292884


Summary of Contents for Crivit 292884
- Page 1 Página GB/MT Instructions and Safety Notice Page BARRA PARA PORTA CHIN-UP BAR DE/AT/CH Bedienungs- und Sicherheitshinweise Seite DELTA-SPORT HANDELSKONTOR GMBH Manual de instruções Instructions for use Wragekamp 6 DE-22397 Hamburg GERMANY TÜRRECK 10/2017 Bedienungsanleitung Delta-Sport-Nr.: TB-4474 IAN 292884 IAN 292884...
- Page 2 72 - 98 cm Apertura Opening Enclavamiento Locking Aprire Öffnen Bloccare Arretieren Abertura Bloqueio...
-
Page 6: Table Of Contents
Índice/Indice/Índice/Contents Contenido del suministro ........10 Contenuto della confezione ......18 Datos técnicos ........... 10 Dati tecnici ............18 Uso conforme a lo previsto ......10 Utilizzo conforme ..........18 Indicaciones de seguridad para el montaje .. 10 Avvertenze di sicurezza per il montaggio ..18 Indicaciones de seguridad para el uso ... - Page 7 Inhaltsverzeichnis Lieferumfang ............40 Technische Daten ..........40 Bestimmungsgemäße Verwendung ....40 Sicherheitshinweise zur Montage ....40 Sicherheitshinweise zur Benutzung ..40 - 42 Montage ............42 Werkzeugliste ..........42 Verschraubung der Sicherheitsendkappen im oberen und unteren Bereich des Türrahmens .......... 42 Montage der Sicherheitsbügel ....42 Öffnen und Arretieren .......
-
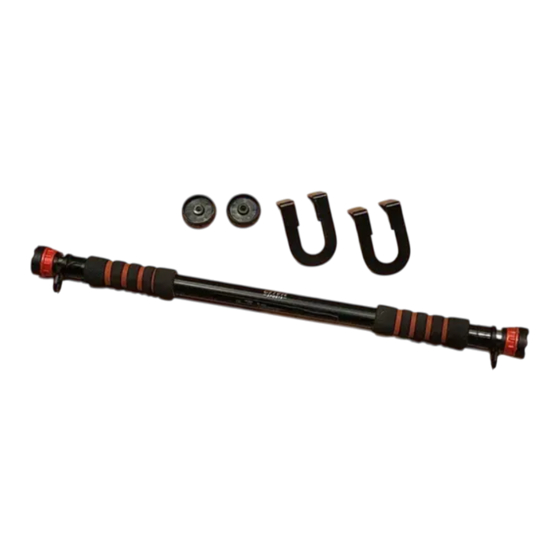
Page 8: Contenido Del Suministro
Este artículo no es apto para niños menores de ¡Enhorabuena! 14 años, ya que éstos no pueden valorar los pe- Con la compra de este artículo ha adquirido un ligros que pueden derivarse del mismo. Además, producto de excelente calidad. el artículo posee piezas pequeñas que podrían Antes de utilizarlo por primera vez, fa- ser ingeridas por ellos. - Page 9 • Este artículo ha sido concebido para un peso • ¡Mantenga las cintas de entrenamiento en corporal máximo de 100 kg. No use el artícu tensión en todo momento y tenga cuidado de lo si excede este peso corporal. no resbalarse! •...
-
Page 10: Montaje
¡Atención! El uso de las abraza- Peligros derivados del deras de seguridad es obligatorio desgaste si se realizan ejercicios con las • El artículo sólo debe emplearse si se encu- cintas de entrenamiento. entra en perfecto estado. Antes de cada uso • ¡Para enclavar la barra de tracción en el compruebe que el producto no presente da- marco de la puerta, ambas abrazaderas ños ni signos de desgaste. -
Page 11: Indicaciones De Entrenamiento
Indicaciones de Calentamiento de la musculatura de la nuca y el cuello entrenamiento 1. Gire la cabeza lentamente hacia la izquierda Los ejercicios que se exponen a continuación y hacia la derecha. constituyen sólo una selección. Encontrará más 2. Repita este movimiento 4 o 5 veces. ejercicios en la correspondiente bibliografía 3. - Page 12 2. Colóquese el lazo de la cinta de entrena- 4. Permanezca un momento en esta posición y miento alrededor del pie más alejado de la vuelva lentamente a la posición de salida. puerta. Las piernas están separadas a la 5. Repita el ejercicio 10-15 veces en 3 tandas. Importante: Tenga cuidado de que los anchura de las caderas y el tronco recto.
- Page 13 2. Coja los lazos de las cintas de entrenamiento ¡Atención! Tenga en cuenta la por los lados con los codos flexionados. longitud de extensión máxima Posición final Fije el artículo en la posición que se representa 3. Tense los músculos abdominales y de los de la parte inferior del marco de la puerta. brazos y estire las cintas de entrenamiento Posición de salida delante del cuerpo.
-
Page 14: Estiramiento
Estiramiento La parte inferior de la espalda no se levanta en ningún momento. Acerque los omóplatos Tómese el tiempo suficiente para estirar después a la columna vertebral. La cabeza se de cada entrenamiento. A continuación le encuentra en la prolongación de la columna describiremos un sencillo ejercicio para ello. -
Page 15: Indicaciones Para La Eliminación
Indicaciones para la IAN: 292884 Servicio España eliminación Tel.: 902 59 99 22 Elimine el artículo y el material de embalaje (0,08 EUR/Min. conforme a la normativa legal local en la ac- + 0,11 EUR/llamada tualidad. No deje material de embalaje, como (tarifa normal)) bolsas de plástico, en manos de niños. -
Page 16: Contenuto Della Confezione
L’articolo comprende inoltre delle piccole parti Congratulazioni! che possono essere ingoiate dai bambini. Con il vostro acquisto avete scelto un prodotto altamente qualitativo. Familiarizzate con il pro- Avvertenze di sicurezza dotto prima di prenderlo in funzione. per il montaggio Leggete attentamente le seguenti istru- • Attenzione! L‘articolo può essere zioni d´uso. utilizzato solo con gli elementi finali Utilizzate il prodotto soltanto per lo scopo avvitati all‘infisso della porta! previsto e i campi d´impiego indicati. - Page 17 • Questo articolo è realizzato per un peso • Gli estensori per il training vanno riportati alla corporeo massimo di 100 kg. Non utilizzare posizione di partenza sempre lentamente e in l‘articolo se il proprio peso corporeo dovesse tensione. essere superiore. •...
-
Page 18: Montaggio
La sicurezza dell‘articolo può essere garantita • Mettere le staffe di sicurezza fornite in dotazi- solo se si verifica regolarmente che esso non one sulla sbarra (imm. D). presenti danni o segni di usura. Se l‘articolo • Spostare infine la staffa di sicurezza sulla dovesse essere danneggiato, non deve più... -
Page 19: Riscaldarsi
• Determinare da sé la frequenza e l‘intensità Importante: non dimenticare di continu- degli esercizi. Iniziare lentamente con 2-3 are a respirare tranquillamente! sessioni la settimana da 10 minuti ciascuna Riscaldamento della muscolatu- e aumentare progressivamente la frequenza ra delle gambe e l‘intensità degli esercizi. 1. Mettersi in piedi su una gamba e sollevare Tanto più... - Page 20 Avvertenza: per compensazione, allenare Posizione di partenza anche la muscolatura interna delle cosce. 1. Afferrare la sbarra dal basso. Il busto è disteso. Cambiare appoggio, mettere il piede rivolto 2. Mettere un piede in ciascun cappio degli es- verso la porta nel cappio e avvicinarlo a sé. tensori.
- Page 21 4. Spostare le scapole in direzione della colon Attenzione! Osservare la na vertebrale. La testa è in linea con la colon lunghezza massima di distensione. na vertebrale e la spalla rimane in basso. Fissare l‘articolo nella posizione indicata nella 5. Rimanere per qualche istante in questa parte bassa dell‘infisso della porta.
-
Page 22: Stretching
Posizione di partenza Muscolatura delle gambe 1. Mettersi al centro e con le gambe alla larghe- 1. Mettersi in posizione eretta e sollevare un zza delle anche sotto all‘articolo. Il busto è dis- piede dal pavimento. teso e le ginocchia sono leggermente piegate. 2. Muovere lentamente il piede compiendo un 2. - Page 23 Lo stesso vale anche per le parti sostituite o riparate. Le riparazioni dopo la scadenza della garanzia verranno effettuate a pagamento. IAN: 292884 Assistenza Italia Tel.: 02 36003201 E-Mail: deltasport@lidl.it Assistenza Malta Tel.:...
-
Page 24: Material Fornecido
Além disso, o artigo contém peças pequenas Muitos Parabéns! que podem ser ingeridas pelas crianças. Com a sua compra optou por um produto de alta qualidade. Antes de o utilizar pela primeira Indicações de segurança vez, familiarize-se o com o produto. relativas à montagem Para o efeito leia com atenção o seguin- • Atenção! O artigo só pode ser usado te manual de instruções. - Page 25 • Utilize o artigo exclusivamente para a finalida- • As tiras de treino devem ser usadas exclusiva- de prevista. mente em conjunto com a barra para porta. • Este artigo apenas deve ser usado por As tiras de treino não podem ser fixadas pessoas que estejam familiarizadas com as noutros objetos.
-
Page 26: Montagem
• Proteja o artigo de temperaturas elevadas e • Após o bloqueio da barra na armação da da humidade. porta, aperte com firmeza o aparafusamento do arco de segurança. Montagem • Engate os mosquetões das tiras de treino nos olhais dos arcos de segurança. A abertura do Lista de ferramentas mosquetão tem de estar virada para dentro. -
Page 27: Aquecimento
3. Em seguida, troque para a outra perna e Atenção! Evite uma intensidade repita este exercício. de treino demasiado alta! 4. Levante as pernas sucessivamente e dê • Quando começar a treinar são suficientes alguns passos. Certifique-se de que levanta 2-3 minutos por exercício. Quando o treino as pernas apenas até... - Page 28 Fortalecimento dos tríceps (fig. J) 4. Puxe as omoplatas no sentido da coluna. A cabeça está alinhada com a coluna vertebral Atenção! Respeite o comprimento e os ombros permanecem para baixo. de expansão máximo 5. Permaneça nesta posição durante algum tempo Fixe o artigo na posição indicada na parte e regresse lentamente à...
- Page 29 2. Agarre nas argolas das tiras de treino e mant- Importante: Certifique-se de que man- enha o tronco elevado. Os polegares estão tém a coluna direita e os braços junto virados para cima. Os cotovelos estão ligeira ao tronco. mente dobrados e as tiras de treino são estica- Fortalecimento dos abdominais das paralelamente ao chão. frontais (fig. O) Posição final Atenção! Respeite o comprimento...
-
Page 30: Alongamentos
2. Mova-o lentamente em círculos, primeiro num de expirada a garantia, eventuais reparações sentido e depois no outro. implicam o pagamento de custos. 3. Após algum tempo, troque de pé. Importante: Certifique-se de que as IAN: 292884 suas coxas permanecem paralelas. Em- Assistência Portugal purre as costas para a frente, manten- Tel.: 70778 0005 do o tronco direito. -
Page 31: Scope Of Delivery
Safety notes regarding Congratulations! mounting With your purchase you have decided on a high-quality product. Get to know the product • Caution! The article may only be used before you start to use it. with the end caps screwed into the Carefully read the following instructions door frame. for use. • The maximum extension width of 98cm is Use the product only as described and only marked on both end rods, please do not for the given areas of application. -
Page 32: Assembly
• Check the mounting (clamping) before each use. • Do not use the training bands for other • Check the stability again before each use by purposes (e.g. as a tension cable, tow rope, or firmly pulling and shaking the article. similar). -
Page 33: Mounting The Safety Bracket
The screw connection provides great Tighten the door bar so far that it cannot move, security during training and is a manda- even with sudden loads (please note that the tory requirement. door frame can still be deformed despite correct Caution: The drilled holes will cause per- handling). The ends of the door bar must always manent damage to the door frame. lie fully on the door frame. -
Page 34: Suggested Exercises
End position Warming up neck muscles 4. Tense your stomach muscles and pull the foot 1. Turn your head slowly to the left and to the right. with the loop several centimetres away from 2. Repeat this movement 4 - 5 times. you to the side. Your upper body and hips 3. - Page 35 Strengthening your arm and chest Strengthening back muscles muscles (figure K) (figure M) Caution! Please pay attention to Caution! Please pay attention to the maximum extension length the maximum extension length Attach the article to the upper part of the door Attach the article to the lower part of the door frame as illustrated. frame as illustrated. Starting position Starting position 1. Grip the bar from below. Keep your upper 1.
-
Page 36: Stretching
4. Pull your shoulder blades in towards your Starting position spine. Your head is an extension of your spine 1. Stand under the middle of the article with and your shoulders should stay down. your legs hip-width apart. Your upper body is 5. -
Page 37: Care And Storage
Important: Please ensure that your and repaired parts. thighs stay parallel next to one another. Repairs after the warranty are subject to a Push your hips forward and keep your charge. upper body upright. IAN: 292884 Service Great Britain Care and storage Tel.: 0871 5000 720 Please do not forget that regular maintenance (£ 0.10/Min.) and cleaning contribute to the safety and longe- E-Mail: deltasport@lidl.co.uk... -
Page 38: Lieferumfang
Außerdem enthält der Artikel Kleinteile, die von Herzlichen Glückwunsch! Kindern verschluckt werden können. Mit Ihrem Kauf haben Sie sich für einen hoch- Sicherheitshinweise zur wertigen Artikel entschieden. Machen Sie sich vor der ersten Verwendung mit dem Artikel Montage vertraut. • Achtung! Der Artikel darf nur mit im Lesen Sie hierzu aufmerksam die nach- Türrahmen verschraubten Endkappen folgende Gebrauchsanweisung. - Page 39 Verwenden Sie den Artikel nicht, wenn Ihr • Führen Sie die Trainingsbänder immer langsam Körpergewicht darüber liegt. und unter Spannung in die Ausgangsposition • Verwenden Sie den Artikel ausschließlich für zurück. seinen bestimmungsgemäßen Zweck. • Die Trainingsbänder sind ausschließlich für •...
-
Page 40: Montage
Prüfen Sie den Artikel vor jedem Gebrauch auf • Setzen Sie die mitgelieferten Sicherheitsbügel Beschädigungen oder Abnutzungen. auf das Türreck (Abb. D). Die Sicherheit des Artikels kann nur • Anschließend schieben Sie den Sicherheits- gewährleistet werden, wenn er regelmäßig bügel auf die schwarze Endkappe und auf Schäden und Verschleiß... -
Page 41: Aufwärmen
• Tragen Sie bequeme Sportbekleidung und 4. Kreisen Sie abwechselnd Ihren linken und Turnschuhe. rechten Arm vorwärts und nach ca. 1 Minute • Bestimmen Sie die Häufigkeit und Intensität der rückwärts. Übungen selber. Fangen Sie langsam mit Wichtig: Vergessen Sie nicht, ruhig 2- bis 3-mal die Woche, je 10 Minuten an weiter zu atmen! und steigern Sie die Häufigkeit und Übungs- Aufwärmen der Beinmuskulatur... - Page 42 6. Wiederholen Sie diese Übung 10 -15 Mal à Ausgangsposition drei Sätze und wechseln dann das Bein. 1. Greifen Sie die Stange von unten. Der Ober- Hinweis: Als Ausgleichsübung sollte auch die körper ist aufrecht. innenliegende Oberschenkelmuskulatur trainiert 2. Stellen Sie je einen Fuß in eine Trainingsband- werden.
- Page 43 Kräftigung der Rückenmuskulatur Endposition 3. Spannen Sie Arm- und Bauchmuskulatur an (Abb. M) und ziehen Sie die Unterarme nach oben. Achtung! Beachten Sie die Die Oberarme liegen eng am Körper an. maximale Strecklänge Die Handinnenfläche zeigt zu Ihnen. Befestigen Sie den Artikel in dargestellter Positi- 4. Ziehen Sie die Schulterblätter zur Wirbelsäu- on im unteren Teil des Türrahmens.
-
Page 44: Dehnen
2. Führen Sie den rechten Arm hinter den Kopf, Kräftigung der Armmuskulatur bis die rechte Hand zwischen den Schulter- (Abb. P) blättern liegt. Achtung! Beachten Sie die 3. Greifen Sie mit der linken Hand den rechten maximale Strecklänge Ellenbogen und ziehen Sie diesen nach Befestigen Sie den Artikel in dargestellter Positi- hinten. - Page 45 Die Garantiezeit wird durch etwaige Repara- turen aufgrund der Garantie, gesetzlicher Ge- währleistung oder Kulanz nicht verlängert. Dies gilt auch für ersetzte und reparierte Teile. Nach Ablauf der Garantie anfallende Repara- turen sind kostenpflichtig. IAN: 292884 Service Deutschland Tel.: 0800-5435111 E-Mail: deltasport@lidl.de Service Österreich Tel.:...
Need help?
Do you have a question about the 292884 and is the answer not in the manual?
Questions and answers