Table of Contents
Advertisement
Quick Links
Advertisement
Table of Contents

Related Manuals for Lithium Grim Dirty Little JCM


Summary of Contents for Lithium Grim Dirty Little JCM
- Page 1 Dirty Little JCM Building instructions v1.0...
-
Page 2: Table Of Contents
Dirty Little JCM v1.0 Table of contents PCB layout ............................... 3 Components ............................4 Bill of Materials............................5 Power section ............................6 Modifications ............................7 Build sequence ............................8 Off board wiring ............................8 Potentiometers............................ 8 (Foot)switch ............................9 Troubleshooting ............................ 10 Schematic .............................. -
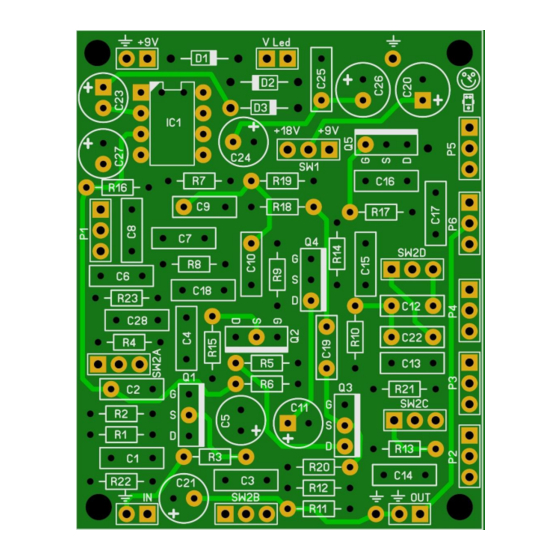
Page 3: Pcb Layout
Dirty Little JCM v1.0 PCB layout Dimensions: 50 mm x 61 mm 1.97 inch x 2.4 inch Manufacturers and product names are mentioned solely for circuit identification, and where applicable their trademarks are the property of their respective owners who are in no way associated or affiliated with the author. No cooperation or endorsement... -
Page 4: Components
Dirty Little JCM v1.0 Components All parts must be rated 25V+ Name Value Comment Name Value Comment Name Value Comment 220n 470k 1N5817 1N5817 680n 820R 1N5817 ICL7660S Or LT1054 GAIN B25K 470p 470k BASS 470k B250K TREBLE 470p 560R... -
Page 5: Bill Of Materials
Dirty Little JCM v1.0 Bill of Materials Capacitors Resistors Amount Part Type Amount Part Type 1 47p Ceramic 1 560R 1% metalfilm 1 220p Ceramic 1 820R 1% metalfilm 1 270p Ceramic 3 1k 1% metalfilm 4 470p Ceramic 2 4k7... -
Page 6: Power Section
Dirty Little JCM v1.0 Power section The effect has been designed to be able to operate on 9V or 18V. SW1 enables you to switch dynamically between these settings. If you do not want to use the switch then do not forget to solder a jumper between the middle pad and the desired voltage pad. -
Page 7: Modifications
Dirty Little JCM v1.0 Modifications The effect can be perceived as dark and wooly. If you experience this, I recommend the following mod (thanks to John Kallas & lvlark on tagboardeffects): C4: 220n C17: 22n C28: 10n ... -
Page 8: Build Sequence
Dirty Little JCM v1.0 Build sequence Soldering this board can be very complicated for some people since the solder pads are very close together. Use a magnifying glass to make the job easier. The trick to soldering a PCB is to work from small to big components. -
Page 9: (Foot)Switch
Dirty Little JCM v1.0 (Foot)switch R led Sleeve Ring Sleeve Note that this wiring is using a sort of star grounding and the output connector must make good electrical contact with the enclosure else the grounding will not work properly and the effect might start to buzz loudly. -
Page 10: Troubleshooting
Dirty Little JCM v1.0 Troubleshooting All PCB’s have been 100% factory e-tested and out of every batch I receive I build an effect to double check, so there should not be a connection problem on the PCB itself. The board is not working (at all), what now? ... -
Page 11: Schematic
Dirty Little JCM v1.0 Schematic Manufacturers and product names are mentioned solely for circuit identification, and where applicable their trademarks are the property of their respective owners who are in no way associated or affiliated with the author. No cooperation or endorsement...
Need help?
Do you have a question about the Dirty Little JCM and is the answer not in the manual?
Questions and answers