FM STG 71 M Instruction Manual
Electric/gas ovens
Hide thumbs
Also See for STG 71 M:
- Instruction manual (28 pages) ,
- Instruction manual (28 pages) ,
- User manual
Table of Contents
Advertisement
Available languages
Available languages
Quick Links
Manual de instrucciones
Instruction manual
Hornos eléctricos/gas – Electric/gas Ovens
Modelos/Models:
STG 71/111 M (eléctrico/gas-electric/gas)
STB 604/606/610 M (eléctrico/gas-electric/gas)
ATENCIÓN: Lea las intrucciones antes de utilizar el aparato.
ATTENTION: Please, read these instructions before using this unit.
Advertisement
Table of Contents

Related Manuals for FM STG 71 M


Summary of Contents for FM STG 71 M
- Page 1 Manual de instrucciones Instruction manual Hornos eléctricos/gas – Electric/gas Ovens Modelos/Models: STG 71/111 M (eléctrico/gas-electric/gas) STB 604/606/610 M (eléctrico/gas-electric/gas) ATENCIÓN: Lea las intrucciones antes de utilizar el aparato. ATTENTION: Please, read these instructions before using this unit.
-
Page 3: Table Of Contents
ÍNDICE/CONTENTS CERTIFICACIÓN CE GARANTÍA NORMAS GENERALES Y NORMAS DE SEGURIDAD INSTRUCCIONES DE SEGURIDAD, TRANSPORTE Y MANTENIMIENTO Desembalaje Transporte Operaciones preliminares Colocación del equipo PUESTA EN MARCHA DEL EQUIPO Conexión eléctrica Entrada de agua Conexión de desagüe Conexión gas INSTRUCCIONES DE USO Primer uso del aparato Uso para cocción Panel de mandos... - Page 4 SAFETY INSTRUCTIONS, TRANSPORT AND MAINTENANCE 11.1 Unpackaging 11.2 Transport 11.3 Preliminary operations 11.4 Placing the unit INSTALLATION 12.1 Electrical connection 12.2 Water inlet 12.3 Draining connection 12.5 Gas connection USE INSTRUCTIONS 13.1 Using the unit for the first time 13.2 Cooking use 13.3 Control panel...
-
Page 5: Certificación Ce
EN 60335-1:2012 / EN 60335-2-42:2003 + Corr:2007 + A1:2008 + A11:2012 / EN 55014-1:2006 + A1:2009 + A2:2011 / EN 55014-2:1997 + A1:2001 + A2:2008 / EN 61000-3-2 :2006 + A1:2009 + A2:2009 / EN 61000-3-3 :2008 Fabricante: FM CALEFACCIÓN S.L. CIF: B-14343594 CTRA. de Rute km.2.700, C.P.:14900, Lucena Dirección: Cordoba, España... -
Page 6: Garantía
2. Garantía La duración de la garantía será de 12 meses a partir de la fecha de compra del equipo. La garantía no cubre los daños de cristal, lámparas, juntas de puerta o deterioro del material aislante o daños imputables a una incorrecta instalación, mantenimiento, reparación inadecuada o ausencia del mismo así como usos indebidos del aparato. -
Page 7: Normas Generales Y Normas De Seguridad
Una instalación que no respete las indicaciones del fabricante podría ocasiones daños, lesiones o accidentes mortales. En caso de instalar el horno sobre soportes o superpuestos, utilice únicamente los suministradas por FM y siga su montaje el cual econtrará dentro del embalaje. ... - Page 8 Todo tipo de averías ocasionadas por la cal o sedimentos del agua quedarán exentas de garantía. El incumplimiento de algunas de estas normas de seguridad exime de toda responsabilidad a FM y hace que la garantía quede invalidada. Cargas máximas en función del tamaño de los equipos CAPACIDAD CARGA MÁXIMA...
- Page 9 Toque únicamente los elementos de control del equipo y la maneta de apertura de puerta. Evite tocar cualquier otro elemento externo del horno, ya que estos pueden llegar a alcanzar temperaturas superiores a 60ºC. Para mover o manipular cualquier recipiente o bandeja dentro de la cámara de cocción, póngase siempre manoplas térmicas o similares.
-
Page 10: Instrucciones De Seguridad, Transporte Y Mantenimiento
No serán válidas, fotografías sólo y exlusivamente del contenido. En cualquiera de los 2 casos descritos, deben comunicar a FM industrial, la incidencia en el transporte, ya que de esta manera se podrán gestionar la reposición de la máquina. -
Page 11: Operaciones Preliminares
4.3 Operaciones preliminares Retire la película de protección del equipo. Limpie los restos de pegamento con disolvente adecuado. No utilizar en ningún caso productos abrasivos o ácidos ni tampoco herramientas que puedan estropear las superficies. 4.4 Colocación del equipo Coloque el horno en el lugar de trabajo elegido, respetando las distancias de seguridad indicadas más adelante. Compruebe que el aparato tenga las suficientes entradas de aire frío por los registros de ventilación que aseguren su buen funcionamiento. - Page 12 Ejemplo de colocación del equipo sin fuentes de calor cercanas. Colocación del equipo junto a fuentes de calor. Panel aislante ignifugo Insulating panel Min, 100mm Min, 700mm Para operaciones de mantenimento recomedamos un espacio libre de trabajo de unos 500 mm. El aparato no es apto para instalación empotrada.
-
Page 13: Puesta En Marcha Del Equipo
5. Puesta en marcha del equipo Para una correcta instalación y puesta en marcha del equipo, deberá seguir los puntos indicados en el “DOCUMENTO DE INSTALACIÓN Y PUESTA EN MARCHA DE EQUIPOS SMART”, incluido en la bolsa junto con este manual de instrucciones. - Page 14 Conexión trifásica 400V conectada a toma trifásica tipo CETAC. TRIFÁSICA 230V Conexión trifásica 230V conectada a toma trifásica tipo CETAC. Con el fin de evitar cualquier peligro debido al rearme accidental del dispositivo térmico de corte, este aparato no debe ser alimentado con un dispositivo de control externo, como un temporizador, ni conectarse a un circuito cuya alimentación se interrumpa con regularidad.
-
Page 15: Entrada De Agua
CODIGO DE COLORES: Negro (L2) Gris (L1) Marrón (L3) FASES Azul (N) NEUTRO Amarillo / Verde TIERRA 5.2 Entrada de agua Se recomienda el uso de un filtro antical en la entrada del suministro de agua y una válvula antirretorno. El horno está... - Page 16 Tipos de desagüe: 1. Desagüe de Pared: La salida de desagüe de pared, debe tener un conducto de ventilación vertical con un diámetro no inferior a 25 mm, el cual debe quedar por encima de la cubierta superior del aparato, tal y como se muestra en la imagen. En caso de no instalar el conducto de ventilación vertical, no se garantiza un correcto drenaje pudiendo provocar averías y la pérdida de la garantía.
- Page 17 2. Desagüe separado con embudo: Desagüe de suelo:...
-
Page 18: Conexión Gas
El incumplimiento de estas normas pueden ocasionar daños y lesiones, dando lugar a la invalidación inmediata de la garantía y eximiendo a FM de toda responsabilidad. Antes de proceder a la conexión, compruebe que el tipo de gas que se va a utilizar, asi como la presión de este, se corresponden con la configuración de uso de su horno, la cual se indica en la etiqueta de características del mismo. - Page 19 Asegurese de que el tubo de gas no pasa cerca de zonas calientes y que no quede expuesto a posibles tracciones, torsiones o aplastamientos. El tubo de alimentación de gas (rigido o flexible) deberá cumplir la normativa nacional vigente y ademas, deberá someterse a las inspecciones periodicas pertientes, asi como ser sustituido en caso necesario.
- Page 20 Evacuación tipo B21: mediante este modo, los gases de combustión son evacuados al exterior a través de una campana de aspiración. La distancia mínima a mantener entre el horno y la campana será de, al menos, 50cm...
-
Page 21: Instrucciones De Uso
6. Instrucciones de uso______________ ____ ¡Atención!!! Lea con detenimiento estas instrucciones antes de poner en funcionamiento el dispositivo. 6.1 Primer uso del aparato Eliminar el film de plástico protector exterior. En caso de quedar algún resto de pegamento, use un disolvente adecuado y posteriormente limpie con jabón y enjuague. -
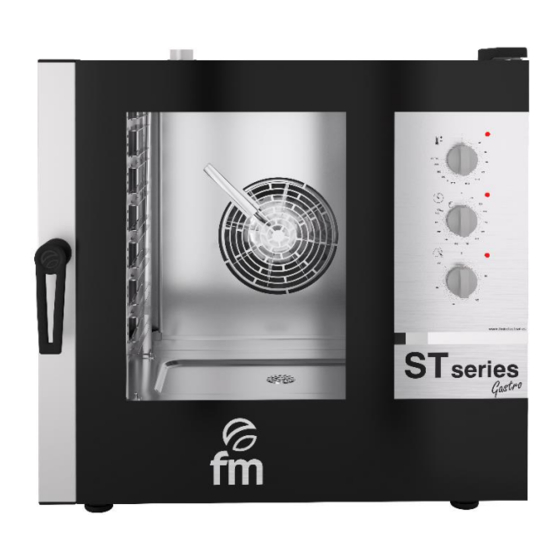
Page 22: Panel De Mandos
Para el uso de productos precongelados, se recomienda descongelar el producto antes de introducirlo en el horno para obtener una mayor uniformidad en la cocción, asi como un menor tiempo de cocción. 6.3 Panel de mandos El panel de control consta de 3 mandos y 3 leds de señalización: Led temperatura Mando regulación temperatura Led encendido... -
Page 23: Regulación Manual Del Tiro De La Chimenea
Humificador: s e controla inyectando agua en la turbina y generando vapor de inmediato para evitar que los alimentos no se resequen. Para activar esta opción gire el mando de la humidificación y seleccione el % de humedad deseado (0-100%). 6.4 Regulación manual del tiro de la chimenea El tiro de la chimena podrá... - Page 24 60 ºC durante al menos 15 min y posteriormente retirar los residuos con un paño húmedo. Puede utilizar detergente FM con la ayuda de un pulverizador, para una mejor limpieza de la cámara de cocción del horno. Advertencia: Póngas guantes de caucho de protección y máscara o gafas de protección antes de manipular estos productos químicos.
-
Page 25: Dudas Más Frecuentes
7. Dudas más frecuentes_______________________________________ A continuación le ofrecemos una lista de causas de fallos más frecuentes y sus posibles soluciones. FALLO CAUSA SOLUCIÓN Falta de tensión de red Verificar tensión de red Conexión red inadecuada Verificar conexión a red Calibre de diferencial inadecuado Verificar calibre diferencial Calibre del térmico inadecuado Verificar calibre térmico... -
Page 26: Ce Certification
EN 55014-1:2006 + A1:2009 + A2:2011 / EN 55014-2:1997 + A1:2001 + A2:2008 / EN 61000-3-2 :2006 + A1:2009 + A2:2009 / EN 61000-3-3 :2008 Manufacturer´s name: FM CALEFACCIÓN S.L. CIF: B-14343594 Manufacturer´s address: CTRA. de Rute km.2.700, C.P.:14900, Lucena Cordoba, España... -
Page 27: Warranty
9. Warranty______ The warranty period is 12 months from the date of purchase of the unit. The warranty does not cover damages to the glass, lamps, door seals, insulating material or damages caused by improper installation, maintenance, or lack of maintenance, repair and misuse. To process the repair of a unit under warranty or for any other query, please contact your distributor and reference to the following description table. -
Page 28: General And Safety Standards
Damages, injuries or fatal accidents could be produced due to the non-observance of the manufacturer’s indications. If the oven is installed on supports or overlaying parts, use the ones supplied by FM only and follow the assembly instructions inside the packaging. ... - Page 29 Faults caused by lime or water sediment are not included in the warranty. Failure to comply with these safety standards will release FM from any responsibility and the warranty will become null and void. Maximum loads CAPACIDAD CARGA MÁXIMA...
-
Page 30: Safety Instructions, Transport And Maintenance
Photographs showing the content only and exclusively will not be accepted. In either case, transport incidences should be reported to FM Industrial to manage the replacement of the machine. If visible damages are detected when receiving the packaged machine, indicate “hits to the oven” at the time of the delivery, take photos of the damages and transport agency label on the packaging. -
Page 31: Preliminary Operations
11.3 Preliminary operations Remove the protection film from the unit. Clean the adhesive residues with an appropriate solvent. Never use abrasive or acid products or tools that may damage the surface. 11.4 Placing the unit Place the oven in the selected work place and keep a safe distance as indicated below. Check that the unit has sufficient cold air inlets through the ventilation registers ensuring correct operation. - Page 32 Example of equipment placement without nearby heat sources. Placement of equipment next to heat sources. Panel aislante ignifugo Insulating panel Min, 100mm Min, 700mm For maintenance operations we recommend a free working space of 500 mm (approximately).
-
Page 33: Installation
Installation _________ 12.1 Electrical connection Before connecting the unit to the power supply, check that the electrical grid characteristics match those described in the technical characteristics of each unit. The electrical installation must be performed by authorised technicians and meet the regulations in force. Preferably, the electrical connection should be performed by mounting and electrical outlet of appropriate type and capacity for the maximum current absorbed by the oven phases. - Page 34 230V three phase connection connected to three phase CETAC type. MATERIAL NOT SUPPLIED THREE PHASE 230V 230V three phase connection connected to three phase CETAC type. MATERIAL NOT SUPPLIED In order to avoid any danger due to accidental rearmament of the thermal cutting device, this device must not be powered by an external control device, such as a timer, or connected to a circuit whose power is interrupted regularly.
-
Page 35: Water Inlet
COLOUR CODE Black (S) Grey (R) Brown (T) PHASES Blue (N) NEUTRAL Yellow / Green GROUNDING 12.2 Water inlet Use anti-lime system before to connect the water pipes to the device, is recommended. The water connection is ¾“. In addition, it is advisable to install a "digimeter" for the liters of water consumed by the oven, and in this way, to know when it is necessary to replace the filter. - Page 36 Types of drains: 3. Wall drain: It must have a vertical ventilation duct with a diameter not less than 25 mm, which must be above the top cover of the oven, as shown in the picture. In case of not installing the vertical ventilation duct, a correct drainage is not warrantyd, being able to cause damages and the loss of the warranty.
- Page 37 4. Drain with separated funnel: MATERIAL NOT SUPPLIED Distance 2,5mm Connection 40mm Connection Floor drain: Clamp Drain pipe Distance 2,5mm...
-
Page 38: Gas Connection
Failure to comply with these regulations may cause damage and injury, resulting in the immediate invalidation of the guarantee and exempting FM from any responsibility. Before proceeding to the connection, check that the type of gas to be used, as well as the pressure of this, correspond to the configuration of use of your oven, which is indicated on the characteristics label of the oven. - Page 39 Make sure that the gas pipe does not pass near hot areas and that it is not exposed to possible tractions, torsions or crushing. The gas supply pipe (rigid or flexible) must comply with current national regulations and, in addition, must undergo appropriate periodic inspections, as well as be replaced if necessary.
- Page 40 Type evacuation B21: by this way, the flue gases are evacuated to the outside through a suction hood. The minimum distance to keep between the oven and the hood will be at least 50cm.
-
Page 41: Use Instructions
Use instructions______________ Attention! Please, read these instructions thoroughly before starting the device. 13.1 Using the unit for the first time Remove the external protection film. If there are adhesive residues, use an appropriate solvent and then, rinse with a damp cloth. The inner chamber and trays should be washed with water and soap and then, work at a 200ª... -
Page 42: Control Panel
13.3 Control panel The control panel consists of the following elements: Temperature led Temperature control On led Time control Humidity led Humidity control There are three variables that can be adjusted by the user: time, temperature and humidity. These variables depend on the type of food and the quantity in the oven. -
Page 43: Manual Regulation Of Chimney Valve
Humidity: is controlled by injecting water into the turbines, and generating steam to avoid food drying. It’s possible to regulate the value of the humidity between 0 to 100%. This regulation takes continuous moisture injection cycles, depending on the programmed percentage. For continuous functioning turn the knob to the left to 100%. 13.4 Manual regulation of chimney valve The chimney can keep it open or closed during cooking. - Page 44 You can use FM detergent with a sprayer, for a better cleaning of the oven's cooking chamber. Warning: Put on protective rubber gloves and mask or goggles before handling these chemicals.
-
Page 45: Frecuently Asked Questions
Frecuently asked questions______________________________ Attached below you will find a list with the most common problems as well as their solution. FAILURE CAUSE SOLUTION No mains voltage Check the mains voltage Inappropriate power connection Check the mains connection Reset the thermostat at the front. If the failure persists, The unit does not contact a specialised technician.
Need help?
Do you have a question about the STG 71 M and is the answer not in the manual?
Questions and answers