Controlli MVH56E Series Mounting Instructions
Valve actuators with emergency fail safe function
Hide thumbs
Also See for MVH56E Series:
- Instructions manual (7 pages) ,
- Mounting instructions (7 pages)
Advertisement
Quick Links
Servocomandi per valvole con dispositivo di ritorno in
emergenza / Valve actuators with emergency fail safe function
ISTRUZIONI DI MONTAGGIO / MOUNTING INSTRUCTIONS
INSTALLAZIONE
Il fluido all'interno della valvola può essere
molto caldo. Prima di rimuovere il servoco-
mando o aprire la valvola, assicurarsi che il
fluido sia isolato e togliere pressione alla val-
vola. L'operazione dovrebbe essere eseguita
da personale esperto.
Attenzione: Non utilizzare il
servocomando disaccoppiato dalla valvola.
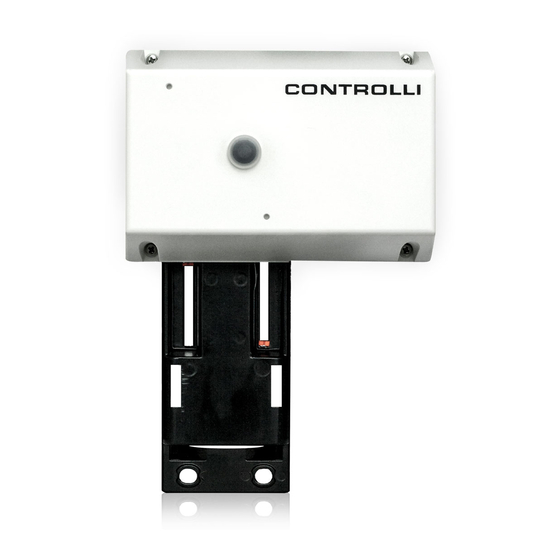
MVH56EA
1
Per valvole corsa 16 e 25mm
• Alzare lo stelo della valvola;
• bloccare la prolunga stelo c sulla cre-
magliera in posizione tutta alzata inter-
ponendo il disco indice a, la rondella
dentellata b ed il dado f posizionato
a circa metà della prolunga stessa.
1a
Per valvole corsa 45mm
• Alzare lo stelo della valvola;
• bloccare la prolunga stelo c sulla
cremagliera in posizione tutta alzata
interponendo il disco indice a e la
rondella dentellata b.
2
Accoppiare il servocomando alla
valvola mediante la forcella (d) e
i due dadi (e) ma senza bloccare
i dadi.
1
Emissione / 1
Issue rev. c
a
st
08/2020
CONTROLLI S.p.A. - 16010 Sant'Olcese (GE) - Italy
Tel. +39 010 73061 | Fax +39 010 7306870/871
info@controlli.eu | www.controlli.eu
MVH56Ex
INSTALLATION
Hot media hazard. Before removing actuator
from valve or opening the valve, ensure that
the valve control medium is isolated and
remove the pressure. Work should only be
carried out by a competent engineer.
Note: do not use the actuator dis-
assembled from the valve.
For valve with 16 and 25mm stroke
• Rise the valve stem;
• Lock the stem extension c on the rack
completely retracted placing the
indicator disk a, the jagged washer
b and the nut f positioned half of the
extension itself.
For valves with 45mm stroke
•
Rise the valve stem;
• lock the stem extension c on the rack
completely retracted placing the indi-
cator disk a and the jagged washer b.
Assemble the actuator to the
valve by U-bolt (d) and the two
nuts (e) without locking the nuts.
1
DIM262
Advertisement

Related Manuals for Controlli MVH56E Series


Summary of Contents for Controlli MVH56E Series
- Page 1 (e) ma senza bloccare nuts (e) without locking the nuts. i dadi. Emissione / 1 Issue rev. c 08/2020 DIM262 CONTROLLI S.p.A. - 16010 Sant’Olcese (GE) - Italy Tel. +39 010 73061 | Fax +39 010 7306870/871 info@controlli.eu | www.controlli.eu...
- Page 2 • Sollevare lo stelo della valvola. • Raise the valve stem. • Togliere il coperchietto e ruotare il per- • Remove the cover and rotate the pivot no in senso orario facendo fuoriuscire clockwise so that the rack comes out la cremagliera di quanto basta per ac- for assembling it with the valve stem;...
- Page 3 Avvitare la prolunga stelo sullo stelo della Screw the extension on the valve stem until valvola fino a che la gola presente alla base the groove on the actuator base coincides del servocomando coincida con quella with the one on the valve, then lock the ex- presente sulla valvola, quindi bloccare la tension tightening the nut on the stem.
- Page 4 Output 200m (AWG20) (AWG20) feedback Signal (Comune) (Common) Corrispondenza morsetti rispetto alle altre linee di prodotto Terminals correspondence with respect to other Controlli ac- attuatori Controlli. tuators models. DMVE DMVE RELE' DI CHIUSURA CLOSING RELAY RELE' DI APERTURA OPENING RELAY...
- Page 5 Comando flottante a 3 punti 3-point floating control Comando flottante a 3 punti (Connessione sink) 3- point floating control (Sink connection) (Connessione sink) (sink connection) 24Vac/24Vdc 24Vac/24Vdc Controllore(*) MVH56Ex Controller(*) MVH56Ex APRI OPEN CHIUDI CLOSE Comando flottante a 3 punti 3-point floating control Comando flottante a 3 punti (Connessione source) 3- point floating control (Source connection)
- Page 6 REGOLAZIONE DEGLI INTERRUTTORI DIP E DEL JUMPER DIP SWITCHES AND JUMPER SETTINGS Impostazioni di fabbrica Factory settings Impostare gli interruttori DIP secondo Set the DIP switches according to the le seguenti tabelle. Per fare in modo tables here below. In order to be sure che le impostazioni vengano recepite that any modification has been ac- è...
- Page 7 Dip switch Direct Action Reverse Action MVH56EA U = 2V U = 10V U= feedback U= feedback U = 10V U = 2V Reverse Action Direct Action MVH56EC U = 10V U = 2V U= feedback U= feedback U = 2V U = 10V Modulating Control (MOD) (Input between Y [+] and M 3 point floating (INC) ( Y1 open , Y2 close connected L1...
- Page 8 DIAGNOSTICA - FUNZIONE ALLARMI (VIA LED) / DIAGNOSTIC - ALARM FUNCTIONS (VIA LED) Comportamento dell’attuatore Comportamento UTILIZZO Possibile Procedura di N° ERRORE Apprendimento corsa Apprendimento corsa ATTUATORE problema ripristino automatico manuale (DIP n. 7 OFF) (DIP n. 7 ON) L’attuatore spinge e tira 5 volte (scontro L’attuatore spinge e inatteso) per tentare di...
- Page 9 Actuator Behaviour Typical trouble Reset N° Error Actuator use Automatic Calibration Manual Calibration behaviour shooting procedure DIP N. 7 OFF DIP N. 7 ON condition The actuator pushes/pulls 5 times (unexpected stall) The actuator pushes/pulls 2 trying to remove the possible times against endpoint during obstacle.
Need help?
Do you have a question about the MVH56E Series and is the answer not in the manual?
Questions and answers