
Related Manuals for Prolux 2.0-B


Summary of Contents for Prolux 2.0-B
- Page 1 PROLUX 2.0 BAGLESS BACKPACK VACUUM CLEANER MODEL: 2.0-B Operation Manual Read all instructions before using this appliance For your safety please read the owner's manual in its entirety before use. Rev. 5/1/19...
- Page 2 50% less cleaning time! Weighing only 9lbs., and with 125 CFM, this vacuum is over 40% lighter and more powerful than the competition! The Prolux 2.0 comes with a 5-year motor warranty, and thanks to its state-of-the-art Motor Bypass Technology, you won’t have to worry about overheating due to a clogged hose.
-
Page 3: Table Of Contents
Table of contents Specifications Safety Precautions Assembly Getting To Know Your Vacuum Using The Accessories & Tools Operation Operating Instructions/Adjusting The Harness Maintenance Charging The Battery Pack Emptying The Dust/Dirt Container Changing/Cleaning The Intake Vortex Filter Changing/Cleaning The HEPA Exhaust Filter Cleaning The Housing Troubleshooting Warranty... -
Page 4: Specifications
● 3-Stage filtration: ○ HEPA H13 Filter, which keeps the air clean with 99.95% efficiency ○ Patented Prolux Cyclonic Filtration Technology © ○ Micron Filter ● Two (2) 30 minute 25.2V Li-ion batteries for up to one hour of cleaning time ●... -
Page 5: Safety Precautions
IMPORTANT SAFETY INSTRUCTIONS READ ALL INSTRUCTIONS IN THIS OPERATING MANUAL BEFORE USING THIS APPLIANCE. When using an electrical appliance, basic precautions should always be followed, including the following: Keep the operating manual for reference. Include the operating manual if you pass the appliance to third parties. Violations of the operating instructions can lead to severe injuries as well as damage to the appliance. - Page 6 Do not vacuum or clean: Hair and other parts of the body. They could be sucked in and cause injury. Pieces of Clothing (e, g, shoe laces, scarves, etc.). They could be sucked in and cause injury. Water and other liquids, especially moisture from carpet cleaning agents. Moisture inside the appliance can lead to short-circuiting.
-
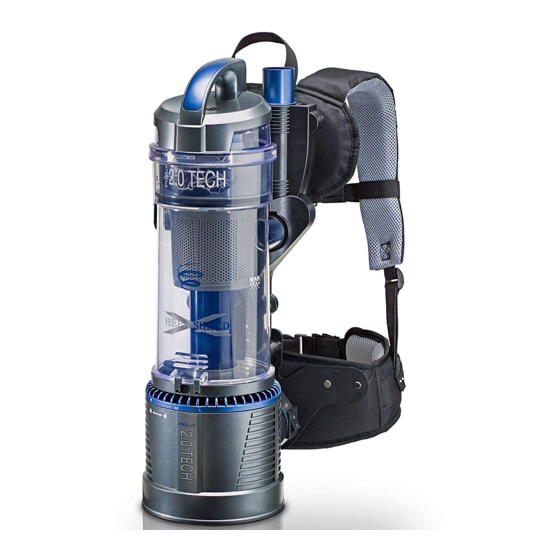
Page 7: Getting To Know Your Vacuum
GETTING TO KNOW YOUR BACKPACK VACUUM 1. Main Motor Unit 2. Dust Container 3. Flexible Hose 4. Shoulder Straps 5. Exhaust HEPA Filter 6. Air Inlet Vortex Filter 7. Carpet/Floor Brush 8. Crevice Tool 9. Upholstery/Pet Hair tool 10. Dusting Brush 11. - Page 8 ASSEMBLY AND OPERATING INSTRUCTIONS NOTE: Always remove the power plug from the wall outlet before assembling or removing accessories. ATTACHING THE FLEXIBLE HOSE & TELESCOPIC WAND TO THE VACUUM The flexible hose should be connected before strapping the unit on. 1.
- Page 9 - 8 -...
-
Page 10: Using The Accessories & Tools
Always test a surface in an area that cannot be seen before use. CARPET/FLOOR BRUSH The Prolux 2.0 includes a specially designed floor tool that can be used on any surface without switching attachments. Easily transition between high pile carpets, low pile carpets, and hard floor surfaces. (Fig 6) - Page 11 - 10 -...
- Page 12 When vacuuming with your Prolux 2.0, you may vacuum using the standard forward and backwards vacuuming motion as you would with standard vacuum cleaners. However, because of the new Prolux 2.0 floor tool design, you can vacuum an area by vacuuming in half circle motions and vacuum the same area twice as fast.
- Page 13 USING YOUR VACUUM 1. Insert the battery into the vacuum 2. Connect hose and telescopic tube if desired. 3. Correctly place shoulder straps on each shoulder and secure the waistband strap. (Fig 8 through Fig 8b) Caution: I f the waistband and both shoulder straps are not properly and securely in place, the unit could fall off your back, causing damage or injury.
-
Page 14: Charging The Battery Pack
HOW TO CHARGE THE BATTERY PACK When using the charger, basic precautions should always be followed, including the following: BATTERY AND CHARGING SAFETY To reduce the risk of electric shock, fire, battery explosion, or injury: Basic information and warning for the Battery and Charger are contained below. For detailed usage and warning information, read the ... -
Page 15: Operation
SPECIFICATIONS AND PARTS Charger Specification: Charger input: 120V 50/60Hz AC only Charger output: 30V 1A Battery Specification: Lithium Polymer chemistry 25.2V Approximate charge time: 8 hours Approximate run time for new battery: 30 minutes. (1 - Battery pack) (2 - Charger) OPERATION Charge in a well ventilated area. - Page 16 PREPARING BATTERY PACK FOR CHARGING 1. Turn off the power switch. Confirm the switch is in the off position. 2. Unlock the battery pack from the vacuum by pulling up on the metal battery hook located on the top of the battery, and take the battery pack out from the vacuum.
-
Page 17: Emptying The Dust/Dirt Container
HOW TO EMPTY THE DUST CONTAINER The dust container must be emptied as soon as it reaches the “MAX” mark indicated on the outside of the tank, or if the suction power has dropped. To empty the Dust Container, please follow the instructions below: 1. -
Page 18: Changing/Cleaning The Hepa Exhaust Filter
NOTE: T he Prolux Self-Cleaning Vortex filter only needs to be cleaned when the entire surface of the filter becomes dirty. Due to its highly efficient design the Self-Cleaning Vortex filter is three times more efficient than standard filters and will have the same amount of airflow whether it’s dirty or clean. The entire surface of the filter will have to be covered in debris before the performance of the vacuum is affected, and the filter needs to be cleaned. - Page 19 Troubleshooting WARNING : Never use a defective appliance. Always switch off the appliance and disconnect it from the outlet or remove the battery before you start to troubleshoot. Fault Possible Cause(s) Solution The vacuum will not turn on. The battery is not charged. Make sure the battery is fully charged by plugging the battery into the charger, then plug the...
- Page 20 This warranty is limited solely to the cost of the repair or replacement of the unit at Prolux’s option. This warranty does not cover normal wear of parts and does not apply to any unit that has been tampered (by unauthorized user) with or used for commercial purposes.
- Page 21 Product Warranty Registration Please follow the link below to register your Prolux product: https://proluxcleaners.com/pages/warranty For more information on this product, including warranty info and to contact Prolux Customer Service, follow the link below: https://proluxcleaners.com/collections/backpack-vacuum/products/2018-prolux-2-0-cordless-bagless- backpack-vacuum-with-lithium-ion-battery Environmental tips Once any electronic product is no longer functional, it should be disposed of in such a way as to cause minimum environmental impact, in accordance with the regulations of your local authority.
Need help?
Do you have a question about the 2.0-B and is the answer not in the manual?
Questions and answers