
Related Manuals for Revopoint 3D Technologies POP


Summary of Contents for Revopoint 3D Technologies POP
- Page 1 Product Operation User Guide 3D Scanner Model: POP Version V1.0 Date OCT 26, 2020 Company Revopoint 3D Technologies Inc. Scope POP 3D scanner...
-
Page 2: Table Of Contents
Content 1 Product overview ........................... 1 1.1 Product profile ........................1 1.2 Packing list ........................... 1 1.3 Specifications ........................1 1.4 Computer configuration requirements ................2 1.5 Scannable objects........................ 2 2 Hardware ............................2 2.1 Hardware Profile ......................... 2 2.2 Hardware connection ......................3 3 Software ............................ -
Page 3: Product Overview
1 Product overview 1.1 Product profile The POP 3D scanner adopts proprietary 3D camera module and embedded chip to deliver accurate and fast 3D scan. This scanner is designed compact and portable, with multi-type scanning capability. It meets the requirement for product development, prototyping, 3D printing users, and artistic creation. -
Page 4: Computer Configuration Requirements
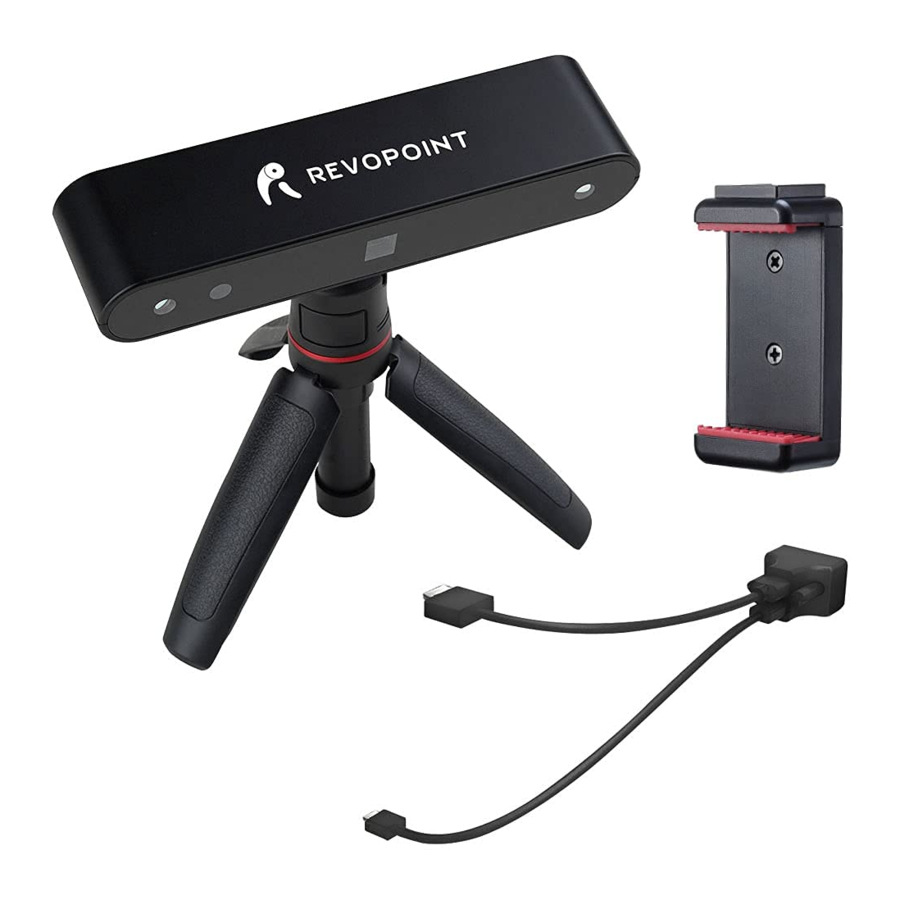
Product Operation User Guide Special object scanning For the transparent and highly reflective objects, please spray powder before scanning Outdoor scanning Cover is needed to avoid interference of strong light Scanner weight ≤100g Dimensions (mm) 154.6x38.2x25.6 Printable data output Able to export 3D model directly to 3D printing Required computer configurations Windows 8\10, 64-bit Wifi... -
Page 5: Hardware Connection
Product Operation User Guide 2.2 Hardware connection 3 Software 3.1 Obtaining software Find the software installation package (Handyscan.exe) in the USB flash disk, or download it on our official website. 3.2 Software installation Double-click the Handyscan.exe. Read the agreement and choose “I accept the agreement”, and then click “Next” to finish installation.After the installation is finished, two software shortcuts will be generated as follows: scanning software ,and the post-processing... -
Page 6: Software Interface
Double click , the following UI is shown. (1) Top navigation bar includes: Status (Preview-Scan-Finish), model type POP and About buttons; (2) Scanning distance prompt: (Scanning distance: Too near, Excellent, Good, Too Far, when the scanning distance is in the Excellent zone, the result is appropriate, when it is too close or too far, red color will be displayed. -
Page 7: Start Scanning
Product Operation User Guide 4 Start scanning 4.1 Create a new project Name the project or import a model. Select alignment method: feature alignment (suitable for object with rich shape features on the surface) , marker alignment and portrait mode. Select scan mode: no colour scan (without texture) , texture scan (with color texture). -
Page 8: Open A Project
Product Operation User Guide 4.2 Open a project ★You can import a 3D file(.ply) that has been scanned before and capture a second scan. 5.3 Scan preview Adjust the camera parameters in the left preview box. Two tuning modes are supported: manual and auto. In manual mode: the brightness value and the gain value can be set manually. -
Page 9: Start Scanning
Product Operation User Guide please keep gain to 1 while tuning brightness to an appropriate value. To reach high scan speed, please try gain 2 or 3 while keeping brightness value as small as possible. In auto mode, please place the object to be scanned in front of the scanner. Choosing “auto” and gain value, the brightness value will be selected automatically. - Page 10 Product Operation User Guide When this prompt appears, you need to return to the previous scanned area and re-align the model to continue the scan. Too few points ② When this prompt appears, check whether the distance between the scanner and the object is too close or too far, adjust the distance to the appropriate range before scanning.
-
Page 11: Finish Scanning
Product Operation User Guide This prompt appears when alignment error occurs in the case of scanning planes or objects with few features. To solve this problem, you can attach markers to the object surface, and select marker alignment mode before scanning. 4.4 Finish scanning Click the "Stop"... -
Page 12: Meshing
Product Operation User Guide 4.5 Meshing Click the "Mesh" button to start converting the scanned point cloud into mesh. -
Page 13: Texturing
Product Operation User Guide 4.6 Texturing The texture function only applies to the color scan mode. Click the "Texture" button , the texture mapping will then be processed.. -
Page 14: Export
Product Operation User Guide 4.7 Export Click the "Export" button , select the file type and a location for the files to be saved, and name the file, to export the 3D model data. The file formats of “obj, stl, ply” are supported. -
Page 15: Post-Processing
Product Operation User Guide 5 Post-processing Double click to open the post-processing software:3DModelProcess ① Click the drop-down button next to "Model" button and select local model ; ② Model processing: single model and multi-model processing are supported; ③ The "Process" button at the bottom of the menu bar is for single-model processing, and the "Merge" button is for multi- model processing, you can select between the two;... -
Page 16: Precautions
Product Operation User Guide scanning. 7 Precautions (1) Please use the device indoors at the temperature of -10°~35°. The scanning effect would be better under dark light. If you need to use it outdoors, please block the sunlight and ambient light properly. (2) Do not dismantle or modify the device. - Page 17 Federal Communications Commission (FCC) Statement. This device complies with part 15 of the FCC Rules. Operation is subject to the following twoconditions: (1) This device may not cause harmful interference, and (2) this device must accept any interference received, including interference that may cause undesired operation. Note: This equipment has been tested and found to comply with the limits for a Class B digital device, pursuant to part 15 of the FCC Rules.
Need help?
Do you have a question about the POP and is the answer not in the manual?
Questions and answers