Advertisement
Table of Contents
- 1 Top Panel
- 2 Panel Descriptions
- 3 Rear Panel
- 4 Side Panel
- 5 AUX in Jack
- 6 PHONES Jack
- 7 Ground Terminal
- 8 Getting Ready
- 9 Basic Operation
- 10 Parameter List
- 11 Noise Suppressor
- 12 Output Select
- 13 MIDI Pc Map
- 14 Attaching the Rubber Feet
- 15 Main Specifications
- 16 Using the Unit Safely/Important Notes
- Download this manual
Owner's Manual
Loading IR data
Use the dedicated IR loader (software) to load IR data into this device.
You can download the dedicated IR loader from the BOSS website.
&
http://www.boss.info/support/
Before using this unit, carefully read "USING THE UNIT SAFELY" and "IMPORTANT NOTES" (the leaflet "USING THE UNIT SAFELY" and the Owner's
Manual (p. 24)). After reading, keep the document(s) where it will be available for immediate reference.
© 2021 Roland Corporation
Advertisement
Table of Contents

Related Manuals for Boss IR-200


Summary of Contents for Boss IR-200
- Page 1 Owner’s Manual Loading IR data Use the dedicated IR loader (software) to load IR data into this device. You can download the dedicated IR loader from the BOSS website. & http://www.boss.info/support/ Before using this unit, carefully read “USING THE UNIT SAFELY” and “IMPORTANT NOTES” (the leaflet “USING THE UNIT SAFELY” and the Owner’s Manual (p.
-
Page 2: Top Panel
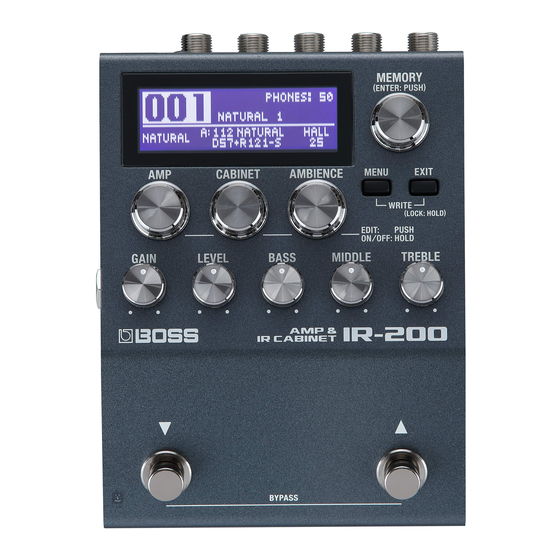
Panel Descriptions Top Panel Display The memory number and name are shown on the play screen. Memory number Memory name Headphone volume The screen changes each time you AMP type hold down the [MEMORY] knob. Cabinet type Ambience level This shows the parameters and values when you are editing. - Page 3 Panel Descriptions [AMP] knob [MENU] button (*1) (*2) Selects the amp type. The menu screen appears. [CABINET] knob [EXIT] button (*1) (*2) Selects the cabinet type. Returns you to the previous screen. In some screens, this cancels the operation currently being executed. Useful function: FAVORITE [GAIN] knob Turn FAVORITE on to make it easier to select the cabinets you like.
-
Page 4: Panel Descriptions
Panel Descriptions Rear Panel SEND jack / RETURN jack Connect an external effect unit to these jacks. * To prevent malfunction and equipment failure, always turn down the * To use these jacks, you need to configure the SEND/RETURN volume, and turn off all the units before making any connections. (p. -
Page 5: Side Panel
Panel Descriptions Turning On/Off the Power Side Panel * Once everything is properly connected, be sure to follow the procedure below to turn on their power. If you turn on equipment in the wrong order, you risk causing malfunction or equipment failure. -
Page 6: Ground Terminal
Panel Descriptions Getting Ready CTL 1,2/EXP jacks Using the jack as CTL 1, 2 Set the type of amp that you’ll connect to the OUTPUT You can connect a footswitch (sold separately: FS-5U, FS-6, (A/MONO, B) jacks. or FS-7) and use it to switch the SOLO SW ON/OFF or switch memories (p. - Page 7 Editing the Memory Turn these knobs to edit the amp and cabinet types, and to adjust the ambience level. Memory [AMP] knob [CABINET] knob [AMBIENCE] knob Turn: Type select Turn: Type select Turn: Effect level Push: Push: Push: Edit screen Edit screen Edit screen Long-press:...
- Page 8 Editing the Memory Press the [MENU] button. Turn the [MEMORY] knob to switch between pages for edit screens with multiple pages. The MENU screen appears. MEMO Use the [MEMORY] knob to select page 1, and 5 Press the [EXIT] button to return to the previous screen. push the knob below the “MEMORY”...
- Page 9 Saving and Switching Memories Saving to Memory Switching Memories (WRITE) Here’s how to recall a saved memory. You can save the settings for the effects you edit. Push the [MEMORY] knob to move the cursor to Press the [MENU] button and [EXIT] button the memory number.
- Page 10 Saving and Switching Memories Exchanging Memories Initializing a Memory (EXCHANGE) (INITIALIZE) Press the [MENU] button and [EXIT] button Press the [MENU] button and [EXIT] button simultaneously. simultaneously. The WRITE UTILITY screen appears. The WRITE UTILITY screen appears. Push the knob below the “EXCHANGE” Push the knob below the “INITIALIZE”...
- Page 11 SEND RETURN MONO STEREO USB parameter EFX OUT MIX IN LEVEL LEVEL DRYOUT EFX IN LOOP BACK LEVEL LEVEL LOOP BACK LEVEL *1 Only supported by the VENDOR driver (IR-200 driver) for Windows and mac OS. Not supported by iOS.
-
Page 12: Basic Operation
Configuring the Settings (Menu) The memory settings are stored individually in each Assigning functions to external pedals memory. Settings aside from memory-related settings You can switch the amp SOLO switch on/off or switch between are saved as overall device settings. memories if you connect a footswitch ( sold separately: FS-5U, FS-6, or FS-7 ) to the CTL 1, 2/EXP jack. -
Page 13: Parameter List
Configuring the Settings (Menu) Parameter List Parameter Value * See the block diagram as well for more information on how the IR-200 is See the sound list on the BOSS website for details on configured internally. the built-in amp types. - Page 14 RETURN jack and the input to SEND/RETURN (the direct sound) will be mixed and output following SEND/RETURN. Use this when you want to mix the IR-200’s effects sounds together with the sound with the external effects device applied to it. SEND...
- Page 15 CABINET A. 20.0Hz–16.0kHz: Specifies the center of the LM FREQ See the sound list on the BOSS website for details on frequency range that will be adjusted by the LOW- (LOW-MID FREQ) the built-in cab types. MID GAIN.
- Page 16 CABI- EQ B ENCE EQ B OUT B NET B THRU, ROOM, STUDIO, HALL See the sound list on the BOSS website for details on TYPE the built-in ambience types. & http://www.boss.info/support/ TIME 0.1–10.0 s: Adjusts the reverberation length (time).
- Page 17 Configuring the Settings (Menu) Parameter Value Parameter Value TONE -50–+50: Adjusts the reverberation’s tonal character. 0–100 (FUNCTION = AMP GAIN: 0–120): Configures the upper limit of the variable range for 0–100: Adjusts the reverberation volume. LEVEL (EFFECT LEVEL) the parameter that is operated with the expression pedal.
-
Page 18: Output Select
Configuring the Settings (Menu) OUTPUT SELECT Parameter Value Selects the type of amp that is connected. STACK INPUT: Use this setting when connecting to the INPUT of the guitar amp in a stack-type amp. A: TYPE Parameter Value BASS AMP W/TWET: Use this setting when connecting to a tweeter-equipped bass amp. - Page 19 At this time, the input sound from the MIX IN (MIX IN LEVEL) ON, OFF computer is mixed at the final stage of the IR-200’s MAIN OUT. LOOPBK SW OFF, ON: Turn this on to send (loop back) the input sound from your computer back to the computer.
- Page 20 Configuring the Settings (Menu) Parameter Value Parameter Value CONTRAST 1–16: Here you can adjust the brightness of the SOLO SW CC OFF, #1–31, #64–95: Sets the CC number used characters in the display. when the SOLO switch is controlled via MIDI. (LCD CONTRAST) (AMP SOLO SW CC) SOLO LV CC...
-
Page 21: Midi Pc Map
When switching memories using Program Change messages transmitted by an external MIDI device, you can freely set the correspondence between Program Change messages received by the IR-200 and the memories to be switched to in the “Program Change Map. ” Parameter Value 1–128:... - Page 22 Returning to the Factory Settings (Factory Reset) Use the dedicated IR loader (software) to back up and Here’s how to return the IR-200 to its factory-set state. restore the IR-200’s data. You can restore the system or individual memories to You can download the dedicated IR loader from the their factory defaults.
-
Page 23: Attaching The Rubber Feet
Appendix Attaching the Rubber Feet Main Specifications You can attach the rubber feet (included) if necessary. AC Adaptor Power Supply Attach them in the locations shown in the illustration. 335 mA Current Draw Excluding rubber feet: * When turning the unit over, be careful so as to protect the buttons and x 138 x 63 mm /... -
Page 24: Using The Unit Safely/Important Notes
USING THE UNIT SAFELY/IMPORTANT NOTES WARNING CAUTION Concerning the Auto Off function Keep small items out of the reach of children The power to this unit will be turned off To prevent accidental ingestion of the parts listed automatically after a predetermined amount of below, always keep them out of the reach of small time has passed since it was last used for playing children. - Page 25 Roland assumes no liability concerning the 2.0 granted by the T-Engine Forum (www.tron.org). restoration of any stored content that has been lost. • Roland, BOSS are either registered trademarks or trademarks of Additional Precautions Roland Corporation in the United States and/or other countries.
- Page 26 MEMO...
Need help?
Do you have a question about the IR-200 and is the answer not in the manual?
Questions and answers