BOSS RC-1 - Loop Station Manual
- Owner's manual (2 pages) ,
- Manual (2 pages) ,
- Owner's manual (1 page)
Advertisement
- 1 Panel Descriptions
- 2 Precautions When Connecting
- 3 Caution When Connecting an External Footswitch
- 4 Turning On the Power
- 5 Basic Operation
- 6 Deleting a Phrase
- 7 Cancelling an Overdub (Undo/Redo)
- 8 Connecting to an External Footswitch
- 9 Changing the Recording Mode/Stop Mode/Display Mode
- 10 Changing the Battery
- 11 Specifications
- 12 About the Battery
- 13 Repairs and Data
- 14 Documents / Resources
Before using this unit, carefully read the sections entitled: "USING THE UNIT SAFELY" and "IMPORTANT NOTES" (supplied on a separate sheet). After reading, keep the document(s) where it will be available for immediate reference.
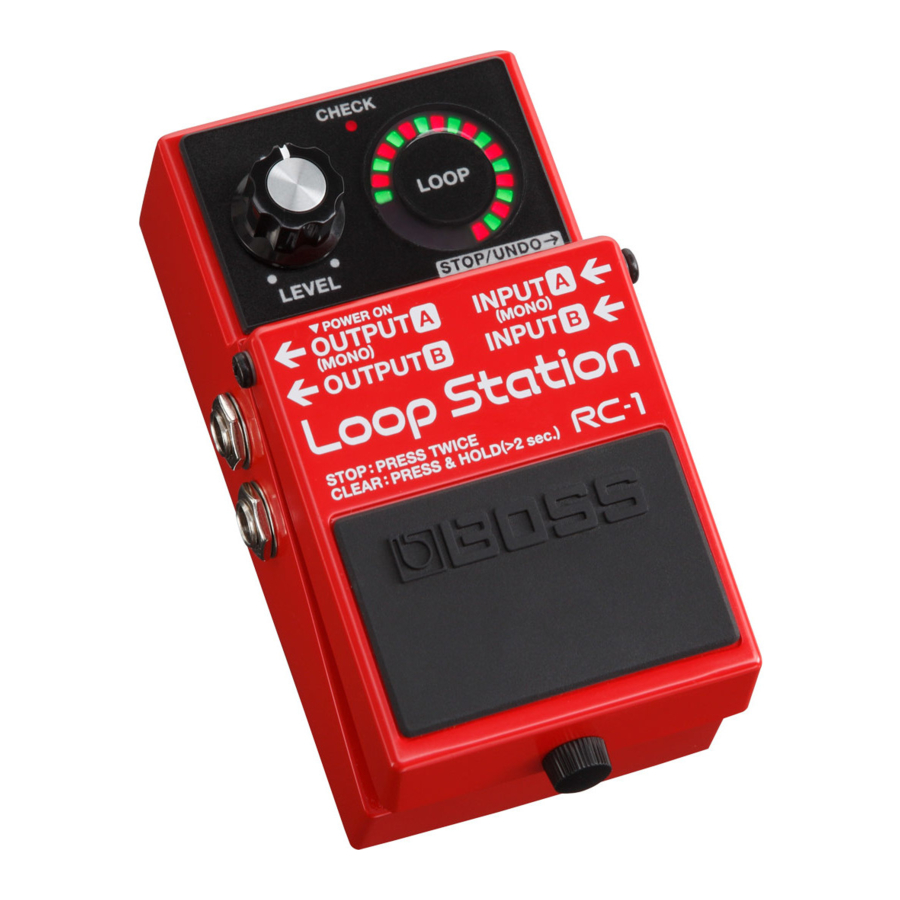
Panel Descriptions

Precautions When Connecting
- To prevent malfunction and equipment failure, always turn down the volume, and turn off all the units before making any connections.
- Raise the amp volume only after turning on the power to all connected devices.
- When operating on battery power only, the unit's indicator will become dim when battery power gets too low. Replace the battery as soon as possible.
- When connection cables with resistors are used, the volume level of equipment connected to the INPUT jacks may be low. If this happens, use connection cables that do not contain resistors.
Caution When Connecting an External Footswitch
You must power-off the unit before connecting an external footswitch.
If you connect the footswitch while the power is on, recorded data might be lost.
Turning On the Power
Inserting a connecting plug into the OUTPUT A jack turns on the power to the unit.
Once the connections have been completed, turn on power to your various devices in the order specified. By turning on devices in the wrong order, you risk causing malfunction and/or damage to speakers and other devices.
When powering up: Turn on the power to your guitar amp last.
When powering down: Turn off the power to your guitar amp first.
- This unit is equipped with a protection circuit. A brief interval (a few seconds) after power up is required before the unit will operate normally.
- Before turning the unit on/off, always be sure to turn the volume down. Even with the volume turned down, you might hear some sound when switching the unit on/off. However, this is normal and does not indicate a malfunction.

when turning off the power
Never turn off the power while the LOOP indicator is rotating or blinking (i.e., don't pull the plug out of the OUTPUT A jack). The recorded data might be lost if you do so.
Basic Operation
To perform recording, overdubbing, and playback, press the pedal as shown in the diagram.

MEMO
- If a footswitch is connected to the STOP/UNDO jack, you can stop by pressing the footswitch just once.
- The recorded phrase is saved even if you turn off the power.
NOTE
- The minimum recording time for a loop phrase is approximately 0.25 seconds. If you press the pedal within approximately 0.25 seconds after you start recording, recording will continue until the phrase is at least approximately 0.25 seconds long.
- The maximum recording time for a loop phrase is approximately 12 minutes (stereo). If you exceed the maximum recording time, recording or overdubbing is interrupted, and operation changes to loop playback.
- Roland assumes no liability concerning the restoration of any stored content that has been lost.
Deleting a Phrase
The recorded phrase is erased if you hold down the pedal for two seconds or longer while stopped.
During erasure, the LOOP indicator (red) blinks rapidly.
- Never turn off the power while the LOOP indicator (red) is blinking rapidly. The recorded data might be lost if you do so.
- The phrase plays while you hold down the pedal. If you want to erase the phrase without playing it, use an external footswitch to stop the phrase.
Cancelling an Overdub (Undo/Redo)
You can undo/redo by holding down the pedal for two seconds or longer during overdubbing or playback.
| Operation | Explanation |
| Undo | Cancels the last recording or overdub. |
| Redo | To bring back the cancelled sound, hold down the pedal once again for two seconds or longer during playback.
|
During undo/redo, the LOOP indicator (green) blinks rapidly.
Connecting to an External Footswitch
Connect your footswitch to the STOP/UNDO jack as shown in the illustration, and set its POLARITY switch.

- The FS-5L cannot be used.
| Footswitch | Operation |
| FS-5U | Stop Erase the phrase |
| FS-5U/FS-7 pedal connected to the stereo L side | |
| FS-6's pedal B | |
| FS-5U/FS-7 pedal connected to the stereo R side | Undo/Redo You can undo/redo by pressing the footswitch. |
| FS-6's pedal A |
Changing the Recording Mode/Stop Mode/Display Mode
- While holding down the pedal switch, turn the power on (insert a plug into the OUTPUT A jack).
The LOOP indicator (red) lights, indicating the current recording mode.Recording mode Explanation Red ![]()
Upper halfSwitch in the order of recording → overdubbing → playback. ![]()
Lower halfSwitch in the order of recording → playback → overdubbing (default setting). - Press the pedal switch successively twice (within one second) to change the recording mode.
- Press the pedal switch.
The LOOP indicator (green) lights, indicating the current stop mode.Stop mode Explanation Green ![]()
Upper halfPress the pedal switch successively twice to stop immediately (default setting). ![]()
Lower halfPress the pedal switch successively twice to enable stopping at the end of the phrase; playback stops when the phrase has played to its end. When playback stops, the phrase is erased.
Operation when stop has been enabled
- The LOOP indicator (green) rotates while blinking.
- Press the pedal switch successively twice to stop immediately and erase the phrase.
- Hold down the pedal switch for two seconds or longer to cancel the stop-enabled state.
- Press the pedal switch successively twice (within one second) to change the stop mode.
- Press the pedal switch.
The LOOP indicator (red and green) lights, indicating the current display mode.Display mode Explanation Red and Green ![]()
Upper halfThe rotational speed of the LOOP indicator changes according to the length of the recorded phrase (default setting). ![]()
Lower halfThe LOOP indicator rotates rapidly; then the playback location blinks. - Press the pedal switch successively twice (within one second) to change the stop mode.
- When the power is turned off and on again, the unit returns to normal operation.


Changing the Battery

- Hold down the pedal and loosen the thumbscrew, then open the pedal upward.
- The pedal can be opened without detaching the thumbscrew completely.
- Remove the old battery from the battery housing, and remove the snap cord connected to it.
- Connect the snap cord to the new battery, and place the battery inside the battery housing.
- Be sure to carefully observe the battery's polarity (+ versus -).
- Slip the coil spring onto the spring base on the back of the pedal, and then close the pedal.
- Carefully avoid getting the snap cord caught in the pedal, coil spring, and battery housing.
- Finally, insert the thumbscrew into the guide bush hole and fasten it securely.
Specifications
| Nominal Input Level | -20 dBu |
| Input Impedance | 1 MΩ |
| Nominal Output Level | -20 dBu |
| Output Impedance | 1 kΩ |
| Recommended Load Impedance | 10 kΩ or greater |
| Maximum Recording Time | Approx. 12 minutes |
| Power Supply | Alkaline battery (9 V, 6LR61) AC Adaptor (PSA series: sold separately) |
| Current Draw | 95 mA
|
| Dimensions | 73 (W) x 129 (D) x 59 (H) mm 2-7/8 (W) x 5-1/8 (D) x 2-3/8 (H) inches |
| Weight | 430 g/1 lb (including battery) |
| Accessories | Leaflet ("USING THE UNIT SAFELY," "IMPORTANT NOTES," and "Information") Alkaline battery (9 V, 6LR61) |
| Options (sold separately) | AC adaptor: PSA series Footswitch: FS-5U, FS-6, FS-7 |
- 0dBu = 0.775 Vrms
- This document explains the specifications of the product at the time that the document was issued. For the latest information, refer to the Roland website.
About the Battery
- Batteries should always be installed or replaced before connecting any other devices. This way, you can prevent malfunction and damage.
- The use of an AC adaptor is recommended as the unit's power consumption is relatively high. Should you prefer to use battery, please use the alkaline battery.
- If you handle batteries improperly, you risk explosion and fluid leakage. Make sure that you carefully observe all of the items related to batteries that are listed in "USING THE UNIT SAFELY" and "IMPORTANT NOTES."
Repairs and Data
- Although we will do our utmost to preserve the data stored in your unit when we carry out repairs, in some cases, such as when the memory section is physically damaged, restoration of the stored content may be impossible. Roland assumes no liability concerning the restoration of any stored content that has been lost.

Documents / ResourcesDownload manual
Here you can download full pdf version of manual, it may contain additional safety instructions, warranty information, FCC rules, etc.
Advertisement


Need help?
Do you have a question about the RC-1 and is the answer not in the manual?
Questions and answers