Table of Contents
Advertisement
Reference Manual
Contents
Getting ready . . . . . . . . . . . . . . . . . . . . . . . . . . . . . . . . . . . . . . . . . . 2
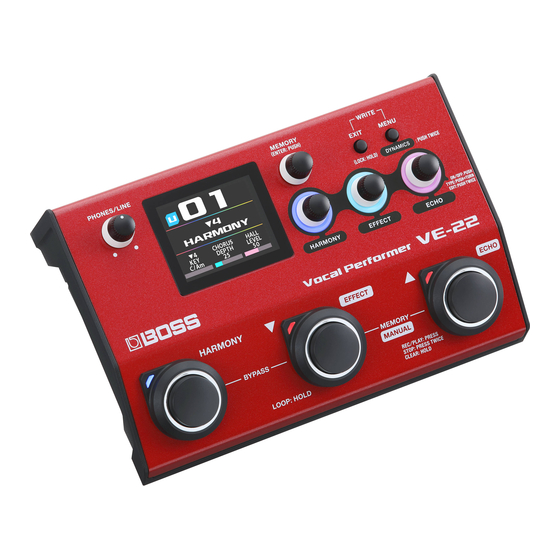
Top panel . . . . . . . . . . . . . . . . . . . . . . . . . . . . . . . . . . . . . . . . . . . . . . . . . .2
Rear panel (connecting your equipment) . . . . . . . . . . . . . . . . . . . . . .3
Installing the batteries . . . . . . . . . . . . . . . . . . . . . . . . . . . . . . . . . . . . . .4
Turning the power on/off . . . . . . . . . . . . . . . . . . . . . . . . . . . . . . . . . . . .4
Phantom power settings . . . . . . . . . . . . . . . . . . . . . . . . . . . . . . . . . . . .4
Basic operation . . . . . . . . . . . . . . . . . . . . . . . . . . . . . . . . . . . . . . . . . 5
Configuring the mic settings (MIC) . . . . . . . . . . . . . . . . . . . . . . . . . . .5
Applying a harmony effect . . . . . . . . . . . . . . . . . . . . . . . . . . . . . . . . . . .6
Editing the memories . . . . . . . . . . . . . . . . . . . . . . . . . . . . . . . . . . . 7
How the memories are structured . . . . . . . . . . . . . . . . . . . . . . . . . . . .7
Switching the pedal mode . . . . . . . . . . . . . . . . . . . . . . . . . . . . . . . . . . .7
Switching between memories . . . . . . . . . . . . . . . . . . . . . . . . . . . . . . . .7
Creating the sound you like . . . . . . . . . . . . . . . . . . . . . . . . . . . . . . . . . .8
Configuring the dynamics . . . . . . . . . . . . . . . . . . . . . . . . . . . . . . . . . . .8
Configuring HARMONY, EFFECT and ECHO . . . . . . . . . . . . . . . . . . . .8
Making settings in MEMORY SETTING . . . . . . . . . . . . . . . . . . . . . . 10
Saving a memory (MEMORY WRITE) . . . . . . . . . . . . . . . . . . . . . . . . 11
Changing the order of memories (MEMORY ORDER) . . . . . . . . . . 11
Initializing memories (MEMORY INITIALIZE) . . . . . . . . . . . . . . . . . 12
© 2024 Roland Corporation
Useful functions . . . . . . . . . . . . . . . . . . . . . . . . . . . . . . . . . . . . . . . 13
MEMORY PEDAL . . . . . . . . . . . . . . . . . . . . . . . . . . . . . . . . . . . . . . . . . . 13
About BPM TAP . . . . . . . . . . . . . . . . . . . . . . . . . . . . . . . . . . . . . . . . . . 13
MANUAL PEDAL . . . . . . . . . . . . . . . . . . . . . . . . . . . . . . . . . . . . . . . . . . 14
CTL 1, 2/EXP . . . . . . . . . . . . . . . . . . . . . . . . . . . . . . . . . . . . . . . . . . . . . . 15
ASSIGN . . . . . . . . . . . . . . . . . . . . . . . . . . . . . . . . . . . . . . . . . . . . . . . . . . 16
Examples of settings . . . . . . . . . . . . . . . . . . . . . . . . . . . . . . . . . . . . . 16
EXP HOLD . . . . . . . . . . . . . . . . . . . . . . . . . . . . . . . . . . . . . . . . . . . . . . . . 21
OUTPUT . . . . . . . . . . . . . . . . . . . . . . . . . . . . . . . . . . . . . . . . . . . . . . . . . 21
Creating a loop phrase (LOOP) . . . . . . . . . . . . . . . . . . . . . . . . . . . . . 22
Getting ready to record . . . . . . . . . . . . . . . . . . . . . . . . . . . . . . . . . . . 22
Recording . . . . . . . . . . . . . . . . . . . . . . . . . . . . . . . . . . . . . . . . . . . . . . . 22
MEMORY EXTENT . . . . . . . . . . . . . . . . . . . . . . . . . . . . . . . . . . . . . . . . . 24
DISPLAY . . . . . . . . . . . . . . . . . . . . . . . . . . . . . . . . . . . . . . . . . . . . . . . . . 24
USB . . . . . . . . . . . . . . . . . . . . . . . . . . . . . . . . . . . . . . . . . . . . . . . . . . . . . . 25
INFO . . . . . . . . . . . . . . . . . . . . . . . . . . . . . . . . . . . . . . . . . . . . . . . . . . . . . 26
FACTORY RESET . . . . . . . . . . . . . . . . . . . . . . . . . . . . . . . . . . . . . . . . . . . 26
Appendix . . . . . . . . . . . . . . . . . . . . . . . . . . . . . . . . . . . . . . . . . . . . . 27
Main specifications . . . . . . . . . . . . . . . . . . . . . . . . . . . . . . . . . . . . . . . 27
Function block diagram . . . . . . . . . . . . . . . . . . . . . . . . . . . . . . . . 28
01
Advertisement
Table of Contents

Related Manuals for Boss Vocal Performer VE-22


Summary of Contents for Boss Vocal Performer VE-22
-
Page 1: Table Of Contents
Reference Manual Contents Getting ready . . . . . . . . . . . . . . . . . . . . . . . . . . . . . . . . . . . . . . . . . . 2 Useful functions . -
Page 2: Getting Ready
Getting ready Top panel [PHONES/LINE] knob [HARMONY], [EFFECT] and [ECHO] knobs Sets the volume for the PHONES/LINE OUT. * This doesn’t change the volume for the OUTPUT L/R. Display Shows various information for the VE-22. Type name Parameter name MEMO Parameter value The screen that appears after you turn on the power is called the “play screen”. -
Page 3: Rear Panel (Connecting Your Equipment)
DC IN jack OUTPUT R, L/MONO connectors Connect an AC adaptor (BOSS PSA-S series, sold separately) here. Connect this to your PA mixer or other audio equipment. * Use the cord hook to secure the cord of the AC adaptor as shown This is for audio output. -
Page 4: Installing The Batteries
Getting ready Installing the batteries Phantom power settings Install the batteries into the battery case at the bottom of this unit. If you’re using a condenser mic that requires phantom power, follow Make sure that the batteries face the right way. the steps below to turn phantom power on. -
Page 5: Basic Operation
Basic operation Input some audio into the mic. Configuring the mic settings (MIC) Turn the [MIC SENS] knob on the rear panel to adjust the mic input sensitivity. Connect a mic to the INPUT connector. Improving S/N (signal-to-noise) for noise reduction The optimum setting for the [MIC SENS] knob is about when only one yellow bar lights up at the loudest input volume. -
Page 6: Applying A Harmony Effect
Basic operation Applying a harmony effect Press the [HARMONY] pedal. The indicator lights Use the [HARMONY] knob to edit the parameter value. You can change the type of parameters shown from the edit screen. Ø “Changing the parameters shown on the play screen” (p. -
Page 7: Editing The Memories
Editing the memories How the memories are structured A combination of effects built into the VE-22 and their settings is called a “memory”. User memories and preset memories There are two types of memories: “user memories”, which can be overwritten; and “preset memories”, which can’t be overwritten. After editing the settings of a memory, you can save it in the user memories and recall it for later use. -
Page 8: Creating The Sound You Like
You must perform a MEMORY WRITE after you change the settings. * For details on the effect parameter, refer to the “ Parameter Guide” (BOSS website). Configuring the dynamics These parameters are for configuring the basic mic sound. If you’ve applied heavy compression (COMP) or if you’re using the distortion effect, you can adjust the NS (noise suppressor) to suppress noise. - Page 9 Editing the memories Adjusting the effects MEMO ¹ You can make the value change in increments of 10 by either turning the [HARMONY], [EFFECT] or [ECHO] knob while holding down the knob, or turning the [HARMONY], [EFFECT] or [ECHO] Press the [MENU] button. knob while holding down the [MENU] button.
-
Page 10: Making Settings In Memory Setting
Editing the memories Making settings in MEMORY SETTING Parameter Value Explanation When you specify a note value for the DELAY TIME of the These settings are for adjusting the memory’s volume, as well as the DELAY or for the RATE of the BPM that’s used to make the effect sound in time with the tempo. -
Page 11: Saving A Memory (Memory Write)
Editing the memories Press the [MEMORY] (ENTER) knob to save. Saving a memory (MEMORY WRITE) The message “EXECUTING... ” is shown. The unit returns to the play screen when saving is You can save the effect and control settings to user memory (U01– finished. -
Page 12: Initializing Memories (Memory Initialize)
Editing the memories Turn the [HARMONY] knob to select the move To initialize, press the [MEMORY] (ENTER) knob. destination. A confirmation message appears. * Press and turn the [HARMONY] knob if you want to move the arrow (Í) 10 memories at a time. To exchange the memories, press the [MEMORY] (ENTER) button. -
Page 13: Useful Functions
Useful functions MEMORY PEDAL Parameter Value Explanation HARMONY EFFECT The pedal switches on the top panel can be assigned to a variety of Specifies the functions, which are useful when you’re playing live. FUNCTION ECHO function. MEMORY PEDAL lets you assign functions that can be controlled by BPM TAP the [HARMONY] pedal switch, when this unit is in memory mode (p. -
Page 14: Manual Pedal
Useful functions MANUAL PEDAL The pedal switches on the top panel can be assigned to a variety of functions, which are useful when you’re playing live. MANUAL PEDAL lets you assign functions that can be controlled by the [HARMONY], [EFFECT] and [ECHO] pedal switches, when this unit is in manual mode (p. -
Page 15: Ctl 1, 2/Exp
Useful functions Parameter Value Explanation HARMONY EFFECT Specifies the FUNCTION ECHO function. BPM TAP When FUNCTION = Configures the HARMONY: operation. MOMENT (MOMENTARY)/ MOMENT: The TOGGLE Press the [ECHO] knob. effect you set is When FUNCTION = EFFECT: applied only while The CTL 1,2/EXP settings screen appears. -
Page 16: Assign
Useful functions Getting ready Parameter Value Explanation Used as a function MEMORY for each memory. PREF Used as a global Press the [É] switch and [Ç] switch simultaneously (PREFERENCE)*1 SYSTEM function for all to enter memory mode. memories. Specifies the FUNCTION VOLUME, OFF function. - Page 17 Useful functions Turn the [HARMONY] pedal function off. Press the [HARMONY] knob. By using this setting, you can make the HARMONY pedal function The ASSIGN screen opens. (HARMONY: ON/OFF) not be assigned in memory mode. 6-1 . Press the [MENU] button. 6-2 .
- Page 18 Useful functions ASSIGN parameter list Parameter Value Explanation You can set up to eight operations for ASSIGN. NUMBER 1–8 * Specify this assignment number first, and then set the parameters below. OFF, ON Specifies whether the set operation is ON (enabled) or OFF (disabled). Specifies the controller.
- Page 19 Useful functions CATEGORY TYPE TARGET — PTC CRCT (PITCH CORRECT) NOTE SHIFT TIME SHORT DL (SHORT DELAY) FEEDBACK E.LEVEL (EFFECT LEVEL) RATE DEPTH CHORUS E.LEVEL (EFFECT LEVEL) D.LEVEL (DIRECT LEVEL) RATE DEPTH FLANGER RESO E.LEVEL (EFFECT LEVEL) D.LEVEL (DIRECT LEVEL) RATE DEPTH PHASER...
- Page 20 Useful functions CATEGORY TYPE TARGET PATTERN RATE DUTY SLICER DEPTH ATTACK EFFECT TRIGGER LO-FI RADIO LEVEL LO-FI SAMPLE BALANCE LEVEL DLY TIME (DELAY TIME) DLY FDBK (DELAY FEEDBACK) — ECHO DLY LEVEL (DELAY LEVEL) REV TIME (REVERB TIME) REV PRE D (PRE DELAY) REV LEVEL (REVERB ELVEL) M.SETTING VOLUME...
-
Page 21: Exp Hold
Useful functions EXP HOLD OUTPUT This lets you set whether to retain the expression pedal value that Configure these parameters according to the device that’s connected was used in the previous memory when you switch to a new memory to the OUTPUT. (HOLD: ON), or not (HOLD: OFF). -
Page 22: Creating A Loop Phrase (Loop)
Useful functions * See the function block diagram (p. 28) for where each loop is Creating a loop phrase (LOOP) placed in the signal chain. With the loop function, you can record a phrase up to 37 seconds and Recording play it back repeatedly (loop playback). - Page 23 Useful functions Record Overdub Loop playback Recording starts immediately when Record additional layers while the The loop plays back. you press the [Ç] switch. loop plays back. Press the [Ç] switch to switch to At the point where you want to Press the [Ç] switch to switch to overdubbing.
-
Page 24: Memory Extent
Useful functions MEMORY EXTENT DISPLAY This sets the upper and lower limits for the selectable memories. This function includes the settings for the colors of the display and the LED indicators. With this function, you can only select memories within the range you set. -
Page 25: Usb
See the function block diagram (p. 28) for the audio signal path. BOSS website. This setting is a system parameter that’s globally enabled for all When connecting to an iOS MODE memories. -
Page 26: Info
Useful functions INFO FACTORY RESET This feature lets you access the Reference Manual (BOSS website). Here’s how you can restore the effect and control settings to the factory settings (factory reset). Press the [MENU] button. By specifying FROM and TO, you can restore only certain memories to their factory settings. -
Page 27: Appendix
48 kHz 24 bits + AF method AD Conversion * AF method (Adaptive Focus method) is a proprietary method from Roland & BOSS that vastly improves the signal-to-noise (SN) ratio of the AD and DA converters. DA Conversion 32 bits... -
Page 28: Function Block Diagram
Function block diagram AUX INPUT *2 OUTPUT DRY (BYPASS) MEMORY: U01-U99, P01-P50 MEMORY SETTING MASTER MODE L/MONO INPUT LEVEL DYNAMICS LOOP LOOP VOLUME HARMONY ECHO OUTPUT EFFECT LEVEL PERFORM CHECK BPM HOLD PHONES/ LINE SELECT LOOP TYPE: PERFORM/CHECK PHONES/ LINE VOLUME (KNOB) OUTPUT...
Need help?
Do you have a question about the Vocal Performer VE-22 and is the answer not in the manual?
Questions and answers
is it possible to copy the saved settings in one user memory to another user memory
Yes, the saved settings in one user memory can be copied to another user memory on the Boss Vocal Performer VE-22. You can specify a memory number as the save destination during the MEMORY WRITE operation, allowing you to overwrite or copy settings from one user memory (U01–U99) to another.
This answer is automatically generated