OTOFONIX Helix User Manual
Hide thumbs
Also See for Helix:
- Quick start manual (8 pages) ,
- User manual (56 pages) ,
- User manual (56 pages)
Table of Contents
Advertisement
Quick Links
Advertisement
Table of Contents

Related Manuals for OTOFONIX Helix


Summary of Contents for OTOFONIX Helix
- Page 1 User Manual...
- Page 2 “ I had no idea how much of life I was missing out on. I can hear the birds chirping again on my daily walks outside. I’m amazed at the difference it has made. –Sally N.
- Page 3 Our dedicated USA-based hearing specialists are happy to guide and assist you with any questions you may have. Please review this user guide to get the most out of your Helix hearing device. For best results use the original charger and adapter.
- Page 4 Different Domes (Eartips) can completely change the sound and feel of your hearing device Note: If you experiencing any itching in your ear canal while getting used to the ear domes, we recommend using Miracell Pro Ear, or olive oil. Use less than a drop and apply around the circumfer- ence of the ear dome to relieve itching.
- Page 5 domes virtually eliminate all feedback that occurs from higher amplification, but they also maximize the “occlusion effect”. A Hybrid Style Dome has a small hole or vent and features of both the open and closed dome. These domes provide greater amplification in the low frequencies than the open domes. The smaller vent also significantly minimizes the “occlusion effect”...
- Page 6 Earhook Power Kit For those with a hearing loss that is more severe, or for those who would just like more amplification, the Earhook kit has been included in your package. The Earhook and thicker tubing provides 6-8 dB of increased sound output.
- Page 7 Mark a line on the tube Cut the tube at the Push the cut end of the just ABOVE the bottom marked line tube onto the Earhook of the Earhook Place the amplifier with the attached Earhook over the ear and the assembled thick tube with dome into the ear canal.
- Page 8 First Time Users of Hearing Devices The first time you use the Helix, some sounds may seem very loud. You may hear the faucet drip, beeps from electronics, crumpling paper, sounds you may not have heard in a long time. This can be over- whelming at first.
-
Page 9: Table Of Contents
If Sound is Distorted or Intermittent 23 Quick Start Guide 8 If Device Makes a Whistling Sound 24 Step 1: How to Charge the Helix 9 If Device has a Weak or No Sound 25 Step 2: How to Power On/Off 12... -
Page 10: Important Information
IMPORTANT LEADING CAUSE FOR LITTLE OR NO AMPLIFICATION It is very important to keep your ears clear of ear wax in order to get the best performance and life from your device, so we strongly suggest using an ear irrigation system on a regular basis. -
Page 11: What's In The Box
What’s In the Box Open Domes Closed Domes Magic Domes Sound Tubes Earhook... -
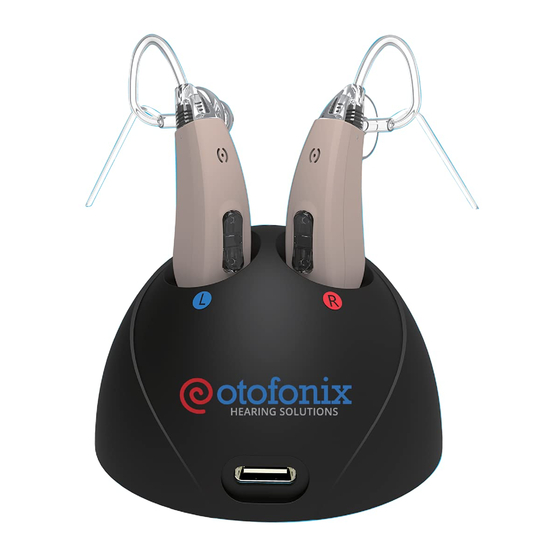
Page 12: Features
Features Sound Tube Microphone Dome Microphone Multi-Function Button Volume Control On-Off Charging Indicator Stabilizer Bar Light Volume/Program Control Charging Port... - Page 13 “ Q uick and thorough response to questions. Very accessible and eager to provide excellent customer service. So far, pleased both with the product and the company. –Jonathan...
-
Page 14: Quick Start Guide
Quick Start Guide Four Easy Steps for Using Your Otofonix Helix To Identify Left/Right Helix Step 1: Charge Helix Hold an aid upright in each hand, with controls facing you. Step 2: Turn Helix On The tips/tubing point toward each other when in the correct hand. -
Page 15: Step 1: How To Charge The Helix
Step 1: How to Charge the Helix Voltage Status Indicator Solid BLUE light Solid GREEN light when charging when charged... - Page 16 Charger Assembly Voltage Status Indicator Contact Point Charging Port Plug the small end of the cable into the Plug the big end of the cable into the adapter. charging port of the charging base. Place your hearing device into the charging base.
- Page 17 3 Always turn off and put your hearing devices into the charging station when not in use. 4 To extend the overall life of your battery, DO NOT store your Helix for more than 1 month without charging Helpful Videos Check out our library of videos for helpful tips Otofonix.com/Resources...
-
Page 18: Step 2: How To Power On/Off
Step 2: How to Power On/Off Press and Hold the upper portion of the rocker switch for about 3 seconds to POWER ON. The device is equipped with a power-on-delay function which allows you time to put the device on your ear. To POWER OFF, press and Hold the upper portion of the rocker switch for about 3 seconds. -
Page 19: Step 3: How To Place On Your Ear
Step 3: How to Place on Your Ear Hook body of device Insert ear dome into ear canal Tuck stabilizer bar into behind the ear. with gentle pressure until outer bowl of the ear so snugly seated in ear canal. ear dome stays in place. -
Page 20: Step 4: Volume Control
Step 4: Volume Control The rocker switch is used to control the volume level. Press and quickly release the upper portion of the rocker switch to increase the volume, while the lower portion reduces the volume. As you increase/decrease the volume, you will hear a single beep that will indicate an increase or decrease in volume. -
Page 21: Changing Programs
Tips to Change Volume and Listening Modes When the device is turned on, it will revert to the last program and volume setting. To limit whistling from your device when changing volume/programs, approach the device from behind your ear rather from the top. Support the bottom of the device with thumb when pressing rocker switch. Otofonix.com/Resources/Videos... -
Page 22: Care And Cleaning
Care and Cleaning For optimal performance, keep the sound tube and ear dome clean. Use cleaning brush daily to clear ear dome of wax. Clean sound tube often and anytime amplification stops or seems reduced. Remove sound tube: Turn Remove ear dome from base of tube counter- sound tube by inverting clockwise and body of... - Page 23 Please note: the hearing device body can be utilized for either ear. Only the thin sound tubing is ear-specific. Red markings under the stabilizer bar is for the right and the blue marking is for the left. Tubing can be ordered at Otofonix.com.
-
Page 24: Helpful Tips
Do not get your Otofonix Helix wet Do not wear your Helix while spraying hair spray or using a hairdryer Do not expose your Helix to excessive heat or moisture (use a hearing aid dehumidifier each night if you live in a humid climate) Keep sound tubes and domes clean. -
Page 25: Ordering Replacements
(3) months. Over time, these items wear out and may become stiff, affecting both fit and sound quality. Regular replacement will keep your Helix sounding and feeling like new. Visit: Otofonix.com or call 704-380-0508 to order tips, tubing and other accessories. -
Page 26: Using The Telephone
Using the Telephone If whistling occurs while using the phone, try various positions to align the phone’s audio output and Helix’s microphone until you find what works best for you. -
Page 27: Protection Plan
Protection Plan With the Otofonix Protection Plan, you are 100% protected from ALL types of acci- dental damage, and almost anything else that may go wrong, including things not covered by the standard Warranty (water damage, battery corrosion or stepping on the hearing amplifier). -
Page 28: Troubleshooting Your Hearing Device
Intermittent or Feedback/ Weak or Static or Steps Distorted Sound Whistling No Sound Hissing Turn Helix On Adjust Volume Charge Helix Use Dehumidifier Clean Tubing/Tip Clean Ear Canal Change Tubing/Tip Please see the pages 22-25 for more detailed troubleshooting tips. -
Page 29: If Sound Is Distorted Or Intermittent
Turn Helix off. Charge until light turns solid green and turn Helix back on. Remove sound tube from Helix body, and increase volume level to max volume. If you hear feedback, the Helix is working properly. Clean the sound tube. (pg. 16) Clean the ear canal. Replace the tubing/tip if they appear worn. -
Page 30: If Device Makes A Whistling Sound
If Device Makes a Whistling Sound Whistling/feedback occurs when amplified sound returns to the microphone and is then re-amplified. This can be resolved by lowering the volume (when feasible). Most hearing aids whistle when the dome is not inserted correctly. Try re-seating the ear dome into your ear canal for a better fit. -
Page 31: If Device Has A Weak Or No Sound
Make sure the Helix is on (see page 12). Make sure Helix is charged. If unsure, turn Helix off and charge until blue light turns green. Turn Helix back on. Remove tubing from (see page 16), and increase volume to max volume. If you hear feedback, the Helix is working properly. -
Page 32: Warranty And Repairs
Warranty and Repairs The Otofonix Helix is covered against defects in materials and workmanship for one year from the date you receive your order. If our examination determines that the unit failed to work due to parts, materials, or workmanship, we will repair or replace it for free. This warranty does not cover malfunctions due to unusual wear and tear or mistreatment of your Helix, such as physical shock, damage from moisture or sweat, excessive wax build-up, or tampering with the device, all of which void the warranty. -
Page 33: Return Policy
Return Policy Your satisfaction is guaranteed. If you are not satisfied with your Otofonix Helix, you have 45 days to return it for a full refund. We are unable to honor return requests after 45 days from the date of deliv- ery. -
Page 34: Warning To Hearing Aid Dispensers
Warning to Hearing Aid Dispensers A hearing aid dispenser should advise a prospective hearing aid user to consult promptly with a licensed physician (preferably an ENT specialist) before dispensing a hearing aid, if the hearing aid dispenser determines through inquiry, actual observation, or review of any other available information concerning the prospective user, that the prospective user has any of the following conditions: •... - Page 35 Stop using the Otofonix Helix and consult a physician if any of the following occur: • Hearing in one or both ears worsens • Hearing does not improve • Skin irritation develops in or around your ear canal • Your ear becomes blocked or clogged with excessive ear wax •...
-
Page 36: Important Notice For Users
Important Notice for Users Good health practice requires that a person with hearing loss has a medical evaluation by a licensed physician (pref- erably a physician specializing in diseases of the ear) before purchasing a hearing aid. Licensed physicians who specialize in diseases of the ear are often referred to as otolaryngologists, otologists, or otorhinolaryngologists. -
Page 37: X-Ray, Mrt, Ct, Pet Scanning, Electro-Therapy
X-ray, MRT, CT, PET Scanning, Electro-therapy • Hearing devices must not be exposed to strong electrical fields that may be generated during X-rays, CT scans, PET scans or MRTs, during electrotherapy or during surgeries. Please remove your hearing devices in these types of situations to prevent any damage to them. Explosion Hazard •... -
Page 38: Technical Data
Technical Data Earhook Tube Peak OSPL 90 HFA OSPL 90(dB SPL) Peak Gain (dB) HFA full on Gain (dB) Total Harmonic Distort: 500Hz(%) < 2 < 2 800Hz(%) < 2 < 2 1600Hz(%) < 2 < 2 EQ Input Noise (dB) <... - Page 39 “ I no longer have to pretend to hear what others are saying and miss out on conversa- tions with my family and friends. Every word sounds crystal clear. It’s restored my confi- dence and given me my life back. –Bill K.
- Page 40 FREE Customer Support (704) 380-0508 Monday - Friday 9:00am - 5:30pm EST Info@Otofonix.com Otofonix.com...
Need help?
Do you have a question about the Helix and is the answer not in the manual?
Questions and answers