Table of Contents
Advertisement
Quick Links
Technical Specifications
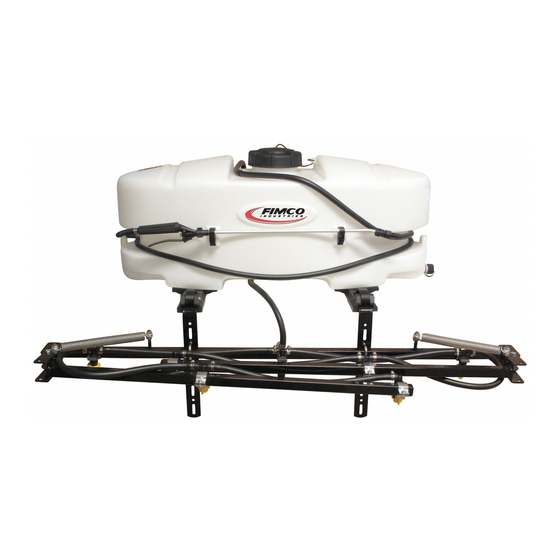
25 Gal. Corrosion-Resistant Polyethylene Tank
12 Volt Diaphragm Pump, 2.4 GPM - 60 PSI
20 Ft. Handgun Hose (3/8" I.D.)
15 Ft. Vertical throw, 30 Ft. Horizontal Throw
Pressure Gauge
7-Nozzle Boom Assembly
(140" Spray Coverage)
Fold-Away Outer Boom Members
Corrosion-Resistant Nylon Nozzles
Check Valve Strainers, 50 Mesh, 5 PSI
General Information
Thank you for purchasing this product. The purpose of this
manual is to assist you in operating and maintaining your lawn
& garden ATV sprayer.
BEFORE RETURNING THIS PRODUCT
FOR ANY REASON, PLEASE CALL
1-800-831-0027
MONDAY-FRIDAY, 8:00 AM TO 5:00 PM CST
If you should have a question or experience a problem with
your Fimco Industries Product: Visit our website @
www.fimcoindustries.com or call the Toll free number above. Our
technical support representatives will be happy to help you.
In most cases a customer service rep. can resolve
the problem over the phone.
To obtain prompt, efficient service, always remember to give the
following information....
• Correct Part Description and/or part number
• Model number and Serial Number
Part descriptions and numbers can be obtained from the
illustrated parts list section(s) of this manual.
Retain a copy of your receipt for your
unit, as it will be required to validate
any warranty service.
Warranted against manufacturer or
workmanship defects from date of
purchase with copy of receipt:
Homeowner Usage: Sprayer-One Year and Pump-Two Years.
Commercial Usage: Sprayer and Pump-90 Days.
OWNER'S MANUAL
Model: ATV-25-700-QR (5302320)
(25 Gallon Lawn & Garden/ATV Sprayer)
Caution: When fully filled with water,
this sprayer will weigh approx. 275
lbs.. Consult the owner's manual for
your vehicle to verify that you are
within it's load carrying capacity.
Assembly Instructions
Make sure the contents of the sprayer's carton match the
items shown on page 2 of the manual.
Follow the steps on pages 3, 4 & 5 to properly assemble
the sprayer.
After assembly is complete and before testing your
sprayer, make sure you connect the electrical hook-up to
the end of your pump and clip the clips to a fully charged
battery. The red wire must be connected to the positive
(+) and the black wire should be connected to the nega-
tive (-).
The drain plug assembly should already be attached to
the tank
***IMPORTANT REMINDER***
This sprayer comes with an On/Off (shut-off) valve located at the inlet location
of the tank, towards the underside. (See Detail A). You must make sure the
valve is in the "open" position before using your sprayer.
www.fimcoindustries.com
1000 FIMCO Lane, P.O. Box 1700, North Sioux City, SD 57049
Toll Free Phone: 800-831-0027 : Toll Free Fax: 800-494-0440
[5194825
Detail A
(01/20)]
Page 1
Advertisement
Table of Contents
Troubleshooting

Subscribe to Our Youtube Channel
Related Manuals for Fimco ATV-25-700-QR


Summary of Contents for Fimco ATV-25-700-QR
- Page 1 Warranted against manufacturer or workmanship defects from date of www.fimcoindustries.com purchase with copy of receipt: 1000 FIMCO Lane, P.O. Box 1700, North Sioux City, SD 57049 Homeowner Usage: Sprayer-One Year and Pump-Two Years. Toll Free Phone: 800-831-0027 : Toll Free Fax: 800-494-0440 [5194825 (01/20)] Commercial Usage: Sprayer and Pump-90 Days.
- Page 2 Contents of your sprayer’s carton (ATV-25-700-QR - 5302320): Owner’s Manual Tank/Plumbing Pre-Assembly 7-Nozzle Boom (5277780), 7-Nozzle Harness (#5277696) & Nozzle Clamps/Pkg. of 7 (5277730) Contents of Parts Bag Tank Lid & Lanyard #5278132 (#5058188) Contents of Bracket Kit #5278133 Page 2...
- Page 3 Step 1 Assembly Procedure (ATV-25-700-QR) Normally, the sprayer will be mounted on an ATV with the pump assembly at the operator’s back and the spray wand will be at the rear of the unit. Right Hand (RH) and Left Hand (LH) sides of the sprayer are...
- Page 4 Step 3 Assembly Procedure (ATV-25-700-QR) After your boom mounting brackets are secured in place and the unit secured on your ATV, bolt the 7-nozzle boom in place with (2) Square U-Bolts and whiz nuts. A 1/2” socket or wrench is required for this step.
- Page 5 Step 5 Assembly Procedure (ATV-25-700-QR) After your nozzle harness is attached to the boom, lo- cate the 48” hose and the (2) hose clamps from the parts bag. Place the hose clamps over each end of the hose loosely. Slip the ends of the hose over the hose barbs on both the manifold and the ’CROSS’...
-
Page 6: Operation
IMPORTANT: Remove tank lid and be sure the tank is clean and free of Manifold Valves CLOSED any foreign material. Rinse tank out of any tank residue before filling with water to test. Testing the Sprayer NOTE: It is VERY important for you to test your sprayer with plain water before actual spraying is attempted. -
Page 7: Speed Chart
Drain and then refill half full, add the recommended amount of a good quality tank cleaner, such as FIMCO Tank Neutralizer and Cleaner. (If no tank cleaner is available, you may substitute dish soap for this step, about 1-2 oz. per gallon). -
Page 8: Troubleshooting The Pump
3/8” Hose Barb Port Kit Fitting #5168836 DON’T Use to pump bleach. Clean and rinse your pump after each use with Fimco Tank Use to pump petroleum products such as diesel fuel, Neutralizer gasoline or kerosene ... - Page 9 Checking the Pressure Switch If your motor is not running and you’ve checked the following: for loose wiring connections, fuse, the switch on the lead wire was “ON” and made sure you were connected to a fully charged battery and everything is fine, but the motor won’t run, then it’s time to check to see if the pressure switch is bad.
-
Page 10: Exploded View Parts List
Exploded View/ Parts List ATV-25-700-QR (5302320) Manifold Detail #5281538 Intake Assembly #5281145 Page 10... - Page 11 7-Nozzle Boom Assembly (5301897) (with 3/8” Hose, 1” Sq. Tubing & AIXR11002VP Tips) Opposite side has typical hardware setup Hinge Detail Clamp Bag of 7: 5277730 CROSS Based on the minimum overlap required to obtain uniform distribution with 110° tips and 20” spacing. ...
-
Page 12: Warranty
WHAT REMEDIES ARE AVAILABLE UNDER THIS LIMITED WARRANTY. If the conditions set forth above are fulfilled and the Equipment or any part thereof is found to be defective, Fimco, Ind. shall, at its own cost, and at its option, either repair or replace the defective Equipment or part.
Need help?
Do you have a question about the ATV-25-700-QR and is the answer not in the manual?
Questions and answers