Table of Contents
Advertisement
Quick Links
Owner's Manual
(25 Gallon Lawn & Garden/ATV Sprayer w/Standard 7-Nozzle Boom Assembly)
Technical Specifications
•
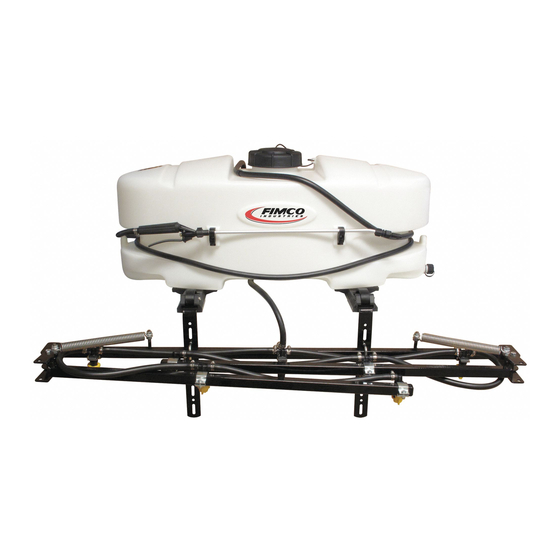
25 Gal. Corrosion-Resistant Polyethylene Tank
•
12 Volt Diaphragm Pump, 2.1 g.p.m.
•
15 Ft. Handgun Hose
•
15 Ft. max. vertical throw, 30 Ft. max. horizontal throw
•
Pressure Gauge (Adjustable pressure)
•
7-Nozzle Boom Assembly (140" Spray Coverage)
•
Fold-Away Outer Boom Members
•
Corrosion-Resistant Nozzles
General Information
Thank you for purchasing this product. The purpose of this
manual is to assist you in operating and maintaining your lawn
& garden/ATV sprayer. Please read it carefully, as it furnishes
information which will help you achieve years of trouble-free
Warranty/Parts/Service
For home usage, products are warranted for one year from date
of purchase against manufacturer or workmanship defects.
Commercial users have a 90 day warranty.
Your authorized dealer is the best source of replacement parts
and service. To obtain prompt, efficient service, always
remember to give the following information...
- Correct Part Description and/or part number.
- Model number/Serial number of your sprayer.
Part descriptions and part numbers can be obtained from the
illustrated parts list section(s) of this manual.
Whenever you need parts or repair service, contact your
distributor/dealer first. For warranty work, always take your
original sales slip, or other evidence of purchase date, to your
distributor/dealer.
Model: ATV-25-700-QR (5302320)
Assembly
1. Install the Quick Release Brackets to the tank as shown
in the exploded view drawing.
2. Place the tank, with the brackets attached, onto your ATV
carrier rack. Attach using ratchet straps
3. Slide the boom mounting brackets into Quick Release
Brackets. Use cam handles on Quick Release Brackets to
secure boom mounting brackets.
4. Attach the boom to the boom mounting brackets, making
sure the boom is centered.
5. Thread the pressure gauge into the manifold assembly.
Use teflon tape or thread sealant on threads to insure no
leaks.
*** IMPORTANT REMINDER ***
Inlet from Tank
A
This unit comes with an On/Off (shut-off)
valve located at the inlet location of the
tank, towards the underside. (See Detail A).
You must make sure the valve is in the
"open" position before using your unit.
www.fimcoindustries.com
1000 FIMCO Lane, P.O. Box 1700, North Sioux City, SD 57049
Toll Free Phone: 800-831-0027 : Toll Free Fax: 800-494-0440
[5008432
(11/14)]
Detail A
Filter/Screen
"ON/OFF" Valve
Printed in the U.S.A.
Advertisement
Table of Contents

Related Manuals for Fimco ATV-25-700-QR


Summary of Contents for Fimco ATV-25-700-QR
- Page 1 Whenever you need parts or repair service, contact your distributor/dealer first. For warranty work, always take your 1000 FIMCO Lane, P.O. Box 1700, North Sioux City, SD 57049 original sales slip, or other evidence of purchase date, to your Toll Free Phone: 800-831-0027 : Toll Free Fax: 800-494-0440 distributor/dealer.
- Page 2 Calibration Assembly (continued) Chemical labels may show application rates in gallons per 6. Connect the wiring harness to the wires coming out of acre, gallons per 1000 square feet, or gallons per 100 the back of the pump. Connect the wiring from the wiring square feet.
- Page 3 Pump Model: 5277981 Available Replacement Parts Item Part Description Number 5157205 7.5 Amp 'Mini Blade' Fuse 5168832 Port Kit Fitting, 1/2" MNPT 5168833 Port Kit Fitting, 1/2" Hose Barb 5168836 Port Kit Fitting, 3/8" Hose Barb 5168837 Upper Housing Assembly 5168839 Plunger Kit 5157202...
- Page 4 Exploded View: ATV-25-700-QR (5302320) BILL OF MATERIALS ON NEXT PAGE 24.1 29.1 24.5 29.5 29.3 29.4 24.2 29.2 24.7 24.3 24.4 24.6 DETAIL "A" DETAIL "B" Page 4...
- Page 5 After use, fill the sprayer tank part way with water. Start the sprayer, and allow the clear water to be pumped through the plumbing system and out through the spray nozzles. Refill the tank about half full with plain water and use FIMCO Tank Neutralizer and Cleaner, and repeat cleaning instructions above.
- Page 6 Typical Spray Pattern (7-Nozzle Boom) 110° Intake/Siphon Tube/Screen Detail of a Typical L&G/ATV Sprayer (not including the 'EC' units) 'Cut' View of a 'Typical' Tank (looking inside) Knurled Nut Make sure the siphon tube is rotated so that the tube just touches the bottom of the tank.
Need help?
Do you have a question about the ATV-25-700-QR and is the answer not in the manual?
Questions and answers