
Subscribe to Our Youtube Channel
Related Manuals for BT PaperJet 60


Summary of Contents for BT PaperJet 60
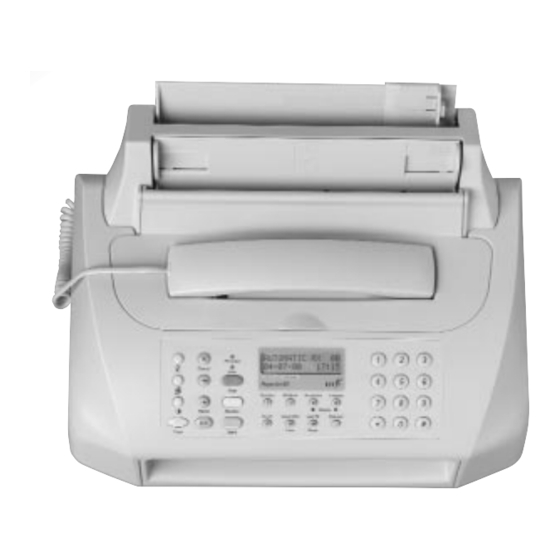
- Page 2 Please open this page for an ‘at a glance’ guide to your PaperJet 60.
- Page 3 Please open this page for a ‘further at a glance’ guide to your PaperJet 60.
- Page 4 Holds up to 5 sheets placed face down for faxing or copying. Outlet for received faxes, copied documents and originals. Max. capacity 40 sheets of 80gsm paper. Adjust to fit the width of your paper for A4, Letter and Legal sizes.
- Page 5 Indicates a problem when sending or receiving a fax. Stops the current operation. Returns the fax machine to standby. Press to get dialling tone. Press to send a fax. Confirms an option chosen from the menu. During a call, press to receive a fax.
- Page 7 Holds up to 40 sheets of A4 paper for ink jet quality printing. If you run out of ink or paper while receiving a fax the document will be stored in the memory and automatically printed out when the new paper or ink has been added. Make single or multiple copies of documents.
- Page 9 When you unpack you should have: PaperJet 60 with attached mains power cable and fitted 3-pin plug. Telephone line cord Starter print cartridge Handset with cord Paper support Document holders for use with torn, thin or small pages Proof of purchase is required for warranty purposes,...
- Page 10 Their accidental contact with powered parts may cause a fire or electric shocks. Do not expose to direct sunlight. Do not stand your fax machine on carpets or other surfaces which generate fibres, or place it in locations preventing free flow of air over its surfaces.
- Page 11 Place your PaperJet 60 on a stable, flat surface. Make sure it is close enough to the telephone and mains power sockets so that cables will reach. Remember to leave enough room at the front of the machine for documents to come out. Allow a free flow of air around the machine for ventilation.
- Page 12 The socket in the back of the line plug is for line connection of an answering machine. Plug into the mains power and switch on. Your PaperJet 60 performs a quick self-test. The display shows: The plain paper sheet feeder can hold up to 40 sheets of 80gsm paper.
- Page 13 Your PaperJet 60 is preset to use standard A4 paper. If you need to use a different size you will need to change the setting as shown below. To ensure your PaperJet is set to print on the paper size you are using, check the print format setting.
- Page 14 Should the message persist, you may need to clean the electrical contacts and the carriage (See ‘To clean the print head’ , page 56). Your PaperJet 60 automatically cleans the print nozzles and prints a test page. Once printed, the display shows...
- Page 15 You can stop any procedure and return your PaperJet 60 to standby at any time by pressing If you do not press any button on your PaperJet 60 for 2 minutes it will automatically return to standby. Your name and number will be added to every fax page you send.
- Page 16 For example to enter the name JOHN: Press the button until the display shows . Press Press the button until the display shows . Press Press the button until the display shows . Press Press the button until the display shows . When you have finished entering your name To confirm.
- Page 17 Dimensions: • width 148mm–216mm. • length 216mm–600mm. Thickness: • 60 –90gsm max 5 sheets. • 50 –140gsm 1 sheet at a time. • 140 –160gsm when using the document holders. • Torn, crumpled and rolled paper. • Paper that is too thin (unless in the document holder supplied).
- Page 18 Your machine is pre-set to STD resolution for faxing and copying. You can change this setting so that the resolution is automatically set to FINE. When the machine is in standby Press until the display shows To display To display Press until the display shows To switch between To confirm.
- Page 19 If a fax fails to be sent, for example, the number dialled was engaged, your PaperJet 60 will automatically retry up to 3 times at 2 minute intervals. If after all retries, the fax has not been sent, the document will be deleted from memory (if using MEMORY TX) or ejected from the sheet feeder.
- Page 20 You can set your PaperJet 60 to send a fax at a specific time in order to take advantage of cheaper call rates or to allow for different time zones. Place document face down in the document feeder. If necessary set the Contrast and Resolution settings.
- Page 21 You can set your machine to send a document to up 10 different numbers (broadcasting). See “To fax from memory” below. Your PaperJet 60 has a memory which lets you store one document for sending at a pre-set time. Place document face down in the document feeder.
- Page 22 After entering your last number press again to confirm. Display shows (or current receive mode). By pressing the set your PaperJet 60 to receive a document in four different ways: Press to display the following settings. Your fax machine automatically answers fax...
- Page 23 To delete the number or name you have entered completely, press the button. Using the codes 0-9, your PaperJet 60 has 10 one-touch memories under which you can store a name, fax number and telephone number.
- Page 24 The name is displayed and then the number is displayed and dialled. Using the codes 01 – 32, your PaperJet 60 has 32 speed dial memories under which you can store a name and fax number and telephone number.
- Page 25 Press to switch between Press to select the fax or phone number setting you want. Display shows Enter the number you want to store. If necessary, press the buttons to move the cursor. Press to confirm. Display shows Enter the name you want to store. Press the buttons to move the cursor.
- Page 26 Provides confirmation of the results of the last fax sent. You can set your PaperJet 60 to print a last transmission report after every fax, every failed fax, or upon request. The default is every failed fax.
- Page 27 Press until the display shows Display shows Display shows Press until the display shows Press to display the option you want – print a report only after a fax has failed to be sent or received. – print a report after every received or sent fax.
- Page 28 Press until the display shows Display shows Press to display the option you want Press to start the printout. Select Press to return to standby. You can use your PaperJet 60 as a normal telephone. Lift the receiver. Dial the phone number.
- Page 29 Do not put a document in the document feeder. You can dial without lifting up the handset. Press and hold the memory location number you want until the telephone number (if stored) is displayed. The number is automatically dialled. When you hear your call being answered, lift the handset and talk.
- Page 30 Your PaperJet 60 can act as a convenience copier and make multiple copies of a document as well as enlarging or reducing your original. • Torn, crumpled and rolled paper • Paper that is too thin • Wet or moist paper •...
- Page 31 Your PaperJet 60 can be set to take messages if you cannot answer calls. Before you can set the reception mode to TAD/FAX RX you must record outgoing message OGM 1. See ‘Outgoing messages’ below. Your outgoing message is the announcement callers hear when your answering machine takes their call.
- Page 32 Display counts down your recording time. Replace handset to end recording, your message is replayed. If you run out of time, your PaperJet 60 automatically stops recording. Press the button to return to standby. When the machine is in standby:...
- Page 33 Pick up the handset if you want to listen to your messages privately. Press the button to end playback. After the last message has been played back your PaperJet 60 returns to standby. During play back: Press to skip back to the start of the previous message.
- Page 34 You can set your PaperJet 60 to call you at a set time at a remote telephone to let you know you have new messages. You can set your PaperJet 60 to forward your messages once only or on a daily basis.
- Page 35 18 minutes including OGMs and announcements. You can set the maximum length of each message at 30 or 60 seconds. (It is pre-set to 30 seconds). When the machine is in standby: Press the...
- Page 36 Your PaperJet 60 is pre-set to play incoming messages through the speaker as they are being recorded. You can switch this feature off. Press the button until the display shows Press the button. Display shows Press the button. Display shows...
- Page 37 You can use your remote access code to prevent other people from listening to your messages by selecting and/or from changing the answering machine’s settings by selecting Press the button until the display shows Press the button. Press the button until the display shows Press the button to display the...
- Page 38 Deleting the access code disables remote access and all other features which use the code. You may have called your PaperJet 60 to check your messages, or it may have called you to let you know you have new messages (see “To forward new messages”...
- Page 39 If messages were started using 2 (all messages) then 3 takes you to the start of the previous message. Changing the settings: Switch answering machine off and set your PaperJet 60 to Switch answering machine on – mode. Record new OGM#1. Record your message after entering the #3 code.
-
Page 40: High Quality
You can adjust the output quality of the printer. There are 2 settings: NORMAL and HIGH QUALITY. The default setting is HIGH QUALITY. Press until the display shows Display shows Press until the display shows Press until the display shows Press to switch between Press to confirm the option displayed. - Page 41 Press to confirm. To return to standby. If the fax machine is set to AUTOMATIC RX or PHONE FAX RX, it is pre-set to answer incoming calls after 2 rings. You can change the number of times it rings...
- Page 42 Press to confirm the option displayed. To return to standby. If you answer a call on an extension phone connected to the same line as your PaperJet 60 and you hear fax tones, you can switch your PaperJet 60 into fax receive mode by dialling .
- Page 43 Press to switch between Press to confirm the option displayed. To return to standby. Your PaperJet 60 is set to send faxes at 9600bps. If you consistently fail to send faxes to a particular number it might help to reduce the transmission speed to 4800bps.
- Page 44 Polling lets you call another fax machine to retrieve a document automatically. It also enables another fax machine to call your PaperJet 60 and request a document that you have set ready to be received. This is often also known as ‘faxback’.
- Page 45 When you have set a polling time Press until the display shows Display shows Display shows To display To confirm cancellation. Your fax machine returns to standby. When you have set a polling time Press until the display shows Display shows...
- Page 46 Press to confirm the option displayed. Press to return to standby. If you have subscribed to your network provider’s caller display service your PaperJet 60 will display caller information. When you receive an incoming call the display will show: Your caller’s number.
- Page 47 When you use the distinctive ring feature for the first time, your PaperJet 60 will “learn” one of the melodies and will then react differently to calls with that melody.
- Page 48 With some switchboards you may also need to switch your PaperJet 60 from TONE dialling to PULSE dialling. Check with your switchboard manager or supplier to see if this is necessary.
- Page 49 When dialling manually, just press before dialling the number. If you are using your PaperJet 60 in PULSE dialling mode, you can change to TONE mode during a call using the button. This...
- Page 50 An error report is automatically printed. Press the button to reset the machine and check the message against the Error Messages list, page 51. Your PaperJet 60 will store incoming faxes in the memory. If you run out of paper or ink or the paper jams...
- Page 51 • Check that is has not been set for manual reception. • Check that you have ink and paper. • Check for paperjams. • Check for paper jams. • Check that you have ink and paper. • The type of paper you are using may not be correct, check paper size and weight shown on page 15.
- Page 52 Other problems may be accompanied by a display of and a number. Check the number against the list below.
- Page 53 If you see an error message on the display, check here for its meaning and solution. Messages are listed in alphabetical order. Last fax call failed. Your machine will redial after nnn seconds. The document is not going through properly. Remove and re-insert the document in the document feeder.
- Page 54 Short beep – confirms fax sent or received successfully. Beeps for 20 seconds – phone call, lift receiver to answer. Your PaperJet 60 can store up to 21 pages of this standard letter (reproduced A4 size). If you cannot resolve a problem by using the Help...
- Page 55 Never use a dry cloth as this may cause static shock. Your PaperJet 60 is supplied with a starter print cartridge and it is not possible to change the ink cartridge independently of the print head.
- Page 56 6 Insert the new assembly into the holder with the electrical contacts facing towards the front of the machine. 7 Pull the assembly towards the front of the machine until you hear it click into position. 8 Close the cover. 1 Open the printer compartment cover.
- Page 57 Press the Function button until the display shows Display shows Either If the print head is new, press the button. Your PaperJet 60 performs a print test. If the print head is not new, press to display Display shows Your machine performs a print test.
- Page 58 Lift the printer compartment cover. Move the print cartridge to the right hand side of the machine. Clean excess ink off the print head pad with a dry cotton swab. Close the cover. Dust or dirt on the optical glass may cause scanning problems such as vertical lines on a received fax or copied document.
- Page 59 If a document or sheet of paper becomes jammed while sending a fax or during copying the display shows If paper used to print received faxes or photocopies becomes jammed the display shows First try ejecting the paper by pressing the button.
- Page 61 This product is intended to be connected to analogue networks and private switching systems in the United Kingdom. This product complies with the essential requirements of the Radio Equipment and Telecommunications Terminal Equipment Directive 1995/5/EC.
- Page 62 ctivity report Alert beeps Answering machine call screens on/off delete messages forward new messages lock/unlock on/off outgoing messages playback of messages playback of outgoing messages playback volume – adjust record memo record OGM recording capacity set Announce Only skip forward/backwards voice announcements on/off eeps Broadcast a document...
- Page 63 Polling cancel change time and number from another fax set by another fax machine Power Power failure report Pre-set fax change details send Print area 53–54 Print cartridge Print head – change...
- Page 64 Speed dial memories delete edit send store Store document in memory one-touch entry speed dial entry Switchboard external button set access number set dial mode switch dialling mode echnical information Telephone line cord Time Toll saver on/off Tones on/off olume buzzer loudspeaker playback...
- Page 65 © British Telecommunications plc 2000. Registered Office: 81 Newgate Street, London EC1A 7AJ. Registered in England No. 1800000. PaperJet 60 user guide (8/00) 3 Designed by The Art & Design Partnership Limited. Printed in Thailand. Printed on paper which meets international environmental standards.
Need help?
Do you have a question about the PaperJet 60 and is the answer not in the manual?
Questions and answers