Advertisement
KIT COMPONENTS
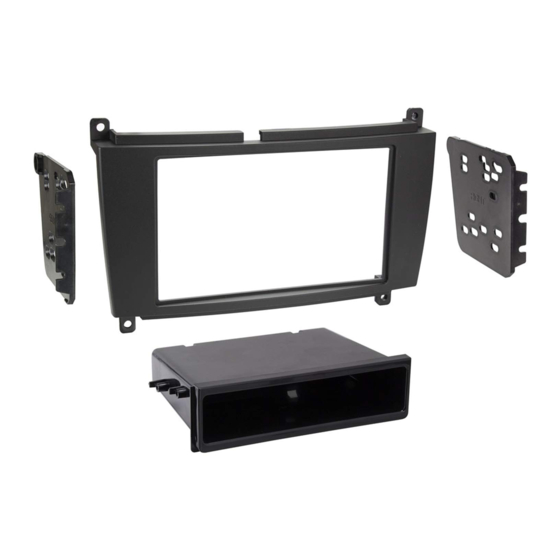
• A) Radio trim panel • B) Radio brackets • C) Pocket • D) (8) #8 x 3/8" Phillips screws
A
Metra. The World's Best Kits.
®
Mercedes-Benz CLK-Class 2005-2009
KIT FEATURES
• ISO DIN radio provision with pocket
• ISO DDIN radio provision
• Painted matte black
B
MetraOnline.com
C
© COPYRIGHT 2018 METRA ELECTRONICS CORPORATION
I N S TA L L AT I O N I N S T R U C T I O N S
TABLE OF CONTENTS
Dash Disassembly . .................................................2
–ISO DIN radio provision with pocket . .................3
–ISO DDIN radio provision . ....................................3
WIRING & ANTENNA CONNECTIONS (sold separately)
Wiring Harness: XSVI-9005-NAV
Antenna Adapter: 40-EU10
Steering Wheel Control Interface: ASWC-1
TOOLS REQUIRED
D
• Panel removal tool • Phillips screwdriver
• Socket wrench • T-20 Torx screwdriver
CAUTION!
All accessories, switches, climate
controls panels, and especially air bag indicator
lights must be connected before cycling the
ignition. Also, do not remove the factory radio
with the key in the on position, or while the
vehicle is running.
99-8724B
REV.8/27/18 INST99-8724B
Advertisement
Table of Contents

Related Manuals for Metra Electronics 99-8724B

Summary of Contents for Metra Electronics 99-8724B
- Page 1 Also, do not remove the factory radio with the key in the on position, or while the vehicle is running. Metra. The World’s Best Kits. MetraOnline.com ® © COPYRIGHT 2018 METRA ELECTRONICS CORPORATION REV.8/27/18 INST99-8724B...
- Page 2 DASH DISASSEMBLY 1. Unclip the shifter trim panel, then unclip 4. Open the cup-holder, then unclip, the shifter boot from the panel. Slide unplug, and remove the hazard button the shifter boot through the panel, then panel. (Figure D) unplug and remove the panel. (Figure A) 5. Remove (4) T-20 Torx screws securing the 2. Unclip the ashtray and set to the side. radio, then unplug and remove the radio. (Figure E) (Figure B) 3. Remove (2) T-20 Torx screws securing the Continue to Kit Assembly (Figure A) bottom of the climate control panel, then unplug and remove the panel. (Figure C) (Figure D) (Figure B) (Figure E) (Figure C) 1.800.221.0932 MetraOnline.com...
- Page 3 KIT ASSEMBLY ISO DIN radio provision with pocket ISO DDIN radio provision 1. Attach the radio brackets to the radio 1. Attach the radio brackets to the radio trim panel using (4) #8 x 3/8” Phillips trim panel using (4) #8 x 3/8” Phillips screws supplied. (Figure A) screws supplied. (Figure A) 2. Attach the pocket to the bracket 2. Slide the radio into the completed assembly using the (4) #8 x 3/8” Phillips assembly, and then secure it using screws. (Figure B) screws supplied with the radio. (Figure A) (Figure B) 3. Remove the metal DIN sleeve and trim ring from the aftermarket radio. 3. Locate the factory wiring harness and antenna connector in the dash, and 4. Slide the radio into the completed (Figure A)
- Page 4 Log onto www.installerinstitute.com or call 800-354-6782 for more information and take steps toward a better tomorrow. Metra recommends MECP certified technicians Metra. The World’s Best Kits. MetraOnline.com ® © COPYRIGHT 2018 METRA ELECTRONICS CORPORATION REV.8/27/18 INST99-8724B...
Need help?
Do you have a question about the 99-8724B and is the answer not in the manual?
Questions and answers