
Related Manuals for StarTech.com RK4242BK30


Summary of Contents for StarTech.com RK4242BK30
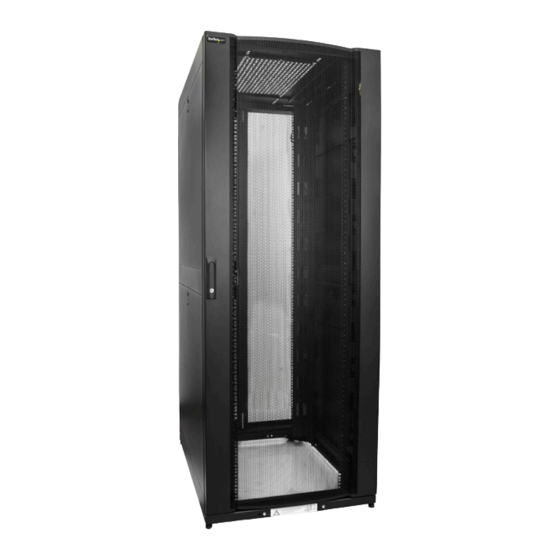
- Page 1 Server Rack Cabinet | 30 in. Wide | 42U Actual product may vary from photos User Manual SKU#: RK4242BK30 For the latest information and specifications visit www.startech.com/RK4242BK30 Manual Revision: 12/03/2018...
-
Page 2: Compliance Statements
To view manuals, videos, drivers, downloads, technical drawings, and more visit www.startech.com/support... -
Page 3: Safety Statements
Säkerhetsåtgärder • Montering av kabelavslutningar får inte göras när produkten och/eller elledningarna är strömförda. To view manuals, videos, drivers, downloads, technical drawings, and more visit www.startech.com/support... -
Page 4: Warning Statements
Förläng inte fler än en komponent från skåpet för att undvika risk. • Placera inte saker ovanpå skåpet och ställ inte skåpet ovanpå ett annat skåp. • Håll vätskor borta från skåpet. To view manuals, videos, drivers, downloads, technical drawings, and more visit www.startech.com/support... - Page 5 Sie niemals mehr als eine Komponente aus diesem Gehäuse aus. • Platzieren Sie keine Gegenstände auf dem Gehäuse und stapeln Sie das Gehäuse nicht auf einem anderen Gehäuse. • Halten Sie Flüssigkeiten von diesem Gehäuse fern. To view manuals, videos, drivers, downloads, technical drawings, and more visit www.startech.com/support...
- Page 6 Para evitar este risco, não expandir mais de um componente desta caixa. • Não colocar nenhum artigo nesta caixa e não empilhar a caixa em cima de outra caixa. • Manter líquidos afastados desta caixa. To view manuals, videos, drivers, downloads, technical drawings, and more visit www.startech.com/support...
- Page 7 één component uit de behuizing steken. • Plaats geen voorwerpen op deze behuizing en stapel de behuizing niet op een andere behuizing. • Houd vloeistof uit de buurt van deze behuizing. To view manuals, videos, drivers, downloads, technical drawings, and more visit www.startech.com/support...
- Page 8 本製品は、 室内での使用を想定しています。 戸外では使用しないで下さい。 • 本製品は、 非常に重いエンクロージャです。 絶対に一人で持ち上げたり動かしたり しないで下さ い。 • 転倒注意 ! 本製品から複数のコンポーネントが突き出した状態にしておく とエンクロージャが転 倒する恐れがあります。 転倒リスクを回避するために、 エンクロージャからはコンポーネントが突 き出ないようにして下さい。 • 本製品の上に何も載せないで下さい。 複数のエンクロージャを重ねて設置しないで下さい。 • 液体物をエンクロージャに近づけないようにして下さい。 • エンクロージャ自身と中に積載する装置の総重量に耐えられるエリアに設置して下さい。 • この製品にはアースが必要です。 アース接続をしていない状態で本製品を使用しないでくださ い。 To view manuals, videos, drivers, downloads, technical drawings, and more visit www.startech.com/support...
-
Page 9: Table Of Contents
Removing the Roof Panel ........................22 Grounding the Rack ..........................23 Adjusting the Vertical Mounting Rails or Cable Management Rails ........23 Baying Multiple Racks Together ......................26 To view manuals, videos, drivers, downloads, technical drawings, and more visit www.startech.com/support... -
Page 10: Product Diagram
Product Diagram Actual product may vary from photos Front View Front Door Door Handle Caster Leveler To view manuals, videos, drivers, downloads, technical drawings, and more visit www.startech.com/support... -
Page 11: Side View
Side View Side Panel Locking Latch To view manuals, videos, drivers, downloads, technical drawings, and more visit www.startech.com/support... -
Page 12: Product Information
• 13 mm Socket x 1 • Level x 1 • Grounding Wire x 1 • Phillips Head Screwdriver x 1 • Cage Nut Tool x 1 • To view manuals, videos, drivers, downloads, technical drawings, and more visit www.startech.com/support... -
Page 13: Unpacking The Rack
The Side Panels box will be shipped in the Rack’s interior. Remove the Tie Straps from Side Panel Box and carefully slide the Side Panel Box out of the Rack through either the Front or Rear Door. To view manuals, videos, drivers, downloads, technical drawings, and more visit www.startech.com/support... - Page 14 Note: Make sure that at least one person is holding the Rack in place while removing the brackets. Carefully remove the Rack off of the pallet and place it on a firm, level surface. To view manuals, videos, drivers, downloads, technical drawings, and more visit www.startech.com/support...
-
Page 15: Installation
(4 located next to each Caster) by turning it clockwise until the base of the leveler is tightly pressed against the surface, supporting the weight of the Rack. Levelers To view manuals, videos, drivers, downloads, technical drawings, and more visit www.startech.com/support... -
Page 16: Installing The Cage Nuts
Rack with the heaviest equipment and work your way to the top. Determine the U-space of your equipment and where in the Rack you want to install the device. To view manuals, videos, drivers, downloads, technical drawings, and more visit www.startech.com/support... - Page 17 Use the M6 Screws to secure the device into place. If your device has mounting brackets with hooks, just hook the bracket to the position where you want your device to To view manuals, videos, drivers, downloads, technical drawings, and more visit www.startech.com/support...
-
Page 18: Removing The Front And/Or Rear Door
Door from the Rack. Unplug the Grounding Wire connecting the Door to the Door Frame. The Grounding Wire is located in the top inside corner of the Door. Grounding Wire To view manuals, videos, drivers, downloads, technical drawings, and more visit www.startech.com/support... -
Page 19: Removing The Side Panels
Side Panel from the Rack. While supporting the top portion of the Side Panel, pull the Locking Latch on the side panel downward, to release the Side Panel from the Rack Frame. To view manuals, videos, drivers, downloads, technical drawings, and more visit www.startech.com/support... - Page 20 Locking Latches To view manuals, videos, drivers, downloads, technical drawings, and more visit www.startech.com/support...
- Page 21 Side Panel away from the Rack Frame. Note: The bottom of the Side Panel is hooked onto a lip on the Rack Frame. Side Panels Removed To view manuals, videos, drivers, downloads, technical drawings, and more visit www.startech.com/support...
-
Page 22: Installing The Side Panels
Slide the lip of the Side Panel into the lip on the Rack Frame. Push the top of the Side Panel into the Rack Frame until you hear it click (lock) into place. To view manuals, videos, drivers, downloads, technical drawings, and more visit www.startech.com/support... -
Page 23: Removing The Roof Panel
Locking Tabs (located at the front of the Roof Panel) out from the slots on the Rack Frame. Carefully lift the Roof Panel out of the Rack Frame. To view manuals, videos, drivers, downloads, technical drawings, and more visit www.startech.com/support... -
Page 24: Grounding The Rack
Rails. Two M6 Screws and Cage Nuts are located at the top, two are located in the middle and two are located at the bottom of the Mounting Rail. To view manuals, videos, drivers, downloads, technical drawings, and more visit www.startech.com/support... - Page 25 Using a Phillips Head Screwdriver, remove the six M6 Screws. Using a Cage Nut Tool, remove the six Cage Nuts. Removing M6 screws To view manuals, videos, drivers, downloads, technical drawings, and more visit www.startech.com/support...
- Page 26 Nuts through the Mounting Rail and into the Depth Adjustment Rail. Insert the M6 Screws through the Mounting Rail and into the Depth Adjustment Rails. Use a Phillips Head Screwdriver to tighten the M6 Screws. To view manuals, videos, drivers, downloads, technical drawings, and more visit www.startech.com/support...
-
Page 27: Baying Multiple Racks Together
Align the racks side by side with the Rack’s Front Doors facing forward. Open the Rack’s Front Door allowing you access to the Rack’s Inner Door Frame where the Baying Brackets are located. To view manuals, videos, drivers, downloads, technical drawings, and more visit www.startech.com/support... - Page 28 Note: The adjoining rack may have a Baying Bracket Screw already installed in the Baying Screw Hole. Using a Phillips Head Screwdriver, Loosen the Baying Bracket Screw holding the Baying Bracket in place. To view manuals, videos, drivers, downloads, technical drawings, and more visit www.startech.com/support...
- Page 29 Insert an M5 Screw, through the Baying Bracket and into the adjoining Rack. Use a Phillips Head Screwdriver to tighten the M5 Screw. Retighten the Baying Bracket Screw that was loosened in step 4. To view manuals, videos, drivers, downloads, technical drawings, and more visit www.startech.com/support...
- Page 30 Limitation of Liability In no event shall the liability of StarTech.com Ltd. and StarTech.com USA LLP (or their officers, directors, employees or agents) for any damages (whether direct or indirect, special, punitive, incidental, consequential, or otherwise), loss of profits, loss of business, or any pecuniary loss, arising out of or related to the use of the product exceed the actual price paid for the product.
- Page 31 Hard-to-find made easy. At StarTech.com, that isn’t a slogan. It’s a promise. StarTech.com is your one-stop source for every connectivity part you need. From the latest technology to legacy products — and all the parts that bridge the old and new — we can help you find the parts that connect your solutions.
Need help?
Do you have a question about the RK4242BK30 and is the answer not in the manual?
Questions and answers