Table of Contents
Advertisement
Quick Links
Advertisement
Table of Contents

Subscribe to Our Youtube Channel
Related Manuals for Buchi Pure C-810


Summary of Contents for Buchi Pure C-810
- Page 1 Pure Chromatography Instruments Operation Manual...
- Page 2 CH-9230 Flawil 1 E-Mail: quality@buchi.com BUCHI reserves the right to make changes to the manual as deemed necessary in the light of experience, especially with respect to structure, illustrations and technical details. This manual is copyrighted. Information from it may neither be reproduced, distributed, or used for competitive purposes, nor made available to third parties.
-
Page 3: Table Of Contents
Personal protective equipment .................... 12 Modifications........................ 12 Product description...................... 13 Description of function ...................... 13 Configuration ........................ 14 3.2.1 Front view Pure C-810 / C-815 ................. 14 3.2.2 Front view Pure C-830 / C-835 / C-850 .............. 15 3.2.3 Rear view........................ 15 3.2.4 Connections on gradient valve ................. 17 Type plate.......................... 17 Scope of delivery ......................... 18... - Page 4 Table of contents Büchi Labortechnik AG Installation.......................... 24 Before installation ........................ 24 Installation site........................ 24 Securing against earthquakes ..................... 24 Establishing electrical connections.................. 25 Establishing solvent connection .................. 25 Installing the solvent level sensor.................. 26 Assigning solvent to solvent lines.................. 26 Calibrating the solvent level sensor.................. 27 Installing the exhaust (ELSD only) ..................
- Page 5 Büchi Labortechnik AG Table of contents Operation.......................... 33 Control panel ........................ 33 6.1.1 Layout of control panel ..................... 33 6.1.2 Enter value........................ 34 6.1.3 Menu bar........................ 35 6.1.4 Conditions panel ....................... 37 6.1.5 Collection panel ...................... 38 6.1.6 Gradient panel ...................... 39 6.1.7 Run panel ......................... 40 6.1.8 Solvent selection panel..................... 41 6.1.9 Detector selection panel ................... 41 6.1.10 Slope detection panel .................... 42 Editing a method........................ 42...
- Page 6 Table of contents Büchi Labortechnik AG 6.7.3 Starting a Prep separation using a method .............. 66 6.7.4 Changings during a separation................. 67 6.7.5 Ending a Prep separation .................. 67 6.7.6 Shutting down the instrument ................... 67 Performing a Prep separation manually ................ 67 6.8.1 Preparing the instrument .................. 68 6.8.2 Selecting the prep mode (Pure C-850 only) ............. 68 6.8.3 Starting a separation.................... 68 6.8.4 Changings during a separation................. 69...
- Page 7 Büchi Labortechnik AG Table of contents Appendix .......................... 93 10.1 Spare parts and accessories .................... 93 10.1.1 Accessories ...................... 93 10.1.2 Sample introduction accessories ................ 94 10.1.3 Spare parts ....................... 95 10.1.4 Tubes........................ 95 10.1.5 Tools and adapter kits .................... 95 10.1.6 Wear parts ........................ 96 10.2 Folder locations ........................ 96 10.3 Finding out separation conditions with the navigator............
-
Page 8: About This Document
If you have any questions after reading this operation manual: Contact BÜCHI Labortechnik AG Customer Service. https://www.buchi.com/contact Warning notices in this document Warning notices warn you of dangers that can occur when handling the device. -
Page 9: Trademarks
Büchi Labortechnik AG About this document | 1 R This character draws attention to a requirement that must be met before the instructions below are carried out. This character indicates an instruction that must be carried out by the user. ð... -
Page 10: Safety
— The staff must comply with the local applicable requirements and regulations for safe and hazard-conscious working practices. — Safety-related incidents that occur while using the device should be reported to the manufacturer (quality@buchi.com). 10/102 Operation Manual Pure Chromatography Instruments... -
Page 11: Location Of Warning Signs On The Product
Büchi Labortechnik AG Safety | 2 BUCHI service technicians Service technicians authorized by BUCHI have attended special training courses and are authorized by BÜCHI Labortechnik AG to carry out special servicing and repair measures. Location of warning signs on the product Fig. 1: Location of the warning signs... -
Page 12: Damage To The Internal Memory Due To Incorrect Shutting Down Of The Instrument
Unauthorized modifications can effect safety and lead to accidents. Use only genuine BUCHI accessories, spare parts and consumables. Carry out technical changes only with prior written approval from BUCHI. Only allow changes to be made by BUCHI service technicians. BUCHI accepts no liability for damage, faults and malfunctions resulting from unauthorized modifications. -
Page 13: Product Description
Büchi Labortechnik AG Product description | 3 Product description Description of function Pure instruments are purification devices designed to purify complex samples by either flash chromatography, prep chromatography or by both. — Flash chromatography has the ability to separate gram size samples in short period. -
Page 14: Configuration
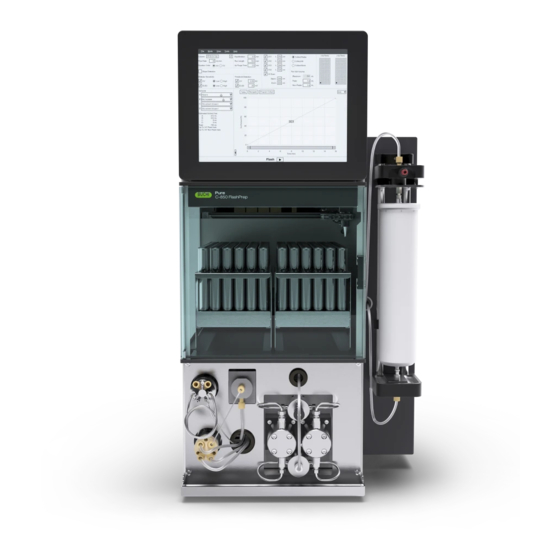
Büchi Labortechnik AG 3 | Product description Configuration 3.2.1 Front view Pure C-810 / C-815 Fig. 2: Front view Pure C-810 / C-815 Control panel RFID reader On/Off switch USB Port Injection port Cartridge holder Flash pump ELSD flow split valve... -
Page 15: Front View Pure C-830 / C-835 / C-850
Büchi Labortechnik AG Product description | 3 3.2.2 Front view Pure C-830 / C-835 / C-850 Fig. 3: Front view Pure C-830 / C-835 / C-850 Control panel RFID reader (C-850 only) On/Off switch USB Port Column holder Prep HPLC pump ELSD flow split valve ELSD nebulizer (C-835 / C-850 only) - Page 16 Büchi Labortechnik AG 3 | Product description 6 5 4 Fig. 4: Rear view Ventilation slot Gradient valve (See Chapter 3.2.4 "Connections on gradient valve", page 17 ) Exhaust Signal connection (used for instruments with ELSD (for external air supply) only) USB ports Power supply connection Fuse On/Off master switch...
-
Page 17: Connections On Gradient Valve
Büchi Labortechnik AG Product description | 3 3.2.4 Connections on gradient valve Fig. 5: Connections on the rear side Waste line Solvent line 4 Solvent line 3 Waste level sensor Solvent line 2 Solvent line 1 Solvent level sensor line 1 Solvent level sensor line 2 Solvent level sensor line 3 10 Solvent level sensor line 4... -
Page 18: Scope Of Delivery
Büchi Labortechnik AG 3 | Product description Buchi Labortechnik AG 9230 Flawil / Switzerland Type: 10xxxxxxxx Volt: xxx-xxx VAC Frequ.: Power: xxxx Built: 20xx Made in Switzerland Fig. 6: Type Plate Company name and address Instrument name Serial number Input voltage range... - Page 19 Büchi Labortechnik AG Product description | 3 Pure Pure Pure Pure Pure C-810 C-815 C-830 C-835 C-850 Pollution degree IP Code IP 20 IP 20 IP 20 IP 20 IP 20 Solvents Gas pressure 8 bar 8 bar 8 bar 8 bar 8 bar ( maximum)
-
Page 20: Ambient Conditions
Büchi Labortechnik AG 3 | Product description Pure Pure Pure Pure Pure C-810 C-815 C-830 C-835 C-850 Pressure range 0-300 bar 0-300 bar 0-300 bar Flow rate 0 - 100 ml/ 0 - 100 ml/ 0 - 100 ml/ Flow rate accuracy - <... -
Page 21: Material
Büchi Labortechnik AG Product description | 3 3.5.3 Material Component Materials of construction Housing Powder coated steel 1.4301 Fraction collection bay PMMA / PET Pump head PEEK Pump cover Pump excenter housing Aluminum Tubings Fitting Valve screw fitting Ferrule ETFE Cone ring Radial seal PTFE... -
Page 22: Transport And Storage
Büchi Labortechnik AG 4 | Transport and storage Transport and storage Transport NOTICE Risk of breakage due to incorrect transportation Make sure that all parts of the device are safely packed in such a way as to prevent breakage, ideally in the original box. Avoid sharp movements during transit. -
Page 23: Lifting The Instrument
Büchi Labortechnik AG Transport and storage | 4 Lifting the instrument WARNING Danger due to incorrect transportation The possible consequences are crushing injuries, cuts and breakages. The instrument should be transported by two persons at the same time. Lift the instrument at the points indicated. Lift the instrument –... -
Page 24: Installation
Büchi Labortechnik AG 5 | Installation Installation Before installation NOTICE Instrument damage due to switching it on too early. Switching on the instrument too early after transportation can cause damage. Climatize the instrument after transportation. Installation site The installation site must meet the following requirements: —... -
Page 25: Establishing Electrical Connections
Risk of property damage and diminished performance due to use of unsuitable power cables. The power supply cables supplied with the product by BUCHI precisely match the requirements of the device. If other power cables that do not meet those requirements are used, the device may be damaged and/or its performance diminished. -
Page 26: Installing The Solvent Level Sensor
Büchi Labortechnik AG 5 | Installation Precondition: R Make sure that the instrument is not connected to the power supply. Attach all solvent lines to the instrument. Connections see Chapter 3.2.4 "Connections on gradient valve", page 17 Put the other end of the solvent line into the solvent bottle. -
Page 27: Calibrating The Solvent Level Sensor
Büchi Labortechnik AG Installation | 5 R The solvent you wish to use is part of the solvent library. See Chapter 6.3 "Editing a solvent", page 53 Navigate to the dialog according to the navigation path. Solvent Loading ð The display shows the dialog box Solvent Loading Tap the drop-down list next to Line 1. -
Page 28: Installing The Exhaust (Elsd Only)
Büchi Labortechnik AG 5 | Installation Installing the exhaust (ELSD only) Press the exhaust gas hose (2) on the exhaust (1). 5.10 Assembling the waste bottle NOTICE Waste bottle on top of the instrument Waste bottle on top of the instrument can cause property damages. Make sure that there is a decline between the connection on the instrument and the waste bottle. -
Page 29: Calibrating The Waste Level Sensor
Büchi Labortechnik AG Installation | 5 5.12 Calibrating the waste level sensor Navigation path ➔ Tools ➔ Calibration and Defaults Precondition: R The waste level sensor is not covered by liquid waste. Navigate to the dialog according to the navigation path. Calibration ð... -
Page 30: Assembling The Gas Connection (Option)
Büchi Labortechnik AG 5 | Installation 5.14 Assembling the gas connection (option) Precondition: R The gas supply complies with the specifications. See Chapter 3.5 "Technical data", page 18 Cut 50 mm from the gas tubing. Attach the cut tubing to the air filter. Secure the tubing in place. -
Page 31: Assembling The Solvent Bottle Platform (Option)
Büchi Labortechnik AG Installation | 5 5.15 Assembling the solvent bottle platform (option) NOTICE Waste bottle on top of the instrument Waste bottle on top of the instrument can cause property damages. Do not place the waste bottle an the solvent bottle platform. Turn the solvent bottle platform upside down. -
Page 32: Assembling The Sample Loop (Prep Instruments Only)
Büchi Labortechnik AG 5 | Installation 5.16 Assembling the sample loop (Prep instruments only) Attach the sample loop to the instrument at the position indicated. 32/102 Operation Manual Pure Chromatography Instruments... -
Page 33: Operation
Büchi Labortechnik AG Operation | 6 Operation Control panel 6.1.1 Layout of control panel Fig. 8: Display Description Function [Menu] bar Shows the available menus. See Chapter 6.1.3 "Menu bar", page 35 [Conditions] panel Shows the properties and default settings of the installed column / cartridge. See Chapter 6.1.4 "Conditions panel", page 37 [Wavelength] panel... -
Page 34: Enter Value
Büchi Labortechnik AG 6 | Operation Description Function [Solvent selection] panel Shows selectable solvents. See Chapter 6.1.8 "Solvent selection panel", page 41 [Detector settings] panel Shows selectable detector options and its settings. See Chapter 6.1.9 "Detector selection panel", page 41 [Slope detection] panel Shows selectable slope detection options. See Chapter 6.1.10 "Slope detection panel", page 42 6.1.2... -
Page 35: Menu Bar
Büchi Labortechnik AG Operation | 6 Tap the button [OK]. ð The value is saved. ð The dialog box closes. 6.1.3 Menu bar The following menus are available: Menu Submenu / Action Explanation [File] [Open Method] Load an existing method. See Chapter 6.4.6 "Selecting an existing method", page 61 [Save Method]... - Page 36 (C-810 C-815 C-850 only) [UV Baseline] Adjust the baseline to zero during a run. [Language] Select a language. [Service] BUCHI service technicians only [Help] [About] The display shows instrument details. [View Manual] The display shows the Operation manual. 36/102...
-
Page 37: Conditions Panel
Büchi Labortechnik AG Operation | 6 6.1.4 Conditions panel Information button (Information about the selected col- umn) The conditions area contains the following settings: Action Option Explanation [Column] Enter value Enter a name for the present car- tridge. (Prep mode) [Column] Select column /auto- Shows the name of the column in-... -
Page 38: Collection Panel
Büchi Labortechnik AG 6 | Operation Action Option Explanation [Air Purge Time] Enter value Indicates the period of time that air is passed through the column after the separation to remove mobile phase 6.1.5 Collection panel Tray number The collection vial matrix corresponds to the trays. The trays are detected by the auto recognition. -
Page 39: Gradient Panel
Büchi Labortechnik AG Operation | 6 6.1.6 Gradient panel Edit the gradient and see separation details. NOTE According to the instrument status different options are available. Action Option Explanation [Table] Create a gradient See Chapter "Editing the gradient in tabular mode", page 46 [Navigator] Finding out Flash sepa- See Chapter 10.3 "Finding out sepa-... -
Page 40: Run Panel
Büchi Labortechnik AG 6 | Operation Action Option Explanation [Gradient hold] Function The gradient is held at the current solvent ratio. The gradient continues to the origi- nal end-point. [Auto gradient hold] Function The gradient will be held every time the signal goes over the set thresh- old. -
Page 41: Solvent Selection Panel
Büchi Labortechnik AG Operation | 6 6.1.8 Solvent selection panel Select solvents for a separation. See Chapter 6.2.3 "Selecting a solvent", page 45 6.1.9 Detector selection panel Action Option Explanation [ELSD] Enable / Disable Action enabled: Select value Select between Low / High Enter values for threshold Action disabled: No selection... -
Page 42: 6.1.10 Slope Detection Panel
Editing a method 6.2.1 Selecting a cartridge (Flash mode) NOTE The automatic reading of the cartridge information can only be done with specific BUCHI RFID tagged cartridges. The indication for recognizing the cartridge is a sound. 42/102 Operation Manual Pure Chromatography Instruments... - Page 43 Büchi Labortechnik AG Operation | 6 Information button (Information about the selected col- umn) Navigation path ➔ Conditions panel Navigate to the panel according the navigation path. Conditions selection Tap the input box next to [Column]. ð The display shows a menu with selectable cartridges. Select the cartridges you wish to use.
-
Page 44: Selecting A Column (Prep Mode)
Büchi Labortechnik AG 6 | Operation 6.2.2 Selecting a column (Prep mode) Information button (Information about the selected col- umn) Navigation path ➔ Conditions panel Navigate to the panel according the navigation path. Conditions selection Tap the input box next to [Column]. ð... -
Page 45: Selecting A Solvent
Büchi Labortechnik AG Operation | 6 6.2.3 Selecting a solvent Navigation path ➔ Solvent selection panel Precondition: R The required solvents lines are connected and assigned. See Chapter 5.7 "Assigning solvent to solvent lines", page 26 Navigate to the panel according the navigation path. Solvent selection Tap the drop-down list next to A: . - Page 46 Büchi Labortechnik AG 6 | Operation Editing the gradient in tabular mode The following settings are available: Action Option Explanation [Min] Enter value Enter the time until the value in col- umn [% 2nd] is reached. [Solvents] Select value Select solvent line combinations. [% 2nd] Enter value Enter the percentage rate for the...
- Page 47 Büchi Labortechnik AG Operation | 6 Enter the time. Tap the button [OK]. Tap the cell for [AB▼]. ð The display shows a drop-down list with solvent line combinations. Select the combination that you want to use. Tap the cell for [% 2nd]. ð...
-
Page 48: Editing Detector Selection
Büchi Labortechnik AG 6 | Operation Change solvent combinations Solvent line combinations can be accessed by clicking on the AB▼ box to reveal a drop-down list. 6.2.5 Editing detector selection Navigation path ➔ Detector selection panel Navigate to the panel according the navigation path. Detector selection Activate checkbox for the detector you wish to use. -
Page 49: Editing The Fraction Collection Criteria
Büchi Labortechnik AG Operation | 6 Status Checkbox Explanation Explanation The instrument collects fractions. Monitoring The instrument records the data from the UV detector but does not collect the frac- tions. The instrument does not record data from the UV detector and does not col- lect fractions. -
Page 50: Editing The Fraction Collection Time
Büchi Labortechnik AG 6 | Operation The following fraction collection criteria are available: Criteria Meaning [Collect Peaks] The instrument collects fractions if one detector signal is above the set threshold. [Collect All] The instrument collects all the fractions regardless of de- tection signals. - Page 51 Büchi Labortechnik AG Operation | 6 Program Collect allows to turn off fraction collection for a specific time. The fraction collector defaults to collect the full run length unless the values from Program Collect override the collection. Navigation path ➔ Gradient panel Navigate to the panel according the navigation path.
-
Page 52: Editing The Vapor Sensor Sensitivity
Büchi Labortechnik AG 6 | Operation 6.2.9 Editing the vapor sensor sensitivity The vapor sensor detects solvent concentration in the ambient air. The following sensitivity limits are available: Sensitivity Meaning High Used for non-volatile solvents Medium Compromise between the low and high setting Used for volatile or semi-volatile solvents The vapor sensor is off Navigation path... -
Page 53: Editing A Solvent
Büchi Labortechnik AG Operation | 6 Navigate to the dialog according to the navigation path. Save Method as ð The display shows the dialog box Save Method as Tap the input box [Enter method name]. ð The display shows a dialog with an alphanumeric input box. Enter the name of the method. -
Page 54: Deleting A Solvent
Büchi Labortechnik AG 6 | Operation Select solvent group for the defined solvent. Tap the button [OK]. ð The dialog box closes. ð The solvent is added. Tap the button [Close]. ð The dialog box closes. Solvent Definition 6.3.2 Deleting a solvent Navigation path ➔... -
Page 55: Injecting A Sample Into The Flash System
Büchi Labortechnik AG Operation | 6 Press the plunger. Wait until the run starts. Disconnect the syringe at the inert loop port. 6.4.2 Injecting a sample into the flash system Injecting a sample into the flash system at the luer port CAUTION Not removed syringe after injection. - Page 56 Büchi Labortechnik AG 6 | Operation Connect the syringe at the luer port. Press the plunger. Disconnect the syringe at the luer port. Injecting a sample into the flash system with a solid loader NOTE Removing is done in reverse sequence. Loosen the solvent line on the top of the cartridge holder.
-
Page 57: Installing And Removing A Cartridge
Instead of a cartridge a bypass can be installed. NOTE The automatic reading of the cartridge information can only be done with specific BUCHI RFID tagged cartridges. The indication for recognizing the cartridge is a sound. Hold the cartridge above the RFID reader. -
Page 58: Installing And Removing A Column
Büchi Labortechnik AG 6 | Operation Lift the clamping plate to release the lock mechanism and pull up the upper part of the cartridge holder. Install the cartridge by pushing the cartridge inlet down into the luer fitting at the bottom plate. Lower the upper part of the cartridge holder over the luer connection. - Page 59 Büchi Labortechnik AG Operation | 6 Install the column in the bottom plate of the column holder. Lower down the upper part of the column holder. Remove the tubing from the upper part of the column holder. Attach the tubing to the column. Operation Manual Pure Chromatography Instruments 59/102...
-
Page 60: Inserting The Fraction Collection Tray
Büchi Labortechnik AG 6 | Operation Remove the lower tubing from the upper part of the column holder. Attach the tubing to the column. 6.4.5 Inserting the fraction collection tray NOTE By default the first available tube on each tray is reserved for waste. Changing the setting. -
Page 61: Selecting An Existing Method
[Override Start Vial] Select the start vial according to your needs. Performing a Flash separation using a method NOTE Pure C-810 / C-815 / C-850 only 6.5.1 Preparing the instrument Time required: approx. 30 sec. Precondition: R All commissioning operations have been completed. -
Page 62: Selecting The Flash Mode (Pure C-850 Only)
Büchi Labortechnik AG 6 | Operation 6.5.2 Selecting the flash mode (Pure C-850 only) Navigation path ➔ Mode Navigate to the menu according to the navigation path. Mode Select [Flash]. ð The flash mode is selected. 6.5.3 Starting Flash separation using a method Precondition: R The instrument is prepared. -
Page 63: Ending A Flash Separation
Tap the action [Shut down]. Confirm the secure question with [Yes]. ð The instrument is shutting down. Performing a Flash separation manually NOTE Pure C-810 / C-815 / C-850 only 6.6.1 Preparing the instrument Time required: approx. 30 sec. Precondition: R All commissioning operations have been completed. -
Page 64: Selecting The Flash Mode (Pure C-850 Only)
Büchi Labortechnik AG 6 | Operation Tap the On/Off switch. ð The instrument is starting up. 6.6.2 Selecting the flash mode (Pure C-850 only) Navigation path ➔ Mode Navigate to the menu according to the navigation path. Mode Select [Flash]. ð... -
Page 65: Ending A Flash Separation
Büchi Labortechnik AG Operation | 6 Follow the instructions on the display. ð Installing the cartridge. See Chapter 6.4.3 "Installing and removing a cartridge", page 57 ð Introducing the sample into the system. See Chapter 6.4.2 "Injecting a sample into the flash system", page 55 6.6.4 Changings during a separation NOTE... -
Page 66: Performing A Prep Separation Using A Method
Büchi Labortechnik AG 6 | Operation Performing a Prep separation using a method NOTE Pure C-830 / C-835 / C-850 only 6.7.1 Preparing the instrument Time required: approx. 30 sec. Precondition: R All commissioning operations have been completed. See Chapter 5 "Installation", page 24 Switch the On/Off master switch to On. -
Page 67: Changings During A Separation
Büchi Labortechnik AG Operation | 6 According the requirements adjust the settings. See Chapter 6.4.7 "Selecting values on the dialog box Sample Loading", page 61 Follow the instructions on the display. ð Installing the column. See Chapter 6.4.4 "Installing and removing a column", page 58 ð... -
Page 68: Preparing The Instrument
Büchi Labortechnik AG 6 | Operation 6.8.1 Preparing the instrument Time required: approx. 30 sec. Precondition: R All commissioning operations have been completed. See Chapter 5 "Installation", page 24 Switch the On/Off master switch to On. Tap the On/Off switch. ð The instrument is starting up. 6.8.2 Selecting the prep mode (Pure C-850 only) Navigation path... -
Page 69: Changings During A Separation
Büchi Labortechnik AG Operation | 6 Select the sample collection in the panel. See Chapter 6.2.7 "Editing Collection the fraction collection criteria", page 49 Select the collection criteria in the panel. Collection criteria Tap the button [Start] on the panel. ð The display shows the dialog box Sample Loading ð... -
Page 70: Identifying Fractions
Büchi Labortechnik AG 6 | Operation Confirm the secure question with [Yes]. ð The instrument is shutting down. Identifying fractions 6.9.1 Identifying fractions by peak Fig. 9: Identifying fractions Navigation path ➔ Gradient panel Precondition: R A separation is finished. Navigate to the panel according the navigation path. -
Page 71: Identifying Fractions Per Vial
Büchi Labortechnik AG Operation | 6 6.9.2 Identifying fractions per vial Fig. 10: Identifying fractions Navigation path ➔ Collection panel Precondition: R A separation is finished. Navigate to the panel according the navigation path. Collection Tap the target vial. ð The panel shows the corresponding peak. -
Page 72: 6.10.2 Sending Data To Usb
Büchi Labortechnik AG 6 | Operation 6.10.2 Sending data to USB Navigation path ➔ Run panel Precondition: R The instrument is in past run mode. Connect a USB storage device to the instrument. Navigate to the panel according the navigation path. Tap the button [Data to USB]. -
Page 73: Cleaning And Servicing
Any servicing and repair work which involves opening up the casing may only be carried out by BUCHI service technicians. Use only genuine BUCHI consumables and spare parts in order to ensure correct operation of the device and preserve the warranty. -
Page 74: Carrying Out A Data Backup
Büchi Labortechnik AG 7 | Cleaning and servicing Component Action Frequency Nebulizer Clean the nebulizer. See Chapter 7.4 Monthly "Cleaning the nebulizer", page 75 Air filter Replace the air filter. Yearly Carrying out a data backup Navigation path ➔ File ➔ Exit Navigate to the dialog according to the navigation path. -
Page 75: Cleaning The Nebulizer
Büchi Labortechnik AG Cleaning and servicing | 7 Cleaning the nebulizer Materials Needed: — HPLC-grade 50:50 methanol: water solution — Sonication bath Switch the On/Off master switch to Off. Disconnect the liquid inlet line from the nebulizer. Disconnect the gas inlet from the nebulizer Remove the knurled screws. -
Page 76: Cleaning The Check Valve
Büchi Labortechnik AG 7 | Cleaning and servicing Replace the nebulizer wear band. Place the nebulizer to the thrift tube. Attach the knurled screws. Connect the liquid and gas inlet lines to the nebulizer. Cleaning the check valve NOTE Most check valve problems can be solved by pumping a strong solution of liquid laboratory grade detergent through the check valves at a rate of 20 mL/min for one hour. -
Page 77: Cleaning The Instrument
Büchi Labortechnik AG Cleaning and servicing | 7 Navigation path ➔ Tools ➔ Manual Control ➔ Column Flushing... Precondition: R A bypass is installed. See Chapter 6.4.4 "Installing and removing a column", page 58 Navigate to the dialog according to the navigation path. Column Flushing Sonicate the check valve Materials needed:... -
Page 78: Cleaning The Solid Loader
Büchi Labortechnik AG 7 | Cleaning and servicing Navigate to the dialog according to the navigation path. Column Flushing Enter the required data according to your needs. Cleaning the solid loader Navigation path ➔ Tools ➔ Manual Control ➔ Solid Loader Flushing... Install a bypass. -
Page 79: Help With Faults
Büchi Labortechnik AG Help with faults | 8 Help with faults Faults, possible causes and solutions (general) Malfunction Possible cause Solution The instrument Power is not being supplied to Verify that the power cord is does not power up the system plugged in. - Page 80 Büchi Labortechnik AG 8 | Help with faults Malfunction Possible cause Solution Pulsation of pump Open or close time of the inlet Rinse the pump module with or outlet valves are not correct high flowrate with ethanol or hot distilled water. Residues in solvent Change check valves.
-
Page 81: Faults, Possible Causes And Solutions (Sample Injection)
Büchi Labortechnik AG Help with faults | 8 Faults, possible causes and solutions (sample injection) Malfunction Possible cause Solution Leak around the in- Dried sample or particulate Clean the injection port with jection port matter interferes with syringe appropriate solvent or fitting remove particulate matter. -
Page 82: Faults, Possible Causes And Solutions (Detection)
Büchi Labortechnik AG 8 | Help with faults Faults, possible causes and solutions (detection) Malfunction Possible cause Solution ELSD signal is low or Sample is too volatile Sample cannot be detected disappears by ELSD due to its volatility. No or low ELSD carrier gas flow Verify there is gas supplied to the instrument. -
Page 83: Error Messages
Serial communication dis- Restart the instrument. Solvent pump: Com- turbed munication to the pump cannot be es- tablished. Instrument Alarm: Contact BUCHI Customer Solvent pump: Mo- Service. tor overloading. Instrument Alarm: Hardware error solvent pump Contact BUCHI Customer Solvent pump: Mo- Service. - Page 84 Büchi Labortechnik AG 8 | Help with faults Error message Possible cause Solution Instrument Alarm: Hardware error solvent pump Contact BUCHI Customer Solvent pump: Service. Power supply error. Instrument Alarm: Hardware error fan solvent Contact BUCHI Customer Solvent pump: Sol- pump Service.
- Page 85 Büchi Labortechnik AG Help with faults | 8 Error message Possible cause Solution Instrument Alarm: Hardware error UV detector. Contact BUCHI Customer UV detector: Lamp Service. ignition fails after short douse in AU- TOZERO function and repeated High Voltage impulse and heater cycle fails too.
- Page 86 Büchi Labortechnik AG 8 | Help with faults Error message Possible cause Solution Instrument Alarm: Hardware error UV detector Contact BUCHI Customer UV detector: Any Service. fan is not working or any fan is discon- nected or mechani- cal blocked.
- Page 87 Büchi Labortechnik AG Help with faults | 8 Error message Possible cause Solution Solvent Pressure 2: Blockage in line after the ELSD Check the fluidic lines and Pressure limit has sampling valve components downstream been exceeded. from the pressure sensor 2 (between the ELSD sampling valve and the fraction collector valve, waste line)
- Page 88 Büchi Labortechnik AG 8 | Help with faults Error message Possible cause Solution Instrument Alarm: Vapor sensor settings are set Change the vapor limits to a Vapor too sensitive lower sensitivity. See Chapter 6.2.9 "Editing the vapor sensor sensitivity", page 52 Leaks Check for any leaks in the solvent flow paths.
-
Page 89: Resetting The Fraction Collector Arm
Reset the Fraction Collector arm. See Chapter 8.8 "Resetting the Fraction collector arm", page 89 Fraction collector arm did not Tighten the motor coupler. home properly Contact BUCHI Customer Service. Fraction collector arm motor is Contact BUCHI Customer slipping Service. Home position sensor is bad Contact BUCHI Customer Service. -
Page 90: Replacing The Shuttle Valve Rotor
Büchi Labortechnik AG 8 | Help with faults Confirm the secure question. ð The Fraction collector arm is resetted. Replacing the shuttle valve rotor Materials needed: — Torx wrench T10 — Pure sampling valve kit Switch the On/Off master switch to Off. Precondition: R Make sure that all tubings are marked for later installation. - Page 91 Büchi Labortechnik AG Help with faults | 8 Make sure that the holes in the new rotor and the pins inside the valve match. Attache the valve head to the instrument with screws. Attach all tubings to the instrument. Operation Manual Pure Chromatography Instruments 91/102...
-
Page 92: Taking Out Of Service And Disposal
When disposing, observe the disposal regulations of the materials used. Materials used see Chapter 3.5 "Technical data", page 18 Returning the instrument Before returning the instrument, contact the BÜCHI Labortechnik AG Service Department. https://www.buchi.com/contact 92/102 Operation Manual Pure Chromatography Instruments... -
Page 93: Appendix
Appendix 10.1 Spare parts and accessories Use only genuine BUCHI consumables and spare parts in order to ensure correct, safe and reliable operation of the system. NOTE Any modifications of spare parts or assemblies are only allowed with the prior written permission of BUCHI. -
Page 94: 10.1.2 Sample Introduction Accessories
Büchi Labortechnik AG 10 | Appendix Order no. Image Solvent bottle platform kit 11069285 Solvent bottle platform on top of the instrument. For maxi- mum 4 bottles (volume 4 L each) Retaining container 11068468 Retaining container for solvent bottle platform for more safety regarding leaking Pure Dry Air Supply unit 11069026... -
Page 95: 10.1.3 Spare Parts
Büchi Labortechnik AG Appendix | 10 10.1.3 Spare parts Order no. Image Pure cartridge holder 11065940 Cartridge holder for cartridges for 4 g to 330 g Pure column holder 11066594 Column holder for columns diameters 10mm to 50mm Injection valve UNF 1/4"-28 044867 Pure transfer line ELSD 11069409... -
Page 96: 10.1.6 Wear Parts
For all C-8xx, for enhanced sensitivity Shuttle valve rotor & head 11068229 Hose SV-ELSD cpl. 11069457 Pure Solid loader test 20 pcs 11069686 10.2 Folder locations Explanation Type Folder Method files .gfm C:\Users\Public\Documents\Buchi\Pure \methods Run files .gkfr C:\Users\Public\Documents\Buchi\Pure\runs 96/102 Operation Manual Pure Chromatography Instruments... -
Page 97: Finding Out Separation Conditions With The Navigator
Büchi Labortechnik AG Appendix | 10 10.3 Finding out separation conditions with the navigator 10.3.1 Open the navigator Navigation path ➔ Gradient panel Navigate to the panel according the navigation path. Gradient Tap the button [Navigator]. ð The display shows the dialog Navigator 10.3.2 TLC Silica The TLC-Silica tool uses TLC separation data to provide a recommended gradient for... -
Page 98: 10.3.3 Lc-C18
Büchi Labortechnik AG 10 | Appendix Measure the distance the spot moved on the silica TLC plates. Divide the measured value by the distance the solvent traveled. ð This is your Rf- value. Enter the value in the Rf entry field. Select the column you wish to use from the drop-down list ð... -
Page 99: 10.3.4 Lc-Transfer
Büchi Labortechnik AG Appendix | 10 Specification of the samples needed: — Two isocratic runs on a HPLC column — Different mobile phase solvent concentrations — Retention times (t1 and t2) of the components from the chromatograms. Precondition: R The display shows the dialog . - Page 100 Büchi Labortechnik AG 10 | Appendix The LC-Transfer tool converts an HPLC gradient into a Flash Chromatography gradient. Specification of the sample needed: — One run on a HPLC column (in gradient elution mode) — Times %B changes (t1, t2 and t3) Precondition: R The display shows the dialog .
- Page 102 T +971 4 313 2860 T +52 55 9001 5386 F +66 2 862 08 54 F +971 4 313 2861 latinoamerica@buchi.com bacc@buchi.com middleeast@buchi.com www.buchi.com/es-es www.buchi.com/th-th www.buchi.com We are represented by more than 100 distribution partners worldwide. Find your local representative at: www.buchi.com...
Need help?
Do you have a question about the Pure C-810 and is the answer not in the manual?
Questions and answers