Table of Contents
Advertisement
Quick Links
Advertisement
Table of Contents
Troubleshooting

Related Manuals for Buchi K-365 Dist Line


Summary of Contents for Buchi K-365 Dist Line
- Page 1 K-365 Dist Line Operation Manual...
- Page 2 CH-9230 Flawil 1 E-Mail: quality@buchi.com BUCHI reserves the right to make changes to the manual as deemed necessary in the light of experience, especially with respect to structure, illustrations and technical details. This manual is copyrighted. Information from it may neither be reproduced, distributed, or used for competitive purposes, nor made available to third parties.
-
Page 3: Table Of Contents
Communication connections .................. 18 3.2.5 Connections on the rear side.................. 20 Scope of delivery ......................... 23 Type plate.......................... 23 Technical data ........................ 24 3.5.1 K-365 Dist Line ....................... 24 3.5.2 Ambient conditions .................... 26 3.5.3 Materials ......................... 26 3.5.4 Installation site...................... 27 Transport and storage ...................... 28 Transport .......................... 28... - Page 4 Menu bar interface pro ...................... 47 7.3.1 Home menu ...................... 47 7.3.2 Manual control menu .................... 47 7.3.3 Method menu...................... 48 7.3.4 Configuration menu .................... 48 7.3.5 Determination data menu .................. 50 Status bar interface pro ....................... 50 Operation Manual K-365 Dist Line...
- Page 5 8.6.22 Changing the aspiration time for the receiving vessel for a method (MultiDist T only) .......................... 70 Editing user setting ...................... 71 8.7.1 Creating a new user .................... 71 8.7.2 Deleting a user ....................... 71 8.7.3 Changing the name of a user ................. 72 Operation Manual K-365 Dist Line...
- Page 6 Deleting one determination.................. 79 9.7.2 Deleting all determination data ................ 80 Exporting determination data (Interface pro only) ............... 80 9.8.1 Exporting one determination (Interface pro only) ........... 80 9.8.2 Exporting all determination data (Interface pro only).......... 80 Operation Manual K-365 Dist Line...
- Page 7 Turning the splash protector nut.................. 97 Taking out of service and disposal.................. 98 12.1 Taking out of service ...................... 98 12.2 Disposal.......................... 98 12.3 Returning the instrument ..................... 98 12.4 Removing water from the steam generator ................. 98 Operation Manual K-365 Dist Line...
- Page 8 13.1.5 Titration spare parts.................... 102 13.1.6 Sample tubes...................... 103 13.1.7 Cable and tubing .................... 103 13.1.8 Other spare parts.................... 104 13.1.9 Consumables...................... 104 13.1.10 Maintenance kit .................... 105 13.1.11 Upgrade kits ...................... 105 13.1.12 Documentation ..................... 105 viii Operation Manual K-365 Dist Line...
-
Page 9: About This Document
Connected devices In addition to these operating instructions, follow the instructions and specifications in the documentation for the connected devices. Operation Manual K-365 Dist Line 9/106... -
Page 10: Safety
— Use of samples, which can explode or inflame (example: explosives, etc.) due to shock, friction, heat or spark formation. — Use of the instrument with other than original BUCHI glassware. Staff qualification Unqualified persons are unable to identify risks and are therefore exposed to greater dangers. -
Page 11: Personal Protective Equipment
Büchi Labortechnik AG Safety | 2 BUCHI service technicians Service technicians authorized by BUCHI have attended special training courses and are authorized by BÜCHI Labortechnik AG to carry out special servicing and repair measures. Personal protective equipment Depending on the application, hazards due to heat and/or corrosive chemicals may arise. -
Page 12: Protection Devices
The device has been developed and manufactured using the latest technological advances. Nevertheless, risks to persons, property or the environment can arise if the device is used incorrectly. Appropriate warnings in this manual serve to alert the user to these residual dangers. 12/106 Operation Manual K-365 Dist Line... -
Page 13: Hot Surfaces
Unauthorized modifications can effect safety and lead to accidents. Use only genuine BUCHI accessories, spare parts and consumables. Carry out technical changes only with prior written approval from BUCHI. Only allow changes to be made by BUCHI service technicians. BUCHI accepts no liability for damage, faults and malfunctions resulting from unauthorized modifications. -
Page 14: Product Description
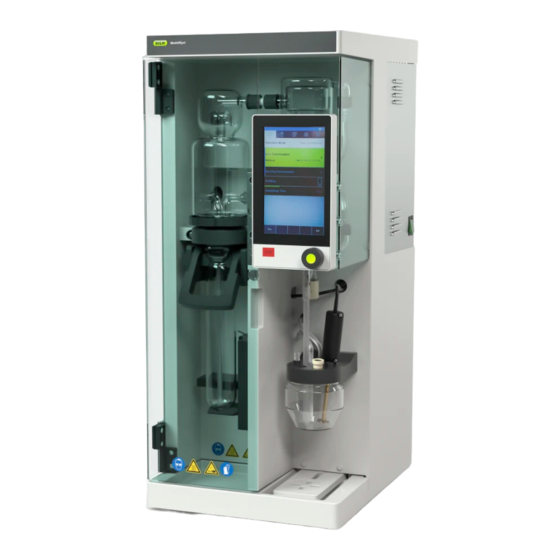
The interface differs according to the configuration: Interface see Chapter 6 "Description of the interface", page 39 ð EasyDist, BasicDist Interface Pro see Chapter 7 "Description of the interface pro", page 45 ð BasicDist (option), MultiDist, MultiDist T 14/106 Operation Manual K-365 Dist Line... - Page 15 Product description | 3 Fig. 3: Front view Splash protector Condenser Ventilation slots On/Off master switch Ventilation slots Receiving area See Chapter 3.2.3 "Receiving area", page 16 Sample tube Handle Interface (according to the instrument configu- ration) Operation Manual K-365 Dist Line 15/106...
-
Page 16: Rear View
10 Ventilation slots 11 Rear cable duct 12 Power supply connection 13 Fuses 14 Type plate (resettable) See Chapter 3.4 "Type plate", page 23 3.2.3 Receiving area The receiving area is different for each instrument configuration. 16/106 Operation Manual K-365 Dist Line... - Page 17 Condenser outlet tubing Rear cable duct Tubing for boric acid aspiration Boric acid dosing Retainer stirrer Retainer dosing tip titration Receiving vessel Retainer titration sensor 10 Retainer temperature sensor 11 Retainer dosing tip back titration Operation Manual K-365 Dist Line 17/106...
-
Page 18: Communication Connections
(COM) (marked COM) (marked COM) Level detection sensor port H₂O tank level sensor port (marked Level Detection) (marked H₂O) Communication port Communication port (marked RS-232) (marked RS-232) NaOH tank level sensor port (marked NaOH) 18/106 Operation Manual K-365 Dist Line... - Page 19 (marked H₂O) (marked Sample Tube Waste) Communication port Communication port (marked RS-232) (marked RS-232) Acid tank level sensor port 10 NaOH tank level sensor port (marked Acid) (marked NaOH) 11 USB port (marked USB) Operation Manual K-365 Dist Line 19/106...
-
Page 20: Connections On The Rear Side
14 NaOH tank level sensor port (marked Receiver Waste) (marked NaOH) 15 USB port (marked USB) 3.2.5 Connections on the rear side The connections on the rear side are depending on the version of the instrument. 20/106 Operation Manual K-365 Dist Line... - Page 21 H₂O supply for steam generation Reserve Reserve Acid supply for sample tube Connections on the rear side BasicDist (option) The connections are located at the rear side of the instrument. See Chapter 3.2.2 "Rear view", page 16 Operation Manual K-365 Dist Line 21/106...
- Page 22 Fig. 13: Connections on the rear side Waste pump for sample tube H₂O supply for sample tube H₂O supply for steam generation Boric acid supply NaOH supply for sample tube Acid supply for sample tube 22/106 Operation Manual K-365 Dist Line...
-
Page 23: Scope Of Delivery
The scope of delivery depends of the configuration of the purchase order. Accessories are delivered as per the purchase order, order confirmation, and delivery note. Type plate The type plate identifies the instrument. The type plate is located at the rear of the instrument. Operation Manual K-365 Dist Line 23/106... -
Page 24: Technical Data
1 - 25°C 1 - 25°C (if the temperature is more than 25°C use a recirculating chiller) Tap water consumption ~ 1.2 L/min ~ 1.2 L/min ~ 1.2 L/min Approvals CE, CSA CE, CSA CE, CSA 24/106 Operation Manual K-365 Dist Line... - Page 25 (At 300 seconds distillation time) AutoDist Mode (Automatic detection of the con- densation start) NaOH pump O pump Acid pump Boric acid pump Sample disposal Optional Receiver disposal Safety sensors Titration vessel Optional Titrator connection Optional Operation Manual K-365 Dist Line 25/106...
-
Page 26: Ambient Conditions
Stainless steel Housing stirrer Glass fiber reinforced polypropylene Rear cover Polyvinyl chloride Glass parts Borosilicate 3.3 Plastic splash protector Glass fiber reinforced polypropylene Protective cover PMMA Sealing NaOH hose EPDM Three-way valve PP / PE 26/106 Operation Manual K-365 Dist Line... -
Page 27: Installation Site
— The installation site meets the requirements for the connected devices. See related documentation — The installation site meets the specifications according to the technical data (e.g. weight, dimension, etc.). See Chapter 3.5 "Technical data", page 24 Operation Manual K-365 Dist Line 27/106... -
Page 28: Transport And Storage
After storage, check the device, all glass components, seals and tubing for damage and replace if necessary. Lifting the instrument NOTICE Dragging the instrument can damage the feet of the instrument. Lift the instrument when positioning or re-locating. Lift the instrument at the points indicated. 28/106 Operation Manual K-365 Dist Line... -
Page 29: Installation
Risk of instrument damage because of not suitable power supply cables. Not suitable power supply cables can cause bad performance or an instrument damage Use only BUCHI power supply cables. Precondition: R The electrical installation is as specified on the type plate. -
Page 30: Installing The Cooling Water Supply
See Chapter 3.5 "Technical data", page 24 Make sure that the instrument is not connected to the power supply. Remove the connection at the condenser inlet. Attach the cooling water hose from the chiller to the condenser. 30/106 Operation Manual K-365 Dist Line... -
Page 31: Installing The Drain Tubing (Option)
MultiDist T only) Attach the waste hose onto the connection marked Pump Receiving Vessel OUT. Secure the hose in place with a hose clip. Put the other end of the hose in a suitable collection device. Operation Manual K-365 Dist Line 31/106... -
Page 32: Installing The Sample Waste Pump Connection (Multidist T Only)
Install the inlet hose to the connection marked H₂O Steam Gen. IN. Attach the inlet hose in place with a hose clip. Moist the aspiration hose. Push the hoses together. Attach the hose grommet to the canister lid. 32/106 Operation Manual K-365 Dist Line... -
Page 33: Installing Naoh Supply (Multidist, Multidist T Only)
Submerse the inlet hose into the NaOH. 5.10 Installing H₃BO₃ supply (MultiDist, MultiDist T only) Install the inlet hose to the connection marked H₃BO₃ Receiving Vessel IN. Attach the inlet hose in place with a hose clip. Operation Manual K-365 Dist Line 33/106... -
Page 34: Installing The H₂O Supply For The Sample Tube (Multidist, Multidist T Only)
Install the inlet hose to the connection marked H₂O Sample Tube IN. Attach the inlet hose in place with a hose clip. Moist the aspiration hose. Push the hoses together. Attach the hose grommet to the canister lid. 34/106 Operation Manual K-365 Dist Line... -
Page 35: Installing The Level Sensor On The Canister (Option)
Connect the sensor cable to the related connection on the instrument. See Chapter 3.2 "Configuration", page 14 5.13 Installing a titrator with LAN (MultiDist T with Eco Titrator only) Settings NOTE Make sure, that the IP on both instruments is 192.168.10.3 Operation Manual K-365 Dist Line 35/106... -
Page 36: Installing A Titrator With Rs232 (Multidist T Only)
R The titrator is prepared. See related manual R The instrument is connected to the LAN Peripherals network. Navigate to the specified submenu. Titrator Model Select the specified action. Titrator Model EDIT Tap the specified function on the function bar. 36/106 Operation Manual K-365 Dist Line... -
Page 37: Installing A Dispenser (Multidist T Only)
Restart the instrument. ð The status bar shows the SD card symbol. 5.18 Installing the level detection sensor (option) NOTE Using the level detection sensor. See Chapter 8.11 "Preparing the level detection sensor (option)", page 74 Operation Manual K-365 Dist Line 37/106... -
Page 38: Installing The Stirrer (Multidist Only)
Installing the stirrer (MultiDist only) Attach the stirrer to the receiving vessel. Push the cable through the rear cable duct. Connect the sensor cable to the related connection on the instrument. See Chapter 3.2 "Configuration", page 14 38/106 Operation Manual K-365 Dist Line... -
Page 39: Description Of The Interface
Function buttons Pressing a function button performs the assigned function on the function bar. Stop button Navigation control Used for navigating the user interface. Using the navigation control Select an entry. Confirm the selected entry. Operation Manual K-365 Dist Line 39/106... -
Page 40: Function Bar Interface
Menu bar interface Menu symbol Name Explanation — Process control parameters menu Home — Start various processes manually Manual control menu — Editing and saving: menu Process ◦ Methods ◦ Series ◦ Templates ◦ Determinations 40/106 Operation Manual K-365 Dist Line... -
Page 41: Method Menu
[Language] Choice of display lan- The following languages are avail- guage on the interface able: English/German/French/Italian/ Spanish/Japanese/Chinese/Russian/ Polish [Current Date] Date input Enter in sequence: Day, month, year. Apply the settings by pressing [Save]. Operation Manual K-365 Dist Line 41/106... - Page 42 Sample Tube] ton. [H₃BO₃ Dosage per Enter value Dosage volume which is applied by Keypress] pressing the related button. [Steam Generator Enter value Enter the time until the instrument Standby] turns automatically into standby. 42/106 Operation Manual K-365 Dist Line...
-
Page 43: Status Bar Interface
The instrument is in standby mode. Process is running. The instrument is heating up. The BLE dongle is connected to the instrument. A level detection sensor is connected to the in- strument. Reaction detection sensor attached. Operation Manual K-365 Dist Line 43/106... - Page 44 White: A SD card is in the instrument. Red: The SD card in the instrument is in read only mode. A USB input device is connected. A USB memory stick is connected to the instru- ment. A recirculating chiller is connected. 44/106 Operation Manual K-365 Dist Line...
-
Page 45: Description Of The Interface Pro
Shows current settings, submenus or actions depending on the current operation. Function bar Shows functions that can be performed ac- cording to the current operation. Stop button Navigation control Used for navigating the user interface. Operation Manual K-365 Dist Line 45/106... -
Page 46: Function Bar Interface Pro
Saves the selected series as a tem- plate. Creates a series from the selected template. DELETE [Delete] Deletes the selected entry. DEL ALL [Delete all] Deletes all entries. STANDBY [Standby] The steam generator changes to standby mode. 46/106 Operation Manual K-365 Dist Line... -
Page 47: Menu Bar Interface Pro
Remaining time 7.3.2 Manual control menu The manual control menu contains the following submenus: Submenu Explanation Dose manually See Chapter 8.13 "Dosing manually", page 74 Aspirate manually See Chapter 8.14 "Aspirating manually", page 75 Operation Manual K-365 Dist Line 47/106... - Page 48 Setting for audible signal by the end of a determination. [Display Brightness] Enter setting Display illumination level in %: 0 - [Zero Amount Warn- On/Off The instrument gives a warning when ing] the entry for the weight is zero. 48/106 Operation Manual K-365 Dist Line...
- Page 49 [Export Device] Select value Select between the following data export devices: USB stick/SD card Peripherals submenu Shows information about the connected peripherals. User administration submenu Creating and setting users. See Chapter 8.7 "Editing user setting", page 71 Operation Manual K-365 Dist Line 49/106...
-
Page 50: Status Bar Interface Pro
White: A SD card is in the instrument. Red: The SD card in the instrument is in read only mode. A USB input device is connected. A USB memory stick is connected to the instru- ment. 50/106 Operation Manual K-365 Dist Line... - Page 51 Büchi Labortechnik AG Description of the interface pro | 7 View Status A recirculating chiller is connected. Operation Manual K-365 Dist Line 51/106...
-
Page 52: Preparations For A Determination
Editing the single determination 8.3.1 Changing the name of the single determination NOTE The name of the single determination is displayed in the [Determination data] menu. Specifications on the display: Navigate to the specified submenu. Single Determination 52/106 Operation Manual K-365 Dist Line... -
Page 53: Selecting The Determination Type For A Single Determination
Navigate to the specified submenu. Single Determination Select the specified action. Method Name EDIT Tap the specified function on the function bar. Select the method you wish to use. ð The method is selected. Operation Manual K-365 Dist Line 53/106... -
Page 54: Changing The Sample Quantity For Single Determination
Select the specified action. Unit EDIT Tap the specified function on the function bar. Select the unit you wish to use. ð The unit is saved. Tap the specified function on the function bar. SAVE 54/106 Operation Manual K-365 Dist Line... -
Page 55: Editing A Series
Select the specified action. Series Name EDIT Tap the specified function on the function bar. Enter a name for the series. Tap the specified function on the function bar. SAVE ð The name is saved. Operation Manual K-365 Dist Line 55/106... -
Page 56: Adding A Determination To A Series
Select the determination you wish to delete. Tap the specified function on the function bar. DELETE ð The determination is deleted. 8.4.5 Changing the determination name for a series Specifications on the display: Navigate to the specified submenu. Series 56/106 Operation Manual K-365 Dist Line... -
Page 57: Selecting The Determination Type Within A Series
Tap the specified function on the function bar. Select the determination type you wish to use. ð The determination type is selected. Tap the specified function on the function bar. SAVE ð The name for the determination is saved. Operation Manual K-365 Dist Line 57/106... -
Page 58: Selecting The Method For A Determination Within A Series
Changing the amount unit for a determination within a series The following units are available: Unit Explanation Enter the weight for the determination in gram. Chapter 8.3.4 "Chang- ing the sample quantity for single determination", page 54 58/106 Operation Manual K-365 Dist Line... -
Page 59: Editing A Template
Specifications on the display: Navigate to the specified submenu. Series Select the series from which you want to create a template. Tap the specified function on the function bar. ð The template is created. Operation Manual K-365 Dist Line 59/106... -
Page 60: Changing The Name Of A Template
Select a method you wish to copy. COPY Tap the [Copy] function on the function bar. ð A new method is created. 8.6.2 Deleting a method NOTE Default methods [Priming Method] and [Standard Method] cannot be deleted. 60/106 Operation Manual K-365 Dist Line... -
Page 61: Changing The Name Of A Method
The instrument switches automatically off when the alkalization is completed. Status Explanation Automatic alkalization during the determination. Enter the parameters for the alkalization manually. Specifications on the display: Navigate to the specified submenu. Methods Operation Manual K-365 Dist Line 61/106... -
Page 62: Changing The H₂O Volume For A Method (Multidist Only)
Enter manually the quantity of sulfuric acid. The value is known from the previous digestion process. Specifications on the display: Navigate to the specified submenu. Methods Select the method that you wish to edit. 62/106 Operation Manual K-365 Dist Line... -
Page 63: Changing The Naoh Volume For A Method (Multidist Only)
Changing the acid volume for a method (BasicDist, MultiDist only) Enter manually the quantity of reagent to be dosed. Specifications on the display: Navigate to the specified submenu. Methods Select the method that you wish to edit. Operation Manual K-365 Dist Line 63/106... -
Page 64: Changing The Reaction Time For A Method (Basicdist, Multidist Only)
Steam power in % selectable. See Chapter 8.6.12 "Changing the steam power for a method", page 66 Duration time of the steam step selectable. See Chapter 8.6.11 "Chang- ing the time a steam step is carried out for a method", page 65 64/106 Operation Manual K-365 Dist Line... -
Page 65: Changing The Time A Steam Step Is Carried Out For A Method
R More than one steam step is selected. See Chapter 8.6.10 "Changing the number of Methods steam steps for a method", page 64 Navigate to the specified submenu. Select the method that you wish to edit. Select the specified action. Calibration NaOH Operation Manual K-365 Dist Line 65/106... -
Page 66: Changing The Steam Power For A Method
Settings Selection Explanation The level detection sensor is active. The level detection sensor is off. Specifications on the display: Navigate to the specified submenu. Methods Select the method that you wish to edit. 66/106 Operation Manual K-365 Dist Line... -
Page 67: Changing The Distillation Time For A Method
Select the specified action. Stirrer Speed Dist. EDIT Tap the specified function on the function bar. Enter the stirring speed. SAVE Tap the specified function on the function bar. ð The stirring speed is saved. Operation Manual K-365 Dist Line 67/106... -
Page 68: Changing The Titration Type For A Method (Multidist T Only)
Select the specified action. H₃BO₃ Volume EDIT Tap the specified function on the function bar. Enter the quantity for the volume. Tap the specified function on the function bar. SAVE ð The volume is saved. 68/106 Operation Manual K-365 Dist Line... -
Page 69: Changing The Dosing Unit Volume For A Method (Multidist T Only)
Tap the specified function on the function bar. SAVE ð The stirring speed is saved. 8.6.20 Changing the titration start time for a method (MultiDist T only) NOTE The availability depends on the selected titration type. Operation Manual K-365 Dist Line 69/106... -
Page 70: Changing The Aspiration Time For The Sample Tube For A Method (Basicdist, Multidist, Multidist T Only)
8.6.22 Changing the aspiration time for the receiving vessel for a method (MultiDist T only) Specifications on the display: Navigate to the specified submenu. Methods Select the method that you wish to edit. Select the specified action. Receiver Aspiration 70/106 Operation Manual K-365 Dist Line... -
Page 71: Editing User Setting
Specifications on the display: Navigate to the specified submenu. User Administration Select the user you wish to delete. Tap the specified function on the function bar. DELETE Confirm the secure question. ð The user is deleted. Operation Manual K-365 Dist Line 71/106... -
Page 72: Changing The Name Of A User
R Make sure, that the end stop is in the correct position for the sample tube in use. See Chapter 8.10 "Preparing the end stop for the sample tube size", page 73 Hold the sample tube with the tongs. 72/106 Operation Manual K-365 Dist Line... -
Page 73: Installing A Receiving Vessel
Insert the sample receiving vessel to the instrument. Place the sample receiving vessel on the receiving vessel area. 8.10 Preparing the end stop for the sample tube size Pull the end stop. Twist the end stop. Operation Manual K-365 Dist Line 73/106... -
Page 74: Preparing The Level Detection Sensor (Option)
Select the operation mode according to your requirements. SAVE Tap the specified function on the function bar. 8.13 Dosing manually 8.13.1 Dosing H₂O manually NOTE The quantity of liquid per keystroke can be changed in the [Settings] submenu. 74/106 Operation Manual K-365 Dist Line... -
Page 75: Dosing Naoh Manually
ð The pump applies a defined quantity of H₃BO₃. 8.14 Aspirating manually 8.14.1 Aspirating the sample tube manually NOTE The aspiration time per keystroke can be changed in the submenu. Settings Specifications on the display: Navigate to the specified menu. Operation Manual K-365 Dist Line 75/106... -
Page 76: Aspirating The Receiving Vessel Manually
After switching the valve, the instrument automatically rinses the pumps. The following valve positions are available: Valve position Explanation Acid The system dose acid to the sample tube. NaOH The system dose NaOH to the sample tube. 76/106 Operation Manual K-365 Dist Line... - Page 77 R The On /Off master switch is set to on. Rinse the pump you want to use. See Chapter 10.20 "Rinsing a pump", page 90 Turn the valve in the correct position. Follow the instructions on the interface. Operation Manual K-365 Dist Line 77/106...
-
Page 78: Carrying Out A Determination
Press the [PREP] button on the function bar. ð Wait until the status bar shows the status READY. Select the operation mode. See Chapter 8.12 "Selecting the operation mode", page 74 Tap the [START] button on the function bar. 78/106 Operation Manual K-365 Dist Line... -
Page 79: Ending A Determination
Select the determination you wish to view. ð The display shows the data of the determination. Deleting determination data 9.7.1 Deleting one determination Specifications on the display: Navigate to the specified menu. Select the determination you wish to delete. Operation Manual K-365 Dist Line 79/106... -
Page 80: Deleting All Determination Data
Tap the specified function on the function bar. EXPORT 9.8.2 Exporting all determination data (Interface pro only) Specifications on the display: Navigate to the specified menu. EXPORT Tap the specified function on the function bar. 80/106 Operation Manual K-365 Dist Line... -
Page 81: Cleaning And Servicing
Any servicing and repair work which involves opening up the casing may only be carried out by BUCHI service technicians. Use only genuine BUCHI consumables and spare parts in order to ensure correct operation of the device and preserve the warranty. -
Page 82: Regular Maintenance Work
1 - User; 2 - Operator 10.2 Cleaning and servicing the sample tube Before using, check the sample tube for defects (cracks/splintering). Prevent temperature shocks on the sample tubes. ð Temperature shocks may lead to breakage. 82/106 Operation Manual K-365 Dist Line... -
Page 83: Cleaning The Glass Components
Cleaning and servicing the sample tube seal Check the seal for the following damage that may cause leakage: — Deterioration (surface roughness) — Deformation (rubber shape) — Residues (dirt, white crystals) Rinse the seal with water. Operation Manual K-365 Dist Line 83/106... -
Page 84: Cleaning And Servicing The Splash Protector
Check the pump connectors in the dosing pump window for: — Leakages — Crystallization If necessary, contact BUCHI customer service. 10.12 Cleaning and servicing the condenser Decalcification solution: 160 g citric acid or 80 g amidosulfuric acid dissolved in 0.8 L water. -
Page 85: Cleaning And Servicing The Steam Generator
Wait until the display shows a numeric dialog. Remove the sample tube. Measure the volume in the sample tube. Enter the value in the numeric dialog. SAVE Tap the specified function on the function bar. Operation Manual K-365 Dist Line 85/106... -
Page 86: Calibrating The Acid Pump
Wait until the display shows a numeric dialog. Remove the sample tube. Measure the volume in the sample tube. Enter the value in the numeric dialog. Tap the specified function on the function bar. SAVE 86/106 Operation Manual K-365 Dist Line... -
Page 87: Calibrating The H₃Bo₃ Pump
Put the other end of the hose in the decalcification solution. Set the On/Off master switch to On. Press the [READY] button on the function bar. Wait until the pumps stop working. Set the On/Off master switch to Off. Wait 30 minutes. Operation Manual K-365 Dist Line 87/106... -
Page 88: Replacing The Splash Protector
Chapter 10.18 "Attaching and removing the protection shield", page 89 Loosen the cap nut at the splash protector. Open the splash protector nut. Remove the splash protector. Remove the steam connection. Remove the NaOH/acid connection (according to the instrument configuration). 88/106 Operation Manual K-365 Dist Line... -
Page 89: Replacing The Condenser
Loosen the cap nut at the condenser. Remove the cooling water hoses. Remove the rubber band. 10.18 Attaching and removing the protection shield 10.18. Removing the protection shield Pull the protection shield from the instrument. Operation Manual K-365 Dist Line 89/106... -
Page 90: Attaching The Protection Shield
10.21 Replacing the sample tube seal NOTE Installing is done in reverse sequence. NOTE Make the seal moist with water before installation. Remove the protection shield. See Chapter 10.18.1 "Removing the protection shield", page 89 Loosen the cap nut. 90/106 Operation Manual K-365 Dist Line... - Page 91 Büchi Labortechnik AG Cleaning and servicing | 10 Open the splash protector nut. Remove the splash protector. Remove the seal. Operation Manual K-365 Dist Line 91/106...
-
Page 92: Help With Faults
Clean the hoses. Reduced suction on the bypass valve. Boiling retardation/ Missing digestion rods or boil- Add boiling rods during bumping/foaming ing stones. digestion. Missing antifoam tablet or Add antifoam tablet. other anti-foaming agent. 92/106 Operation Manual K-365 Dist Line... -
Page 93: Troubleshooting Distillation
Check the titer for the titrant in use. pH electrode is defective. Maintain electrode. See related documentation If necessary, replace it. The glassware is dirty. Clean the glassware. See Chapter 10.2 "Cleaning and servicing the sample tube", page 82 Operation Manual K-365 Dist Line 93/106... - Page 94 The glassware is dirty. Clean the glassware. See Chapter 10.2 "Cleaning and servicing the sample tube", page 82 Incorrect weighing. Use weighing boats (easy sample transfer from balance to sample tube). Use anti-static equipment. Use larger sample sizes. 94/106 Operation Manual K-365 Dist Line...
-
Page 95: Troubleshooting Instrument
See Chapter 5.2 "Establishing electrical connections", page 29 The power supply cable is de- Replace the power supply fect. cable. The fuse was triggered. Reset the fuse The switch is defect. Contact BUCHI Customer Service. Operation Manual K-365 Dist Line 95/106... - Page 96 Aspiration is not Leaks Check the hoses connected working with the pump for leaks and deterioration. The aspiration pump is defect. Check if the wheel inside the pump is turning. Contact BUCHI Customer Service. 96/106 Operation Manual K-365 Dist Line...
-
Page 97: Turning The Splash Protector Nut
Büchi Labortechnik AG Help with faults | 11 11.4 Turning the splash protector nut Turn the splash protector nut. Operation Manual K-365 Dist Line 97/106... -
Page 98: Taking Out Of Service And Disposal
R The On / Off master switch is set to Off. Install a drain hose to the connection marked Steam Generator OUT. Put the other end of the hose in a sink. Open the valve. 98/106 Operation Manual K-365 Dist Line... -
Page 99: Appendix
Sample tube holder (6 x 300 mL tubes) 043039 Sample tube holder (12 x 300 mL tubes) 043041 Cyanide caps 11067871 Caps for hermetical closing of all types of Kjeldahl sample tubes during sample preparation for cyanide in food Operation Manual K-365 Dist Line 99/106... -
Page 100: Splash Protector Spare Parts
11071014 Sealing sample tube to splash protector 043068 Sealing sample tube to splash protector (acid re- 11063243 sistant) Steam inlet tubing to sample tube 043424 Steam inlet tubing to sample tube (750 mL) 043119 100/106 Operation Manual K-365 Dist Line... -
Page 101: Tank Spare Parts
Cap Set, 10 L tank 11072173 Canister 10L thin walled 043410 Cap Set, 20 L tank 11072174 Canister 20L 043408 Tank labels 043434 13.1.4 Condenser spare parts Order no. Image Condenser with check valve 11072183 Operation Manual K-365 Dist Line 101/106... -
Page 102: Titration Spare Parts
Image Receiving vessel 043390 Stirrer cpl. 11070246 pH electrode (refillable electrolyte) 11065834 pH Electrode 11056842 Clamp cone pH-electrode 11069793 Hose Tygon Ø 8.0 x 4.8 043364 Receiving support 11071003 Dist. Outlet PTFE L=212 11071941 102/106 Operation Manual K-365 Dist Line... -
Page 103: Sample Tubes
Sample tube 750 mL including suction tube 11058999 13.1.7 Cable and tubing Order no. Hose peristaltic pump out (2.5 m) 11071630 Hose clips peristaltic pump hose 043586 Hose acid pump (2 m) 043588 Hose clip D7.6 043571 Operation Manual K-365 Dist Line 103/106... -
Page 104: Other Spare Parts
4% boric acid pH 4.65 +/- 0.15 with Sher indicator, 5 L 11064973 4% boric acid pH 4.65 +/- 0.15 with bromocresol green / methly red 11064976 mixed indicator, 5 L Sher indicator 100 mL 003512 104/106 Operation Manual K-365 Dist Line... -
Page 105: Maintenance Kit
Comprehensive guide covering all aspects of the theoretical and practical know- how. Kjeldahl Practice Guide (EN) 11592548 Provides theoretical background information, useful hints and calculation tables for daily routine work Kjeldahl Practice Guide (DE) 11592547 Kjeldahl Practice Guide (CN) 11592549 Operation Manual K-365 Dist Line 105/106... - Page 106 T +971 4 313 2860 T +52 55 9001 5386 F +66 2 862 08 54 F +971 4 313 2861 latinoamerica@buchi.com bacc@buchi.com middleeast@buchi.com www.buchi.com/es-es www.buchi.com/th-th www.buchi.com We are represented by more than 100 distribution partners worldwide. Find your local representative at: www.buchi.com...
Need help?
Do you have a question about the K-365 Dist Line and is the answer not in the manual?
Questions and answers